Wood Shop
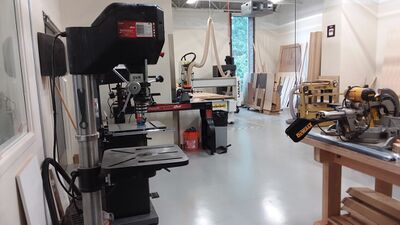
The wood shop is a 975-square-foot space. It contains all the equipment listed below as well as many power tools, hand tools, and other woodworking items. It also contains a large CNC router. The shop is equipped with compressed air quick connections for powering tools and machines. There are two air filtration units hanging from the ceiling. When producing wood dust, turn on the filtration units with the white remote control. These do a good job of removing a large percentage of the wood dust from the air. The dust collectors are not considered equipment, but you should know how to use them if you are working in the wood shop.
Schedule
View the Fall 2025 Wood Shop schedule on this Google Sheet.
Equipment Overview
| Name | Company | Model | Current Ace ⠉ |
|---|---|---|---|
| Belt Sander | Rigid | R2740 | Needed |
| Belt/Disc Sander | PowerMatic | BD31A | Needed |
| CNC Router | Laguna | SmartShop II | Needed |
| Compound Miter Saw | Dewalt | DWS780 | Needed |
| Hand Router | Porter Cable | 8902 | Needed |
| Handheld CNC Router | Shaper | S01-NN Origin | Needed |
| Jointer | Powermatic | 54HH | Needed |
| Oscillating Spindle Sander | Grizzly Industrial | G1071 | Needed |
| Planer | Powermatic | 209HH-3 | Needed |
| Power Carver | Foredom | SR - K5200 Deluxe | Needed |
| Router Table | SawStop/Bora Portamate Motor | RT-LFT 4-Post | Needed |
| Scroll Saw | Excalibur | EX-21 | Needed |
| Table Saw | SawStop | PCS31230 | Needed |
| Vertical Wood Bandsaw | Laguna | mband 14BX220-250 | Needed |
| Wood Drill Press | Tekna Tool | Nova Voyager DVR | Needed |
| Wood Lathe | TeknaTool | Nova Galaxi DVR | Needed |
Equipment by Icon
3 commandments
1. Safety First
Safety First is the most important of the three facets of professional behavior expected of you while you are in the Maker Hub. This applies to your safety, the safety others, and the safety of the equipment.
Keeping yourself safe in the Wood Shop is very important, as there are possibilities for accidents if you don't follow the safety guidelines. Safety starts with you, so don't depend on others to keep you safe. There is a first aid kit located on the south wall near the Wood Shop door.
The following rules must be followed at all times:
- Safety glasses must be worn at all times in the wood shop.
- No horseplay in the shop.
- Don’t do anything distracting to yourself or others while operating machinery.
- Do not wear any loose clothing, jewelry, or lanyards.
- No hats or open-toed shoes.
- Hair is not to extend below the collar.
- Do not wear gloves while operating machinery.
- Food or drink is allowed when not operating machinery; it must be kept a safe distance away from the machines.
- Do not attempt to operate machinery in the shop on which you have not been certified by passing the Canvas quiz and training with the Ace for that piece of equipment.
- Do not argue with volunteers or shop staff. Contact Justin Johnson if you have issues that need to be resolved.
- Do not operate machinery without a shop supervisor or trained volunteer in the shop with you. Never operate equipment alone in the shop.
- Reset the space. Make the area you are working in ready for the next person. Clean up after yourself, using the dust broom and vacuum cleaner. Return any tools (e.g. push sticks, rulers, squares, scribes, etc.) to their proper places.
- The first aid kit is located in the machine shop, next to the wood shop doors.
- If you see a safety violation inform the person immediately and encourage them to comply with the policies.
- Don’t do anything that would require an additional rule to be added to this list.
2. Reset the Space
The Wood Shop has a specific organization to it. Put whatever you use back where it belongs. There is a place for everything and everything has a place. This rule applies to everything in the space. If you use a tool, put it back. If you use a pen, put it back. Throw away your trash and recycling.
Now, we understand that sometimes you need to leave projects out. Maybe you are in the middle of a large project and you need something left overnight. In cases like this, it is okay to leave projects out, but you NEED to make prior arrangements with Nick or Justin.
Please put the machinery back the way you found it. Clean up chips and any messes you make. NEVER use shop air to clean yourself or the machines.
Always put any unused materials back on the storage shelf, and throw away unuseable scrap.
Always leave the space better than you found it.
3. Be Professional
This commandment has two sides to it. It covers the idea of acting like professional (which Webster’s defines as “exhibiting a courteous, conscientious, and generally businesslike manner in the workplace”). The term also describes the standards of education and training that prepare members of the profession with the particular knowledge and skills necessary to perform their specific role within that profession. Hopefully, you are learning both of these as part of your education at George Fox University. In the wood shop we expect you to develop as a courteous, conscientious, and skilled craftsman, understanding the tools and equipment in the Maker Hub and how to use them effectively.
Being a professional has some obvious ramifications in terms of behavior. First, be Christlike. Think of others better than yourselves. Share. If you and someone else are needing to use the same piece of equipment, find a compromise that will honor both your time and theirs. This is being a professional.
If you are learning to how to use a machine, and you can't get something to work the way you want - ASK SOMEONE! Learn! Become a professional. Learn the craft. This is an educational space. You might think it will be quick and you can just get it done “your” way and not learn how to do it correctly. Be a Professional and learn the proper way, and then be available to teach others.
One very important, and likely difficult part of being a professional is to correct others when they are not being professional. It is your responsibility to speak up when you see somebody doing something inappropriate. If you see somebody doing something unsafe, not resetting the space, or being unprofessional, the professional thing to do is to remind them of the three commandments and ask them politely to correct their action. This is OUR space, not any individual's. As a group, we expect everyone in the space to keep the space safe, clean, and operable for everyone.
If someone acts disgracefully unprofessional to you in the wood shop, you are welcome to bring the issue to Justin or Nick's attention.
General Wood Shop Knowledge
Woodworking is dangerous. Be careful.
Gluing
Glue joints (when done correctly) will create a bond stronger than the wood itself. To create a strong glue joint follow this general procedure. It is worth noting that gluing end grain yields a very weak glue joint and should be avoided.
- Ensure that both surfaces that you wish to glue are flat or mate together well.
- Dry fit your glue joint with clamps. This will ensure that your joint fits properly and that all necessary clamps are close by and sized correctly when you go to apply glue.
- You can never have too many clamps.
- Get a handful of paper towels to help clean up glue squeeze out and the glue you will get on your fingers.
- Recognize that once you start applying glue you are on a clock to finish setting up the glue joint before the set time.
- Apply a bead of glue on one surface of your glue joint. Then, spread out that glue into a thin film using your fingers, a glue brush, or a glue roller.
- Repeat step 5 for the other surface of your glue joint such that both surfaces have a thin, even film of glue.
- Quickly use a paper towel to wipe your fingers clean of glue. The goal here is to remove most of the wet glue so it doesn't get spread all over your lumber. Do NOT take the time to clean all of the glue.
- Using the clamps you already gathered, clamp your glue joint together
- You can never have too many clamps.
- After 5-10 minutes, wipe up the excess glue squeeze out.
General Knowledge
- The Table Saw is the center of the shop because it is the most frequently used tool.
- Always inspect materials for nails or metal. Metal debris in wood will damage the equipment and possibly cause injury to you.
- Make sure the process you are using is correct for your material type.
- Get help handling larger pieces of wood.
- When making dust turn on the dust filtration units.
- You can't learn woodworking on a wiki page... Go to the wood shop and start making things!
Here are a couple things to keep in mind:
- Some wood dust can be toxic. Be aware of the type of wood you are working with.
- Blades and cutters are very sharp so always think before touching.
- Be aware of the location of your fingers in relation to blades and cutters. Never let your hands or finger come close to the blade path.
- Be aware of people and what they are doing around you.
- Be aware of what is on the floor around you. Don't trip on dust collector hoses or electrical cords.
- May of the machines are very loud. Wear ear protection when needed.
- If something feels like it could be dangerous ask a supervisor before attempting.
Introduction to Joinery
Canvas Certification
Complete the Wood Shop Certification Quiz Module at the link below to gain access to the Wood Shop. The Maker Hub Canvas course pertains to all facilities and equipment contained in the Maker Hub; simply complete the quizzes for the facilities/equipment you wish to use in the Maker Hub. Please email makerhub@georgefox.edu if you have any questions.


