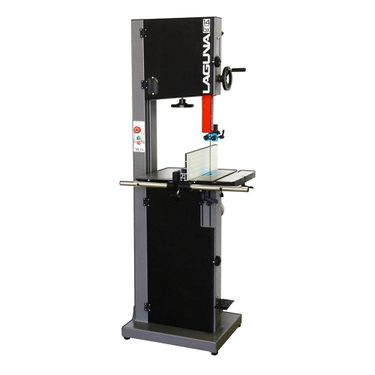
Vertical Wood Bandsaw
Make: Laguna
Model: mband 14BX220-250
Serial Number: 17063967
Ace: Needed (Makerhub@georgefox.edu).
Location: Wood Shop
Safety First
- Don’t feed anything into the blade you don’t want cut. First off, it makes no sense and it could pull other stuff into the midst, like your own body. That isn't a good scenario, so let's prevent that.
- Plan out your cut before making it. Wasting material isn't a good idea, and it's more time consuming when you mess up.
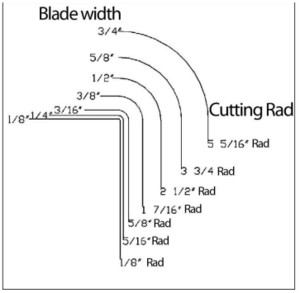
- Don't try to cut too tight of radius. See the blade curve chart before cutting curves.
- Use a push stick to keep your fingers at least 3" from the blade.
- Keep hands and fingers out of the "danger zone" in front of the blade.
- Hold work piece firmly on the table.
Description
The bandsaw is generally defined as a saw blade in the form of an endless steel band that rotates around two or more wheels. This blade is a continuous metal band with teeth on one side. As the wheels rotate, so does the band, which creates the continuous sawing action. Because the direction of the blade is always downward toward the table, there is little danger (except for special cuts) that the wood will be thrown back at the operator, which is called a kickback. For safety reasons many woodworkers prefer the bandsaw especially when cutting small pieces. The unique feature of the bandsaw is that the workpiece can be rotated around the blade creating a curve. It is the tool most often used when curves have to be cut in wood. Because the bandsaw blade is fairly thin, it can cut thick stock with a minimum of horsepower. For this reason the bandsaw is often used when valuable pieces of wood are made into a thin piece of veneer.
Although the bandsaw is usually associated with cutting curves, a variety of straight cuts are easily made with the saw. In fact, it is often used to rip wood because it is much safer than a radial arm saw and also has a smaller saw cut, so it wastes less wood. This becomes very important when using expensive wood where waste must be kept to a minimum. The cut is safer because the force of the cut is straight down on the table; the work cannot be pulled back or kicked back, which sometimes happens with table or radial arm saws. The bandsaw can also cut very thick stock, which the radial arm, or table saw cannot do. The disadvantage of cutting with the bandsaw is that the surface finish of the cut is not as good as with the table or radial arm saw.
Documentation
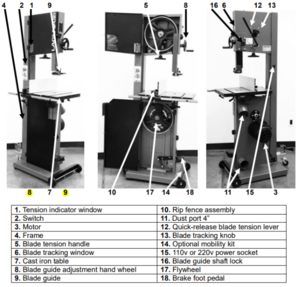
Terminology
Vertical Wood Bandsaw User Manual
Training
Operation
Insert Text
Demonstration
Demonstrate you can safely setup the saw and cut out a curved shape. After making the curved cut demonstrate using the fence to make a straight cut. A Training Venture (TV) that uses the Vertical Wood Bandsaw is the Wooden Train Whistle.
General Procedure
- Make sure the blade guides and fence are in place. These are meant to help your cut, so it is crucial that these are in place.
- Instructions on adjusting can be found in the manual, but they should be fine by default. The ace should take care of such issues.
- Blade guides (p. 33-34)
- Fence (p. 35-37)
- Instructions on adjusting can be found in the manual, but they should be fine by default. The ace should take care of such issues.
- Adjust the upper blade guard so that it is just clearing the material being cut
- Make sure that the cutting teeth are facing down since the blade moves downward. Otherwise, it will not cut.
- Make sure that the blade has been properly tensioned (blade doesn’t have slack) and tracked (blade moves evenly and consistently as the wheels turn, doesn’t wander back and forth)
- Instructions on tensioning (p. 30) and tracking (p. 29) can be found in the manual
- Make sure the proper size and type of blade is in use
- Blade help is in the manual (p. 38-42)
- Turn the saw on. ‘1’ turns on, ‘0’ turns off.
- Hold the workpiece firmly against the table, flat side down.
- Push material into blade at a moderate pace, using a push stick if necessary at the end of the cut.
- Turn the machine off once the cut is complete.
- Remove the workpiece and reset the space.
Certification
Complete the Wood Shop - Vertical Wood Bandsaw Module at the link below to gain access to the Vertical Wood Bandsaw. The Maker Hub Canvas course pertains to all facilities and equipment contained in the Maker Hub; simply complete the quizzes for the facilities/equipment you wish to use in the Maker Hub. Please email makerhub@georgefox.edu if you have any questions.
Troubleshooting
- Suppose the bandsaw will not start.
- Check that the E-stop is fully pulled out.
- Check that the foot pedal brake has returned to its topmost position.
- Check that the electrical power cord is plugged into the power outlet.
Maintenance
General maintenance
Little maintenance is needed to upkeep the Wood Vertical Bandsaw. Refer to the table below for specific tasks.
Specific Maintenance Tasks
| Maintenance Procedure | Frequency | Done By |
|---|---|---|
| General Cleaning | After each use | Student |
| Blade Change | When Dull | Ace |
| Rotate back blade guard 15 degrees | Every 8 hours of use | Ace |


