152 Robot
This TV is tailored for the 152 engineering class. This page will describe the steps of designing and fabricating a vacuum formed body for the 152 robot. This page will also contain links to sign up for the equipment training necessary for completing this training venture and 152 in general.
Necessary Equipment
For 152, students will need to certify on the Soldering Irons, the Electronics Workstation, the Vinyl Cutter, the Vacuum Former, and the Finishing Room. Because the Vacuum Former is located in the Vault, students will also need to pass The Vault quiz as well. Please read the wiki pages and pass the Canvas quizzes for these 6 pieces of equipment/facilities before conducting your in-person demonstrations.
Signing Up for Training/Demonstrations
Given the large number of students in 152, training and demonstrations will follow a similar format to 151.
- Soldering Iron training will be conducted in 4 2-person teams (for a total of 8 students). Ideally, your teammate will be the same teammate you have for the robot project overall. Each 2-person team will solder one Maker Hub LED board kit in a 1-hour block.
- Electronic Workstation training will be conducted in groups of 8 students in a 1-hour block.
- Vinyl Cutter training will be conducted in groups of 8 students in a 1-hour block.
- Vacuum Former and Finishing Room training will be conducted simultaneously within a 1-hour block. This training will also accommodate 8 students at a time.
Please sign up for training at the following Google Sheet:
https://docs.google.com/spreadsheets/d/1BwhbqF90DvTv4_sZq3c2Y9d1rvjpHUb6BeC_hYj_wVU/edit?usp=sharing
Procedure
The following procedure will show the process of vacuum forming and painting/decorating a PETG body for a 152 robot. There are many ways to shape, paint, decorate, and customize your vacuum formed body. The examples given in this training venture are intended to demonstrate some of the possibilities for how you might design and build your own vacuum formed body. You are encouraged to use these examples as stepping stones to build even more creative and inspiring body shells for your robot. Just make sure your final product is GFU appropriate.
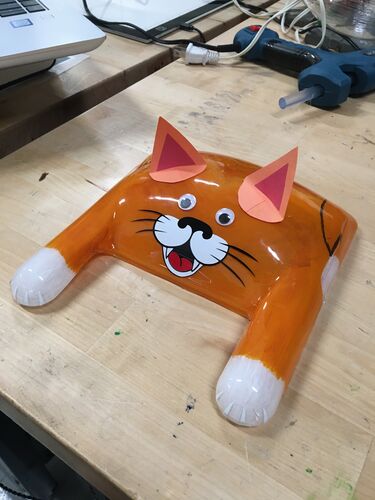
In the example of the orange cat body at the top of this page, I designed and 3D printed a mold for the shape. After cutting away the excess PETG plastic, I hand-painted the inside of the body shell. I used stacked vinyl cutouts for the nose, mouth, and whiskers. I cut white vinyl pieces for the claws. Finally, I added the construction paper ears and googly eyes as the finishing touches. (My orange cat at home--which was the inspiration for this build--has no tail... just in case you were wondering why there's no tail)
But now we will pivot, and I will explain a second example robot body shell in greater detail with pictures to show you the process.

