Plasma Cutter
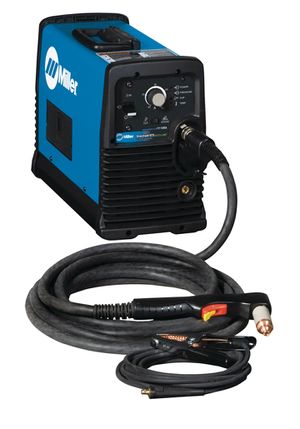
Make: Miller
Model: Spectrum 875
Serial Number: MJ324002P
Ace: Needed (Makerhub@georgefox.edu).
Location: Welding Shop
Safety First
Here are some safety instructions for the Plasma Cutter. Remember... SAFETY FIRST!!!
- Only cut steel and aluminum.
- Never cut any coated materials
- Don't attempt to cut with the compressed air off
- Make sure the vent hood is on and placed near your working area. This will help evacuate the smoke.
- Arc rays can burn your eyes and skin. Wear a welding helmet and there should be no bare skin exposed.
- Never walk on the hoses or ground cable as this could cause damage to the machine.
- Never pull the trigger on the torch unless you are cutting material as this will reduce the life of the nozzle and electrode.
Description
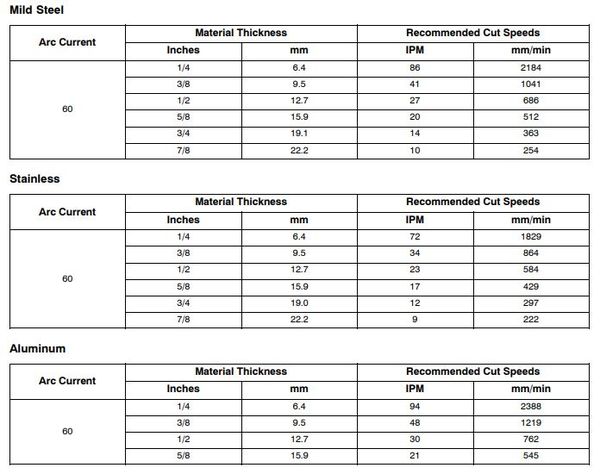
The plasma cutter is a useful and time saving tool. It uses a plasma arc and compressed air to blow away the molten metal in its path. This machine will cut up to 7/8" mild steel at 10 inches/minute and can roughly sever up to 1-1/4" plate. The pierce capacity is 7/16" so you will need to edge start when cutting thicker material. The torch is hand controlled so you can cut many types of designs. You can use a straight edge or material as a guide to cut various shapes and lines. Be aware that material can get very hot while cutting. Remember to keep body parts away from the cutting portion of the torch to prevent a serious accident. If your shoes have a mesh on top, there is a chance hot sparks and molten metal may burn through.
Here is an example of plasma cutting.
Documentation
Terminology
- Duty Cycle- This is a percentage of a 10 minute cycle that the machine can be running without overheating at 104 degrees F. Running at 60 amps our machine has a duty cycle of 40%. This allows for 4 minutes of cutting and 6 minutes of cool down.
- Edge Start- Starting the arc at the edge of the material rather than in the middle.
- Pierce- The ability of the torch to blow all the way through the material at the start of a cut.
- Gouge- To remove material without cutting all the way through.
- Trigger Safety Lock- When operating the start trigger on the plasma torch you will need to flip back the safety lock back before pulling the trigger.
Training
Operation
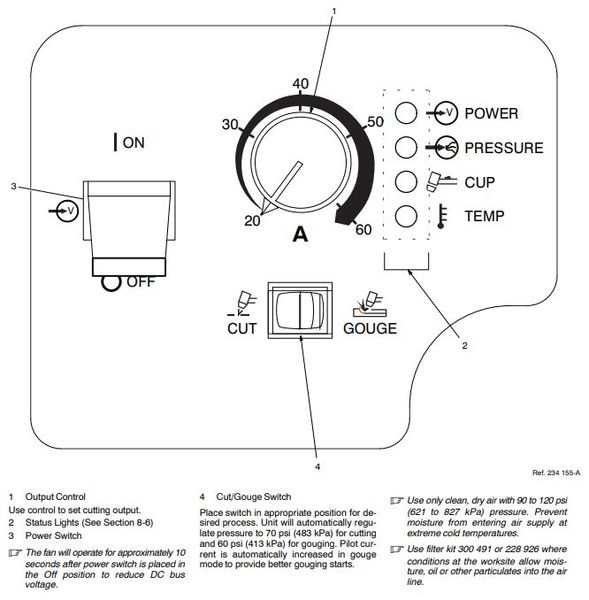
When operating the plasma cutter be aware of what you are attempting to do and listen to the machine. If you notice a sputtering or hissing noise it could be caused by moisture in the line. When you are piercing thin materials you should hold the torch 90 degrees to the metal. When gouge cutting tilt the torch head at a 45 degree angle to the work piece. Maintain the angle while cutting. Controls:
Material Settings:
Shield Settings:
Demonstration
For the demonstration you will need to show that you can safely setup and operate the plasma cutter. You will need to mark a piece of scrap material and cut along the line using a guide or free handing it.
General Procedure
- Place the fume hood over the area you will be welding to help remove fumes.
- Make sure power and the compressed air line is connected.
- Attach the ground clamp to the fixed work piece. The surface should be clean and paint free for a good connection. Keep the clamp close to the cut but out of the way.
- Put on the gloves, jacket, and helmet. You should have no bare skin exposed.
- check the setting on your helmet(see chart for settings).
- Turn on the plasma cutter power switch.
- Measure thickness of material being cut and refer to chart for current setting on the machine.
- Set the current on the plasma cutter.
- Place the drag shield on the edge of the base metal, or hold ⅛ inch off the surface. Direct the arc straight down.
- Raise the trigger lock and press the trigger, this will engage the pilot arc. If you don't lift the lock the trigger can't be pressed.
- Once the cutting starts, begin to slowly move the torch across the metal. The chart shows an approximate inches/minute setting per material thickness.
- Adjust your speed so the sparks go thru the metal and out the bottom of the cut. Cutting too fast could prevent the cut from going all the way through in some areas.
- At the end of the cut, angle the torch slightly towards the final edge or pause briefly before releasing the trigger as this will give you a complete cut.
- Turn off machine.
- Disconnect the compressed air line.
- Disconnect the ground clamp.
- Reset the space!
Certification
Complete the Welding Shop - Plasma Cutter Module at the link below to gain access to the Plasma Cutter. The Maker Hub Canvas course pertains to all facilities and equipment contained in the Maker Hub; simply complete the quizzes for the facilities/equipment you wish to use in the Maker Hub. Please email makerhub@georgefox.edu if you have any questions.
Troubleshooting
- If the temperature status light turns on most likely you have exceeded the duty cycle of the machine. You will need to wait 15 minutes for the machine to cool down.
Maintenance
General maintenance
- The machine contains an internal air filter that should be changed as needed by the technician.
- The cup and torch tip needs to be inspected and replaced by the technician as needed.
Specific Maintenance Tasks
| Maintenance Procedure | Frequency | Done By |
|---|---|---|
| N/A | N/A | N/A |
