Plasma Cutter
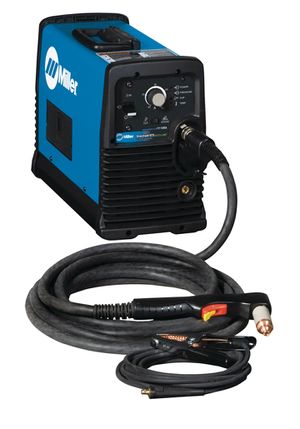
Make: Miller
Model: Spectrum 875
Ace: Needed (Makerhub@georgefox.edu).
Location: Welding Shop
Description
The plasma cutter is a useful fabrication tool. This machine will cut up to 7/8" mild steel at 10 inches/minute and can roughly sever up to 1-1/4" plate. The pierce capacity is 7/16" so you will need to edge start any thicker material. The torch is hand controlled so you can cut out many types of designs. You can also use material as a guide to cut straight lines or various shapes.
Here is an example of plasma cutting.
Documentation
Terminology
- Duty Cycle- This is a percentage of a 10 minute cycle that the machine can be running without overheating at 104 degrees F. Running at 60 amps our machine has a duty cycle of 40%. This allows for 4 minutes of cutting and 6 minutes cooling.
- Edge Start- Starting the arc at the edge of the material rather than in the middle.
- Pierce- The ability of the torch to blow all the way through the material at the start of a cut.
- Gouge- To remove material without cutting all the way through.
- Trigger Safety Lock- When operating the start trigger on the plasma torch you will need to flip back the safety lock before pulling the trigger.
Training
Operation
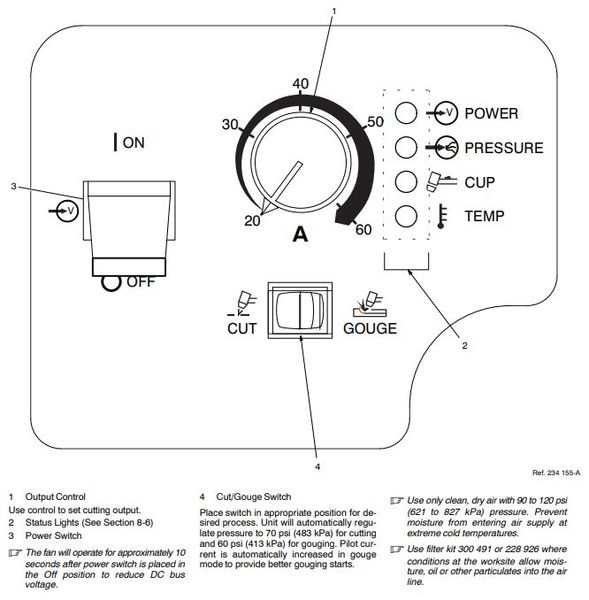
Controls:
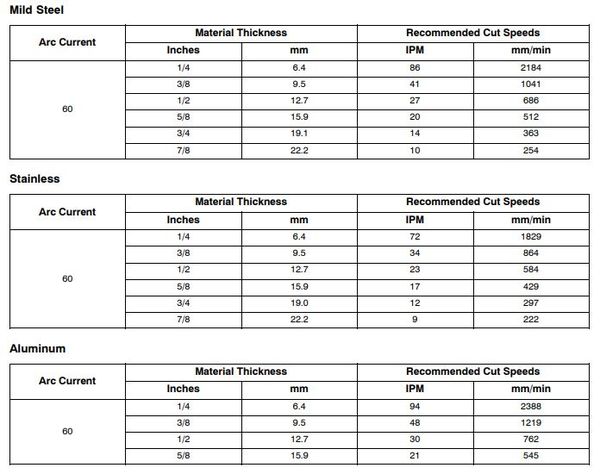
Material Settings:
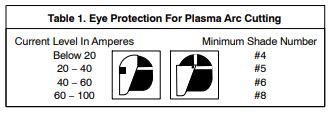
Shield Settings:
Demonstration
For the demonstration you will need to show that you can safely setup and operate the plasma cutter. You will need to mark a piece of scrap material and cut along the line using a guide or free hand.
General Procedure
- Place the fume hood over the area you will be welding.
- Make sure power and air is connected.
- Attach the ground clamp to your work piece.
- Put on your gloves, jacket, and helmet. You should have no bare skin
- check the setting on your helmet(see chart for settings).
- Turn on the plasma cutter power switch.
- Measure thickness of material being cut and refer to chart for current setting on the machine.
- Set the current on the plasma cutter.
- Place the drag shield on the edge of the base metal, or hold ⅛ inch off the surface. Direct the arc straight down.
- Raise the trigger lock and press the trigger, this will engage the pilot arc. If you don't lift the lock the trigger can't be pressed.
- Once the cutting starts, begin to slowly move the torch across the metal. The chart shows an approximate inches/minute setting per material thickness.
- Adjust your speed so the sparks go thru the metal and out the bottom of the cut. Cutting too fast could prevent the cut from going all the way through in some areas.
- At the end of the cut, angle the torch slightly towards the final edge or pause briefly before releasing the trigger as this will give you a complete cut.
- Turn off machine
- Turn off air
- Disconnect ground clamp
- Reset the space!
Safety
- Only cut steel and aluminum.
- Never cut any coated materials
- Don't attempt to cut with the compressed air off
- Make sure the vent hood is on and placed near your working area.
- Arc rays can burn your eyes and skin. Wear a welding helmet and there should be no bare skin exposed.
Certification
Troubleshooting
- If the temperature status light turns on most likely you have exceeded the duty cycle of the machine. You will need to wait 15 minutes for the machine to cool down.
Maintenance
General maintenance
Insert text
Specific Maintenance Tasks
| Maintenance Procedure | Frequency | Done By |
|---|---|---|
| Sample | Sample | Sample |


