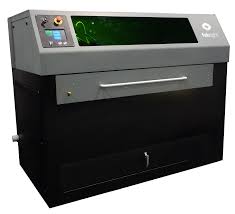
Metal Laser Cutter
Make: FabLight
Model: Tube and Sheet FL4500
Ace: Nathan Jonson (njonson19@georgefox.edu).
Location: Machine Shop
Description
FabLight FL4500 is a versatile and powerful laser cutter that is capable of engraving and cutting sheet and tube metal. It will cut and engrave on square, rectangle, and round tubes up to 2" diameter as well as sheet metal. Internal features on tubing such as complex holes, slots, notches, and other features along the tube are also very easy to cut. It is equipped with an industrial-quality IPG fiber laser and precise mechanical control, you can make just about anything metal you can think of, including: custom signs, furniture, panels, enclosures, industrial components, jewelry & art.
Documentation
Terminology
- Engrave - Removes a thin layer of material from the surface of the metal along an established line. This has great accuracy but only produces a thin line.
- Raster - Very similar to an engrave but a raster is used to engrave a large area by passing over the area repeatedly. This works great for lettering, designs and such but does lose a little accuracy around the edges.
User Manual
Training
Overview
Insert Text
Demonstration
For the demonstration, you are required to engrave your own design on flat stock. This design should include a cut, engrave and raster. If no design is available use a George Fox logo.
General Procedure
For Flat Stock:
Setting up the file:
- Export the desired part as a DXF (a DWG will also work). It does not matter what software was used to create it as long as it can be exported as a DXF.
- Open the fabcreator software.
- Import the DXF using [File] > [Import] and make sure to select the correct units when prompted.
- Go to the [Edit] tab to select and delete any unwanted lines.
- Alternatively, line types can be adjusted in the [Part] tab to be cut, engraved, a raster, or a reference line. This can be helpful to see what the entire part looks like if when you are cutting a smaller piece for it.
- Go to the [Properties] tab and select the correct material properties such as material, material thickness, and stock type.
- While in the [Properties] tab, select the [Move to Origin] option to properly align the part where the laser will begin cutting. If there are multiple parts, align one with the origin and the oriente the rest based on that.
- Hit [Accept].
- If there are any small parts tabs can be added to prevent them from falling through the rack by going to the [Process] tab and the clicking the [Tabs] button.
- Save the file to a usb drive by going to [Job] > [Make]. Note: Make sure this is not saved in a folder of the usb drive so the laser can find the job.
Setting up the laser cutter:
- Turn on the Fablight by flipping the switch found on the left side of the machine and then turning the key.
- Once it is on select the machine home feature on the touchscreen to move the laser head to its starting position.
- Open the door on the front of the machine and check that the adjustable chuck is slid all the way to the right so the material tray will not hit it.
- Slide out the material tray so that the cutting material can be loaded.
- Place the cutting material anywhere on the tray and slide the tray back in. Make sure a click is heard to signify that the tray is in the correct position. There are two places where it will click you want to stop at the first one. The second one is at the very back of the machine and is where the tray goes when using the chuck.
- Close the door.
Performing the cut:
- Insert the usb drive below the key.
- Using the touch screen, press [New Job] > your file name > [Select Job]. A preview window will then open up where the model can be checked to make sure everything is correct.
- Hit the green checkmark to exit the preview.
- Hit the green checkmark again to move to the next step.
- Set the origin by moving the x and y slider bars. The laser head will move with the sliders and the exact position can be seen by the red guide laser. The location of the red dot will be the origin used in the fabcreator software and it should be placed where the use of material can be maximised (usually the corner of the material).
- Press [Run Job] on the touchscreen.
- Press the [Start] button to the top of the touchscreen to begin the cut.
- Once the cut is completed wait a minute or so to let fumes dissipate and the material to cool.
- Remove the material from the machine using the door on the front.
Safety
Certification
Troubleshooting
Maintenance
General maintenance
Insert text
Specific Maintenance Tasks
| Maintenance Procedure | Frequency | Done By |
|---|---|---|
| Sample | Sample | Sample |
