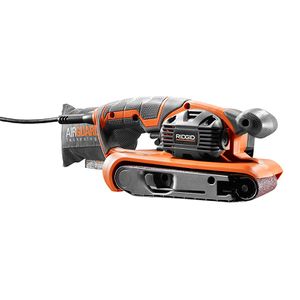
Belt Sander
Make: Rigid
Model: R2740
Serial Number: CS18371D633445
Ace: Needed (Makerhub@georgefox.edu).
Location: Wood Shop
Safety First
- Both hands need to be on the sander while sanding.
- Keep hair away from the sander.
- Make sure to always unplug the sander before changing belts.
- Keep the belt away from you and others.
- Place the belt sander on its side when sanding is complete to prevent unwanted sanding and the possibility of the sander moving when plugged in.
- Make sure material is secured prior to starting to sand.
Description
The belt sander is used for sanding large, flat work-pieces. This is a tool that can greatly reduce the amount of time it takes to finish a project, but it can be difficult to master. This tool can remove material very quickly and is best used for rough sanding.
Here is an example of this piece of equipment being used.
Documentation
Terminology
Tracking Adjustment- A fine adjustment knob for adjusting the angle of one roller to keep the belt running true on the roller set.
Training
Operation
A belt sander is a fantastic tool for large surfaces/objects that cannot be sanded using the belt/disc sander or would take too long to do by hand. They are commonly used for trimming to a scribed line, sanding very rough surfaces, leveling surfaces (like a replacement board in a hardwood floor), and freehand rounding and shaping. Because they have a lot of power and can handle coarse grits, they excel at the rapid removal of wood. Also, unlike orbital and vibrating sanders, the sanding action is linear, so even with coarse grits you can sand with the grain and get a good-looking result.
Demonstration
Demonstrate you can safely use the belt sander. You will then proceed to sand a piece of scrap material. Remember to always set the sander on its side to prevent it accidentally moving or doing damage. Make sure the belt is the correct grit and in good condition before use. Depending on your project you will want to start with different grits of sandpaper. A good starting grit for medium to heavy material removal would be 120 grit. If you want to be very aggressive with the material removal an 80 grit belt would be best. Sand along the grain with smooth strokes. Let the weight of the sander do the work and don't push down into the work. Don't let the sander hang very far over the edge of the work piece otherwise you risk taking more material off on the edge. Always start and stop the sander off of the workpiece. Make sure the work piece is secure prior to sanding.
General Procedure
In order to use the belt sander, begin by inspecting the sanding belt condition with the sander unplugged. Make sure the the sanding belt is not clogged with sawdust, remelted glue, or other gunk. A lever on the side will lock or unlock the belt in place. The knob located on the side near the roller allows the tracking of the sanding belt to be fine tuned. If the belt pulls to one side the knob should be used to finely adjust the roller angle to keep the sanding belt tracking. Material removal can happen quickly when using a belt sander with coarse grit so exercise caution. As a final step in the preparation to sand, ensure that the belt sander is set to run at an optimal speed for the type of wood and type of work to be done on that wood. The speed can be adjusted using the dial located near the hand grip.
Sand the workpiece by working with the grain, and aim to overlap each pass with the the belt sander by about half of the previous passes width (1 1/2 in). The belt sander's own weight will keep it on the workpiece and removing material- it should not take much additional pressure at all to sand the workpiece. Keep the belt sander flat. Rocking back and forth of the belt sander will result in scratches, nicks, and valleys in the surface. Exercise special care when the belt hangs off the workpiece, not holding the belt sander flat will result in more material being taken off the edge of the piece than elsewhere. Despite the most careful handling, natural variations in wood can cause some of the wood to be sanded off faster than wood elsewhere. It is often advisable to draw lines of over the area that is to be sanded with a soft leaded pencil. By observing the gradual fading and disappearance of these lines, a flatter surface can be maintained.
When finished with the belt sander, make sure it has stopped spinning before setting it down. Never place it on the workpiece as you may scratch or mar the material.
Certification
Complete the Wood Shop - Belt Sander (Handheld) Module at the link below to gain access to the Belt Sander. The Maker Hub Canvas course pertains to all facilities and equipment contained in the Maker Hub; simply complete the quizzes for the facilities/equipment you wish to use in the Maker Hub. Please email makerhub@georgefox.edu if you have any questions.
Troubleshooting
Ask a shop supervisor for help if you have any issues.
Maintenance
General maintenance
Basic cleaning and emptying of the dust collection bag is required during and after use.
Specific Maintenance Tasks
| Maintenance Procedure | Frequency | Done By |
|---|---|---|
| Sample | Sample | Sample |

