High Speed Camera
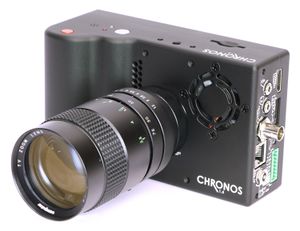
Make: Chronos
Model: CH14-1.0-32C
Serial Number: 00902
Ace: Needed (Makerhub@georgefox.edu).
Location: The Vault
Description
The Cronos is a high speed camera that allows the recording of video with very high framerates, up to 1057FPS at 1280x1024, or 38,500FPS at decreased resolutions. At these high framerates, events that are too fast to be seen with the naked eye can be studied in detail. Video can be saved in RAW, CinemaDNG, or H.264 codecs.
Here is an example of this camera being used.
Documentation
Terminology
- FPS - Frames per second, also known as frame rate; a measure of how quickly the camera captures images. Standard frame rates are between 24 and 60FPS. The Cronos is capable of filming at up to 38,500FPS.
- Exposure - How long a frame of video is actually gathering light, given in seconds. This is called Shutter Speed on most consumer cameras.
- Analog Gain - Called ISO in consumer cameras, digitally controls the brightness of the image. More gain means a brighter image, but also more noise (manifests as grain, especially noticeable in dark areas of the image). For the best image quality, use a low gain and compensate by increasing the amount of light where you’re filming or open the aperture if the image is too dark.
- Aperture - Measures the diameter of the lens's iris, given in F-stops (F1.4, F2.8, F4, etc.). The lower the number, the larger the diameter of the iris (called a wider or more open aperture) and the more light that hits the sensor. A wider aperture also decreases the depth of field (how much is in focus at a time), making the background blurry. This is bad if you are trying to film a lot of things far away from each other, but good if you need lots of light and are only filming one thing.
- H.264 - A common video encoding standard used commonly in online video. Generally you want to pick this one.
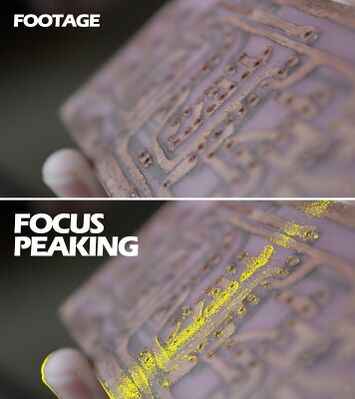
- Focus Peaking - A feature that makes it easier to see what is in focus. Highlights edges that are in focus in a color (usually red).
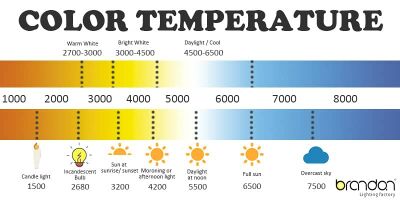
- White Balance - Controls the color temperature of light the camera is filming, measured in degrees kelvin. (Seriously, color temperature was originally defined by the color of light a bar of lead glows with at a particular temperature) Incandescent lights are around 3200K, outdoor daylight is around 5900K, LED lighting is around 5600K. Generally just adjust this by eye. If the image appears too blue, increase the color temperature. If the image appears too orange, decrease the color temperature. If adjusted correctly, white objects in the image should appear, well… white.
- Trigger - Tells the camera when to stop recording. High speed cameras are always recording, and only stop and save video when stopped.
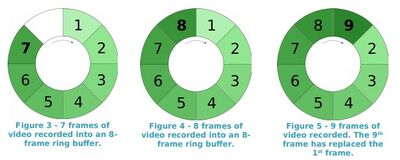
- Ring buffer - The camera records frames in a “ring”, with each frame filling a new spot on the ring. When the ring is full, the next frame overwrites the first frame in the buffer. Each subsequent frame is also overwritten. This means you can start recording whenever you want, and the camera will only save the buffer when you press the trigger. By default, when you press the trigger it immediately stops recording. By going to the Trigger Delay menu, you can change it so the camera continues to record after you press the trigger (this does not work for the red record button).
User Manual Chronos 1.4 User Manual
Training
Operation
The Chronos 1.4 captures and saves high frame rate video, also known as high-speed or slow-motion. This can be used to study things that are too fast to be seen by the unaided eye.
Demonstration
Before using the camera, students will perform a short in-person training session after passing the FOXTale quiz. General procedures and expectations for equipment care will be reviewed. Students should be familiar with the operation of the camera and be ready to demonstrate this by setting up and capturing some video following the General procedure below.
General Procedure
This section is meant to provide a brief overview of operating the Chronos 1.4. For a more detailed explanation of the camera, its features, and options/menus please consult the user’s manual.
To capture high speed video with the Chronos
1. Attach the camera to a tripod and turn the camera on. Give it a minute to warm up (especially if it’s cold)
2. Set your desired frame rate in the Record Settings menu based on how fast the thing you’re trying to film is.
3. Set Aperture (dial on the lens) and Gain (Record Settings menu) so the image is properly exposed (not too bright, not too dark)
4. Set White Balance in the “Set White Balance” menu. Either make an educated guess, or hold up a white object in front of the camera and press “Set Custom White Balance”.
5. Perform a black calibration. Place the lens cap on the lens and press the Black Cal button in the main menu. Ideally the camera should run for 15-20 minutes before performing a Black Cal to let the sensor get up to temperature. NOTE: Doing a Black Cal will discard any unsaved footage
6. Change your trigger settings if using an external trigger or want to set up trigger delay
7. Press the red record button to start recording. Make sure your image is properly exposed and that your subject is in focus. Anything in focus will be highlighted in red with focus peaking. NOTE: Pressing record will discard any unsaved footage
8. Trigger the camera when ready, the camera will stop recording or continue to record for a short period of time depending on your trigger settings. The camera can be triggered by using the red record button or external trigger. Note that trigger delay settings will not apply to the red record button.
9. The footage in memory will be shown on the screen. You can press and hold the right arrow to play the footage forward. Play rate should usually be set to 30fps.
10. To reduce file size, set start and end markers before saving. Do this by scrolling the playback slider (goes from bottom to top) to the start of the part you want to keep and press “Mark Start”, then scroll to the end of the part you want to keep and click “Mark End”. The portion that will be saved is highlighted in red next to the playback slider. Then click Save. Once saved, the red will turn to green, indicating that it is safe to capture footage again.
11.Make sure to safely eject your storage media before removing it from the camera. This can be done by going to the Play menu and clicking Settings, then “Safely Remove”
12. When finished using the camera, press the power button to turn off the camera. Do not hold the power button for more than 4 seconds. This will cause a forced shutdown, which could corrupt the camera’s internal memory. Only perform a forced shutdown if the camera becomes completely unresponsive to touchscreen input.
13. Return the camera to its case, nicely coil trigger and power cables and place those in the case as well.
Safety
There is almost nothing you could do that would result in injury from using the high speed camera. Obviously things you could be filming (e.g. explosions) could be dangerous, and you must use common sense in what you decide to place in front of the camera. In most every situation, the camera is at risk of damage more than you are. Always observe the following precautionary guidelines when using the camera.
- The camera should always be securely mounted or held so it is not at risk of falling/being knocked over
- If there’s risk of things flying and hitting the camera, it should be behind a shield
- Don’t set down or store the camera in an environment that could damage it. Examples include outdoors when raining, in direct sunlight, on rough surfaces, or in places where things could fall/knock against the camera
- Don’t put any stress on the lens, the mount is fragile
- If the lens is ever disconnected, the sensor cap must be immediately attached
- When not being used, the camera should be stored in its pelican case with latches secured. Latches should always be secured, even if you’re coming right back!
Certification
Foxtale Quiz Foxtale Course
Troubleshooting
Maintenance
General maintenance
Everyone who uses the camera should make sure the camera body and lens are clean when finished. The camera should be cleaned using a clean, lint-free or microfiber cloth optionally with isopropyl (rubbing) alcohol on the cloth. Don’t use so much alcohol as to soak into the camera. The screen can be cleaned with a lint-free or microfiber cloth and a small amount of glass cleaner or isopropyl. Cleaners should not be sprayed directly on the camera, instead apply to the cloth.
The IR filter can be cleaned if it becomes very dirty. This should only be done by the ace or other qualified individual.
Specific Maintenance Tasks
| Maintenance Procedure | Frequency | Done By |
|---|---|---|
| Cleaning Lens | As needed | Ace |


