Difference between revisions of "Photo Table"
| Line 34: | Line 34: | ||
====Terminology==== | ====Terminology==== | ||
| + | * Ortery Capture - This is the software that you will use to interact with the photo table in order to adjust the lighting, turntable, and take pictures. | ||
| + | * | ||
| + | '''User Manual''' | ||
| − | + | There is not currently an online user manual. [https://www.ortery.com/photography-equipment/360-product-photography/3d-photobench-260/ You can find some information about the photo table]on the Ortery website. | |
| − | |||
| − | |||
==Training== | ==Training== | ||
| Line 103: | Line 104: | ||
== Documentation == | == Documentation == | ||
| − | * | + | * |
== Training == | == Training == | ||
Revision as of 15:57, 28 June 2019
Make: Ortery
Model: 3D PhotoBench 260
Ace: Needed (Makerhub@georgefox.edu).
Location: The Vault
Description
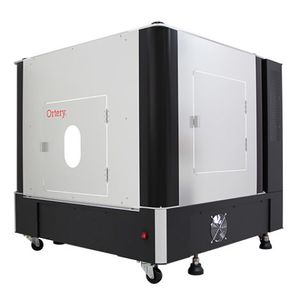
The Photo Table, or Photobench as called by its manufacturer Ortery, is a device which links to a lab PC specifically designated for this device and enables users to take still photos, 360 photos, and videos of various products and items on flat white backgrounds like the ones you see online for products you might view on a daily basis. If you have ever wondered how those product pictures are taken, this is it. This makes the photo table perfect for creating professional grade product photos for projects and presentations.
Documentation
Terminology
- Ortery Capture - This is the software that you will use to interact with the photo table in order to adjust the lighting, turntable, and take pictures.
User Manual
There is not currently an online user manual. You can find some information about the photo tableon the Ortery website.
Training
Overview
Insert Text
Demonstration
In order to use this device, you must be able to demonstrate the following:
- Set up the Ortery Photo Table and the software on the computer, along with connecting the camera and getting the settings dialed in.
- Set up the camera and object to be photographed.
- Take a 360 photo of the object.
- Export the file to a safe location for later access and use.
General Procedure
Setting up the Ortery:
- Plug in the Ortery Photo table and turn the power switch to on
- Turn on the computer
- Open up the Ortery Software
- Use the provided USB cable to connect the Camera to the computer
- Make sure when doing this, the camera is off while connecting the camera, and that the software is able to recognize the camera
- Take some test shots to ensure that the camera and the software are properly set up
Setting up the object to be Photographed:
- Make sure that the object is clean and free of any debris
- This will allow for not only a cleaner photo, but will also help with keeping the Photo table clean.
- Open up the front or the side of the photo table if the camera is already set up on the front part of the photo table.
- Place the object in the center of the table, and make sure that it’s in the center be spinning the ortery
- (There should be a better way of doing this… maybe a laser that is pointed to the exact middle of the rotating table)
- Close the side or front door.
Capturing images of the product:
- In the Ortery software, open up a new capture and the panel will open up.
- Customize the camera settings (aperture, shutter speed, etc)
- Press capture
Safety
- For this machine, you want to make sure that you are treating all the equipment with respect and ensure that all things are secured before you proceed to any new step or moving around, as it is expensive.
- With the rotating table, if you have long hair, make sure that it is out of the way of the table; although it won’t kill you, it can still cause problems and cause some injuries if you’re not careful.
Certification
Troubleshooting
Maintenance
General maintenance
Insert text
Specific Maintenance Tasks
| Maintenance Procedure | Frequency | Done By |
|---|---|---|
| Sample | Sample | Sample |
The current Ace of the Photo Table is Needed (Makerhub@georgefox.edu).

