Difference between revisions of "Router Table"
| Line 44: | Line 44: | ||
====Terminology==== | ====Terminology==== | ||
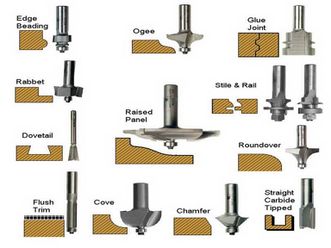
| − | Each bit is made for a different job. The wood shop has a wide assortment, although less common types may be unavailable. It should be noted that different bit sizes and profiles will operate better at different speeds. The amount of material that is being removed in each pass as well as the hardness of the wood should determine the speed | + | Each bit is made for a different job. The wood shop has a wide assortment, although less common types may be unavailable. It should be noted that different bit sizes and profiles will operate better at different speeds. The amount of material that is being removed in each pass as well as the hardness of the wood should determine the speed. |
| − | Occasionally routing can leave burn marks on the | + | Occasionally routing can leave burn marks on the workpiece. This can happen when the workpiece is fed through the router too slowly, but it can also mean that the bit in the router has become dull. Let a shop supervisor know if a bit seems dull. Sometimes the burning is due to build up of resin and other gunk (a technical term) on the backside of the blade which insulates the bit and allows for heat to build up. Inspect bits before using, and make sure they look clean. If the bit seems both clean and sharp, the cause of burning on you workpiece is either a feed rate that is too slow or a router bit speed that is too high. A good rule of thumb for setting the router bit speed is the larger the cutter the slower the speed. Usually the router table will be set to 20000 RPM. If you plan to use a larger bit and reduce the speed of the router, ask a shop supervisor for assistance. |
[[Image:RouterBits.jpg|331px|none]] | [[Image:RouterBits.jpg|331px|none]] | ||
Revision as of 11:34, 2 March 2022
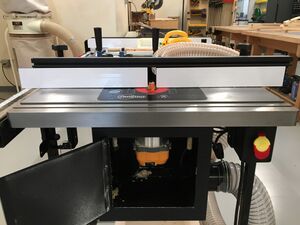
Make: SawStop/Bora Portamate Motor
Model: RT-LFT 4-Post
Serial Number: 107015
Ace: Needed (Makerhub@georgefox.edu).
Location: Wood Shop
Description
A router table can be used to make custom moldings and make slots in workpieces. Router tables are extremely versatile in the types of cuts they can perform. Holes and channels of varying depths and nearly limitless shapes can be cut. The router table can also use special bits to cut bevels and chamfers along the edges of a workpiece.
Introductory Video
Things you can do with a router table
Documentation
Terminology
Each bit is made for a different job. The wood shop has a wide assortment, although less common types may be unavailable. It should be noted that different bit sizes and profiles will operate better at different speeds. The amount of material that is being removed in each pass as well as the hardness of the wood should determine the speed.
Occasionally routing can leave burn marks on the workpiece. This can happen when the workpiece is fed through the router too slowly, but it can also mean that the bit in the router has become dull. Let a shop supervisor know if a bit seems dull. Sometimes the burning is due to build up of resin and other gunk (a technical term) on the backside of the blade which insulates the bit and allows for heat to build up. Inspect bits before using, and make sure they look clean. If the bit seems both clean and sharp, the cause of burning on you workpiece is either a feed rate that is too slow or a router bit speed that is too high. A good rule of thumb for setting the router bit speed is the larger the cutter the slower the speed. Usually the router table will be set to 20000 RPM. If you plan to use a larger bit and reduce the speed of the router, ask a shop supervisor for assistance.
- Fixture - Tooling you make or buy, which assists in the usage of a tool and helps yield a higher quality product.
- Soft Start - Electronic circuit used to slow the start up speed of a motor or power tool.
user manual
Training
Operation
Although the router table displays the SawStop logo, it does not have the SawStop technology. If your fingers come in contact with the spinning bit, the bit will not stop and it will be a very bad day for you.
Always unplug the router before changing a bit.
Insert the bit until the cutting edge touches the collet then pull the bit out about an eighth inch and finger tighten the collet. It’s important to allow an eighth inch of space between the bit and the collet. Router bits that are not installed properly can come loose while making your cut. In addition, router bits heat up quickly. Heat causes expansion. The space between the bit and the collet will allow for this expansion.
Use the two wrenches to tighten the locking nut on the collet.
When setting the fence, the router fence does not need to be exactly parallel to the bit for most cuts. This differs greatly from equipment like the table saw or bandsaw which have flat blades instead of a rounded bit. The important thing is to set the fence the proper distance away from the bit, and the bit will do the rest work.
When using the fence, always feed the workpiece from the right side of the router table to the left. The bit spins counterclockwise. The rotation of the bit pushes against the feed direction and pushes the workpiece into the fence as the user feeds the workpiece from right to left. This is the proper way to make a controlled cut on the router table. It is dangerous to feed the workpiece from left to right because the router bit will pull the workpiece out of your hands and fling it across the room.
The feed rate is how fast the workpiece moves through the router bit. A feed rate that is too fast can cause the surface of the wood to tearout. In other words, the surface of the wood will be rough or chipped. A feed rate that is too slow can cause the wood to burn.
Be mindful of how much material you are removing in a single pass. If you attempt to remove too much material, you could end up straining the router motor, putting sideways pressure on the router bit, or cause tearout/burning on your workpiece. If you need to remove a lot of material, break it up into multiple smaller passes. If you are unsure how much material is "too much," ask a shop supervisor for assistance. Unfortunately, there is no magic number that indicates you are removing too much material. It's based on the cross-sectional area of the material you plan to remove, the shape of the router bit, the speed of the router bit, and experience.
Demonstration
Demonstrate you can safely setup the hand router/tooling. You will need to chamfer or round over an edge of material. Remember to always unplug the router when changing tools or making adjustments to prevent an accidental turn on situation. The direction of travel is also important when making cuts to prevent tearing out corners and edges. Use router bits with bearings to help guide the cutter. Never attempt to free hand a cut without a guide for the router to follow as this can lead to the router running away out of control.
General Procedure
Edge Chamfer
1. The material you are cutting needs to be free from nails or foreign objects. The material should be at least 1/2" thick.
2. Make sure the material is secured. You can use clamps, double sided tape, or bench pucks. Material that is not secure will move and create a hazard.
3. Select the type of router bit you wish to use. Make sure the bit has a bearing guide.
4. Verify the router is unplugged and place the router upside down on the bench.
5. Select the 1/2" or 1/4" collet needed for the appropriate bit.
6. Install the router bit into the collet at least 3/4" Always make sure the collet is clean before inserting a bit to prevent poor clamping issue.
7. Firmly lock the tool down using the router wrench. The nut will squeeze the collet down onto the router bit shank. You will need to use the spindle nut wrench and the spindle lock button.
8. Position the router onto your material. Loosen the spindle depth lock. Adjust the height of cutter engagement as desired and lock the spindle depth lock.
9. Make sure the power switch is in the OFF position. Verify the router cutter is clear and place the router on its side. Proceed to plug in the router.
10. Only handle the router with both hands on the handles. Move the router onto your material. Make sure the cutter does NOT make contact.
11. Turn on the power switch and let the router get up to speed. Slowly feed the cutter into the material until the bearing makes contact with the material edge. Keep the guide plate flat on your material and slowly feed the router opposite the direction of the spinning cutter. If you travel in the wrong direction the cutter will try to pull the router along. If you travel too slow the wood will start to burn. Traveling too fast will produce a poor cut. Be careful to keep the router from tilting when traveling along the edge and especially while traveling around a corner.
12. Power off the router after making your cut. Let the spindle stop turning before moving the router away from the work piece.
13. Place the router on its side and unplug the router to prevent an accidental power on condition.
14. Remove the router bit by using the wrench and spindle lock button.
15. Reset the space.
Safety
- Be aware of the cutter location on a router at all times as it is fairly exposed.
- Keep all body parts away from the cutter and make sure the motor has stopped before removing your hands from the handles.
- Any equipment/tool that you don't handle safely is the most dangerous tool in the shop.
- Don't attempt to use any router bits exceeding 1" in diameter.
- Never attempt to use the router without the base.
Certification
Troubleshooting
If you notice burning or dark coloration on the material it could be caused by feeding the cutter at too slow of a rate. A dull cutter can also cause material burning.
Maintenance
General maintenance
- Make sure cutter bits are clean.
- Remove and clean the collets as needed.
- Make sure any adjustment screws are tight.
Specific Maintenance Tasks
| Maintenance Procedure | Frequency | Done By |
|---|---|---|
| Sample | Sample | Sample |

