Difference between revisions of "Virtual Reality Welding Station"
| Line 20: | Line 20: | ||
[[{{#show: {{FULLPAGENAME}}|?Has icon|link=none}}|100px|left|top|{{#show: {{FULLPAGENAME}}|?Has icondesc}}]] | [[{{#show: {{FULLPAGENAME}}|?Has icon|link=none}}|100px|left|top|{{#show: {{FULLPAGENAME}}|?Has icondesc}}]] | ||
[[{{#show: {{FULLPAGENAME}}|?Has image|link=none}}|300px|thumb|upright=1.5|{{#show: {{FULLPAGENAME}}|?Has imagedesc}}]] | [[{{#show: {{FULLPAGENAME}}|?Has image|link=none}}|300px|thumb|upright=1.5|{{#show: {{FULLPAGENAME}}|?Has imagedesc}}]] | ||
| + | Make: {{#show: {{PAGENAME}} |?Has make}} | ||
| + | |||
| + | Model: {{#show: {{PAGENAME}} |?Has model}} | ||
| + | |||
| + | Ace: {{#show: {{PAGENAME}} |?Has ace.Has name}} ({{#show: {{PAGENAME}} |?Has ace.Has email address}}). | ||
| + | |||
| + | Location: {{#show: {{PAGENAME}} |?Is located in facility}} | ||
| + | |||
| + | ==Description== | ||
| + | |||
| + | Insert Description Text | ||
| + | |||
| + | Here is an example of this piece of equipment being used. | ||
| + | |||
| + | Insert video media here. | ||
| + | |||
| + | ==Documentation== | ||
| + | |||
| + | ====Terminology==== | ||
| + | |||
| + | Insert terminology here | ||
| + | |||
| + | User Manual | ||
| + | |||
| + | ==Training== | ||
| + | ====Overview==== | ||
| + | |||
| + | Insert Text | ||
| + | |||
| + | ====Demonstration==== | ||
| + | |||
| + | Insert text | ||
| + | |||
| + | ====General Procedure==== | ||
| + | |||
| + | Insert text | ||
| + | |||
| + | ==Safety== | ||
| + | Insert text | ||
| + | |||
| + | ==Certification== | ||
| + | |||
| + | Foxtale Quiz | ||
| + | |||
| + | ==Troubleshooting== | ||
| + | |||
| + | ==Maintenance== | ||
| + | ====General maintenance==== | ||
| + | |||
| + | Insert text | ||
| + | |||
| + | ====Specific Maintenance Tasks==== | ||
| + | {| class="wikitable" | ||
| + | !Maintenance Procedure | ||
| + | !Frequency | ||
| + | !Done By | ||
| + | |- | ||
| + | |Sample | ||
| + | |Sample | ||
| + | |Sample | ||
| + | |} | ||
The current Ace of the {{PAGENAME}} is '''{{#show: {{PAGENAME}} |?Has ace.Has name}}''' ({{#show: {{PAGENAME}} |?Has ace.Has email address}}).<br /> | The current Ace of the {{PAGENAME}} is '''{{#show: {{PAGENAME}} |?Has ace.Has name}}''' ({{#show: {{PAGENAME}} |?Has ace.Has email address}}).<br /> | ||
Revision as of 14:16, 11 June 2019
Make: Miller
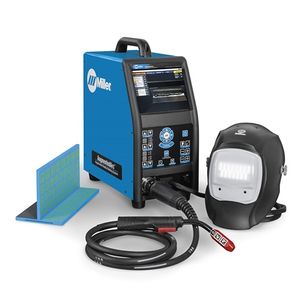
Model: Augmented Arc Welding Simulator
Ace: Wyatt Bertis (wbertis22@georgefox.edu).
Location: The Vault
Description
Insert Description Text
Here is an example of this piece of equipment being used.
Insert video media here.
Documentation
Terminology
Insert terminology here
User Manual
Training
Overview
Insert Text
Demonstration
Insert text
General Procedure
Insert text
Safety
Insert text
Certification
Foxtale Quiz
Troubleshooting
Maintenance
General maintenance
Insert text
Specific Maintenance Tasks
| Maintenance Procedure | Frequency | Done By |
|---|---|---|
| Sample | Sample | Sample |
The current Ace of the Virtual Reality Welding Station is Wyatt Bertis (wbertis22@georgefox.edu).
Documentation
Setting up Simulator
Plug in extension cord (make sure it won’t trip anyone)
Flip switch on back of machine
Press power button on the front of the machine Attach welding process of your choice (see welding processes section down below) At login screen, select user Select right or left handed Open Exercise Place Helmet on head and size to head
Clean up
Take helmet off at place on 2nd shelf of cart
Disconnect welding process
Exit out of the exercise
Press power button on front of the machine, and wait for screen to be completely blank
Flip the switch to off on the back of machine
Unplug the extension cord and leave it coiled up neatly underneath the cart
Stack work pieces neatly
Coil up all torches used and neatly place on the bottom shelf of the cart
Switching Welding Processes MIG Take connector of MIG torch and align 4 holes with machine (left side) Twist the threaded end, but do not over tighten Stick Grab clamp with small cord attached Line up the 5 holes of the connector with that of the machine (right side) To remove, press silver button and softly pull straight out (do not twist) TIG Grab cable with TIG torch attached Align 4 holes of the connector with that of the machine (left side - same as MIG) Screw in while holding the connector (do not over tighten) To remove, unscrew the connector
Warnings
Don’t drop the helmet, always place on cart when your not wearing it
When someone enters the tool room, make sure they know about the extension cord
Do not aggressively over tighten the connectors of the welding torches
Make sure to press silver button when releasing the connector of the stick torch
Do not cut power to the machine before it is completely shut down (clean up #4 & #5)
Always lay torches completely on top of the table
Make sure overhead clamp is secured tightly before using
Simulator Video:
https://www.millerwelds.com/equipment/training-solutions/training-equipment/augmentedarc-augmented-reality-welding-system-m30100

