Difference between revisions of "Wood Lathe"
(→Safety) |
|||
| (43 intermediate revisions by 7 users not shown) | |||
| Line 2: | Line 2: | ||
|Is equipment=True | |Is equipment=True | ||
|Is located in facility=Wood Shop | |Is located in facility=Wood Shop | ||
| − | |Is used in domain= | + | |Is used in domain=wood |
|Has name={{PAGENAME}} | |Has name={{PAGENAME}} | ||
| + | |Has make=TeknaTool | ||
| + | |Has model=Nova Galaxi DVR | ||
| + | |Has serial number=GL5663547 | ||
| + | |Has life expectancy= | ||
| + | |Has year of manufacture or purchase= | ||
| + | |Has replacement cost= | ||
|Has icon=File:Wood Lathe.png | |Has icon=File:Wood Lathe.png | ||
|Has icondesc= | |Has icondesc= | ||
| Line 10: | Line 16: | ||
|Has imagedesc= | |Has imagedesc= | ||
|Has description= | |Has description= | ||
| − | |Has certification= | + | |Has certification=https://georgefox.instructure.com/courses/1190 |
| − | + | |Has ace=Needed;Makerhub@georgefox.edu | |
| − | |||
| − | |Has ace= | ||
}} | }} | ||
| − | [[{{#show: {{FULLPAGENAME}}|?Has icon|link=none}}| | + | [[{{#show: {{FULLPAGENAME}}|?Has icon|link=none}}|140px|left|top|{{#show: {{FULLPAGENAME}}|?Has icondesc}}]] |
[[{{#show: {{FULLPAGENAME}}|?Has image|link=none}}|300px|thumb|upright=1.5|{{#show: {{FULLPAGENAME}}|?Has imagedesc}}]] | [[{{#show: {{FULLPAGENAME}}|?Has image|link=none}}|300px|thumb|upright=1.5|{{#show: {{FULLPAGENAME}}|?Has imagedesc}}]] | ||
| Line 21: | Line 25: | ||
Model: {{#show: {{PAGENAME}} |?Has model}} | Model: {{#show: {{PAGENAME}} |?Has model}} | ||
| + | |||
| + | Serial Number: {{#show: {{PAGENAME}} |?Has serial number}} | ||
Ace: {{#show: {{PAGENAME}} |?Has ace.Has name}} ({{#show: {{PAGENAME}} |?Has ace.Has email address}}). | Ace: {{#show: {{PAGENAME}} |?Has ace.Has name}} ({{#show: {{PAGENAME}} |?Has ace.Has email address}}). | ||
Location: {{#show: {{PAGENAME}} |?Is located in facility}} | Location: {{#show: {{PAGENAME}} |?Is located in facility}} | ||
| + | |||
__TOC__ | __TOC__ | ||
| + | |||
| + | ==Safety First== | ||
| + | [[File:Safety First HD2.png|left|150px]] | ||
| + | *Don't wear anything that could get caught in the lathe. An example of items would be bracelets, lanyards, hair below the shoulders, etc. | ||
| + | *If you have questions make sure to ask a supervisor. The shop supervisors are skilled and are glad to give advice. | ||
| + | *The most common issue with safety is digging the chisel in too hard. If it is dug in too hard, it can get caught and cause a dangerous situation. | ||
| + | *When sanding make sure to remove the tool rest. This will eliminate a possible pinch point. | ||
| + | |||
| + | |||
| + | |||
| + | |||
==Description== | ==Description== | ||
| Line 33: | Line 51: | ||
There are a wide variety of projects that can be done on the wood lathe, some easier than others, and all requiring a different need for skills and tools. This makes it hard sometimes to provide a common set of instructions, however, there some general safety rules and instructions for use that are used in any project on the lathe. The lathe can be fun to work with, but always remember, safety first. | There are a wide variety of projects that can be done on the wood lathe, some easier than others, and all requiring a different need for skills and tools. This makes it hard sometimes to provide a common set of instructions, however, there some general safety rules and instructions for use that are used in any project on the lathe. The lathe can be fun to work with, but always remember, safety first. | ||
| − | {{#evu:https://www.youtube.com/watch?v= | + | {{#evu:https://www.youtube.com/watch?v=mLuwcKNbtq8}} |
| + | |||
| + | |||
| + | {{#evu:https://www.youtube.com/watch?v=kunZIzNNxUY}} | ||
| + | |||
==Documentation== | ==Documentation== | ||
====Terminology==== | ====Terminology==== | ||
| − | Spindle: The spinning | + | * Spindle: The spinning portion in the drive head that rotates the work piece. |
| − | Chisel: The cutting tool | + | * Chisel: The hand held cutting tool used to remove material. |
| − | Tool Rest | + | * Tool Rest - A bar used to support the cutting tool while removing material. |
| − | [ | + | * Spur Center - A piece of steel that connects the drive spindle to the work piece. |
| + | |||
| + | * Live Center - A support piece that connects the work piece to the tail stock. The work piece is captured between the drive center and live center. | ||
| + | |||
| + | [[Media:566-Galaxi-DVR-1644-manual FINAL-Remote-II 23.July .2018.pdf|Wood Lathe User Manual]] | ||
==Training== | ==Training== | ||
| − | ==== | + | ====Operation==== |
| − | The wood lathe is | + | The wood lathe is similar to the metal lathe in the Machine Shop. It can spin material at various speeds and allows the user to create cuts and round shapes. Unlike the metal lathe, there is not a built in tool holder. On the wood lathe, a turner will instead use a hand held chisel to carve away the wood. For most projects, the material on the wood lathe is held using two centers, one on each side of the work. The head stock side of the material is the driven side. When installing the spur center in hard wood you will need to saw two diagonal cuts and drill the center hole. If working with soft wood you can use a punch to locate the center and use a mallet to drive the spur center into the work piece. You will need to use the following chart for setting the correct turning speed. |
| + | |||
| + | |||
| + | [[File:Turning Speeds.JPG|600px|thumb|none]] | ||
====Demonstration==== | ====Demonstration==== | ||
| − | + | Demonstrate you can safely setup the lathe and make a snowman ornament out of wood! The goal is to shape the wood into 3 spheres that look like a snowman, no additional accessories like carrot noses and top hats are necessary. | |
====General Procedure==== | ====General Procedure==== | ||
| − | # | + | # Select the stock size you need for your project and make it square using the table saw if needed. If the material is squared up it should run true on the lathe. |
| − | # Mark the center of both ends and | + | # Mark the center of both ends using a pencil and straight edge. Use a punch to indent both ends at the center marks. This will help locate the tooling and keep the part running true.[[File:...woodLathe1.png|300x300px|thumb|none]] |
| − | # Make sure to use the two point centers on the lathe and ensure the motor head is tight on the rails. | + | # Make sure to use the two point centers on the lathe and ensure the motor head is tight on the rails. If the tail stock or head is loose the work piece could fly out of the machine. |
| − | # Move the | + | # Move the tail stock away from the head stock to provide clearance for the wood stock to fit between the head and tail stock. Lock the tail stock and use the center punch mark to line up the live center and spur center. |
| − | # Spin the handle on the | + | # As you Spin the handle on the tail stock the distance between the two centers will be reduced and capture the material. Keep the center punch marks lined up with the points on the centers until it pinches the work piece. |
| − | # | + | # When the spur center is engaged into the material lock the quill using the red handle handle located on top of the tail stock. Now your piece is secured![[File:...woodLathe2.png|none|thumb]] |
| − | # | + | # The tool rest should be placed roughly 1/4"or less from the stock.[[File:...woodLathe3.png|none|thumb]] |
| − | # The | + | # The tool rest should be at a height so that the tool on top of the rest will be cutting at the middle of the stock. |
| − | # | + | # Always rotate the spindle by hand prior to applying power. This will help prevent crashing the work piece into the tool rest. |
| − | # | + | # Turn on the machine power switch located on the left end of the machine. |
| − | # Use the gouge to slowly begin chipping away the wood. Make sure the chisel | + | # Check the speed indicated on the display prior to pressing the green "ON" button. Use the speed chart for settings. Its always better to start at a slow speed and adjust as needed. |
| − | # Slowly push the chisel | + | # Adjust the spindle speed as needed using the black knob. |
| − | # Start | + | # Use the gouge to slowly begin chipping away the wood. Make sure the chisel is pressed firmly onto the tool rest and you are holding the handle tight into your core. |
| + | # Slowly push the chisel into the material until it begins chipping at the wood. | ||
| + | # Start cutting down the high parts of the material or towards the middle if it’s all even. Move the chisel towards the end, chipping away little bits of wood at a time. | ||
# Smooth out the wood, chipping away until you make a cylinder. | # Smooth out the wood, chipping away until you make a cylinder. | ||
| − | # Once you have the cylinder, choose one | + | # Once you have the cylinder, choose one end to be the head. |
# Gradually narrow down to a cone shape, then cut away material to make the three spheres of the snowman’s body. | # Gradually narrow down to a cone shape, then cut away material to make the three spheres of the snowman’s body. | ||
# After the shape is done, sand the piece, progressively finer grit until smooth. | # After the shape is done, sand the piece, progressively finer grit until smooth. | ||
# Take the piece off, cut any remaining material and sand the mount points smooth. | # Take the piece off, cut any remaining material and sand the mount points smooth. | ||
| − | # | + | # Reset the space. |
| − | |||
| − | |||
| − | |||
| − | |||
| − | |||
| − | |||
| − | |||
==Certification== | ==Certification== | ||
| + | Complete the <strong>Wood Shop - {{PAGENAME}} Module</strong> at the link below to gain access to the {{PAGENAME}}. The Maker Hub Canvas course pertains to all facilities and equipment contained in the Maker Hub; simply complete the quizzes for the facilities/equipment you wish to use in the Maker Hub. Please email <span style="color:blue">makerhub@georgefox.edu</span> if you have any questions. | ||
| − | + | [https://georgefox.instructure.com/enroll/GH36RT Maker Hub Canvas Course] | |
==Troubleshooting== | ==Troubleshooting== | ||
Revision as of 14:17, 22 August 2024
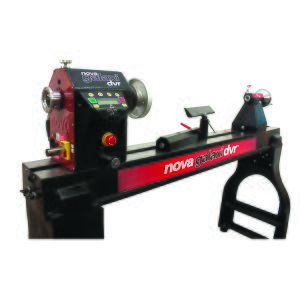
Make: TeknaTool
Model: Nova Galaxi DVR
Serial Number: GL5663547
Ace: Needed (Makerhub@georgefox.edu).
Location: Wood Shop
Safety First
- Don't wear anything that could get caught in the lathe. An example of items would be bracelets, lanyards, hair below the shoulders, etc.
- If you have questions make sure to ask a supervisor. The shop supervisors are skilled and are glad to give advice.
- The most common issue with safety is digging the chisel in too hard. If it is dug in too hard, it can get caught and cause a dangerous situation.
- When sanding make sure to remove the tool rest. This will eliminate a possible pinch point.
Description
The wood lathe is a machine very similar to the metal lathe in the machine shop. It spins a piece of stock at a variable speed, and lets the turner create round objects. Unlike the metal lathe, there is not a cutter secured to the machine that is moved into place to cut. On the wood lathe, a turner will instead use long handled chisels to carve away the wood. Another difference is that for most projects, the wood is not clamped down in a found vise like the machining lathe, instead, two free-spinning center points on each side of the piece clamp the wood between them and hold it centered.
There are a wide variety of projects that can be done on the wood lathe, some easier than others, and all requiring a different need for skills and tools. This makes it hard sometimes to provide a common set of instructions, however, there some general safety rules and instructions for use that are used in any project on the lathe. The lathe can be fun to work with, but always remember, safety first.
Documentation
Terminology
- Spindle: The spinning portion in the drive head that rotates the work piece.
- Chisel: The hand held cutting tool used to remove material.
- Tool Rest - A bar used to support the cutting tool while removing material.
- Spur Center - A piece of steel that connects the drive spindle to the work piece.
- Live Center - A support piece that connects the work piece to the tail stock. The work piece is captured between the drive center and live center.
Training
Operation
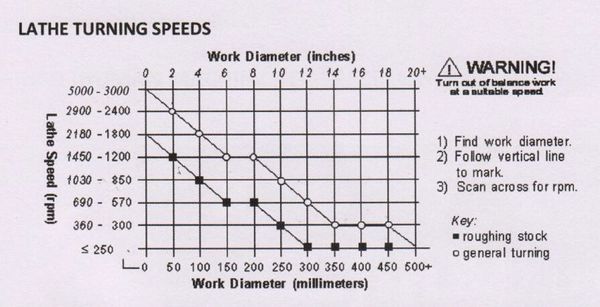
The wood lathe is similar to the metal lathe in the Machine Shop. It can spin material at various speeds and allows the user to create cuts and round shapes. Unlike the metal lathe, there is not a built in tool holder. On the wood lathe, a turner will instead use a hand held chisel to carve away the wood. For most projects, the material on the wood lathe is held using two centers, one on each side of the work. The head stock side of the material is the driven side. When installing the spur center in hard wood you will need to saw two diagonal cuts and drill the center hole. If working with soft wood you can use a punch to locate the center and use a mallet to drive the spur center into the work piece. You will need to use the following chart for setting the correct turning speed.
Demonstration
Demonstrate you can safely setup the lathe and make a snowman ornament out of wood! The goal is to shape the wood into 3 spheres that look like a snowman, no additional accessories like carrot noses and top hats are necessary.
General Procedure
- Select the stock size you need for your project and make it square using the table saw if needed. If the material is squared up it should run true on the lathe.
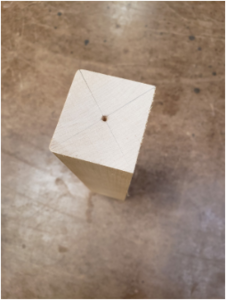
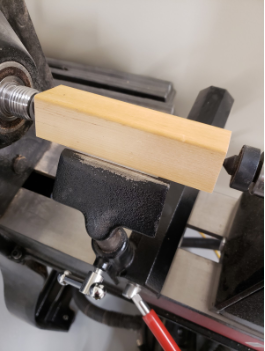
- Mark the center of both ends using a pencil and straight edge. Use a punch to indent both ends at the center marks. This will help locate the tooling and keep the part running true.
- Make sure to use the two point centers on the lathe and ensure the motor head is tight on the rails. If the tail stock or head is loose the work piece could fly out of the machine.
- Move the tail stock away from the head stock to provide clearance for the wood stock to fit between the head and tail stock. Lock the tail stock and use the center punch mark to line up the live center and spur center.
- As you Spin the handle on the tail stock the distance between the two centers will be reduced and capture the material. Keep the center punch marks lined up with the points on the centers until it pinches the work piece.
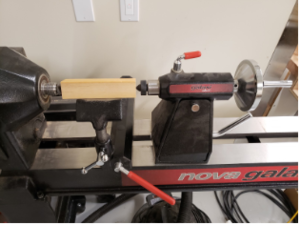
- When the spur center is engaged into the material lock the quill using the red handle handle located on top of the tail stock. Now your piece is secured!
- The tool rest should be placed roughly 1/4"or less from the stock.
- The tool rest should be at a height so that the tool on top of the rest will be cutting at the middle of the stock.
- Always rotate the spindle by hand prior to applying power. This will help prevent crashing the work piece into the tool rest.
- Turn on the machine power switch located on the left end of the machine.
- Check the speed indicated on the display prior to pressing the green "ON" button. Use the speed chart for settings. Its always better to start at a slow speed and adjust as needed.
- Adjust the spindle speed as needed using the black knob.
- Use the gouge to slowly begin chipping away the wood. Make sure the chisel is pressed firmly onto the tool rest and you are holding the handle tight into your core.
- Slowly push the chisel into the material until it begins chipping at the wood.
- Start cutting down the high parts of the material or towards the middle if it’s all even. Move the chisel towards the end, chipping away little bits of wood at a time.
- Smooth out the wood, chipping away until you make a cylinder.
- Once you have the cylinder, choose one end to be the head.
- Gradually narrow down to a cone shape, then cut away material to make the three spheres of the snowman’s body.
- After the shape is done, sand the piece, progressively finer grit until smooth.
- Take the piece off, cut any remaining material and sand the mount points smooth.
- Reset the space.
Certification
Complete the Wood Shop - Wood Lathe Module at the link below to gain access to the Wood Lathe. The Maker Hub Canvas course pertains to all facilities and equipment contained in the Maker Hub; simply complete the quizzes for the facilities/equipment you wish to use in the Maker Hub. Please email makerhub@georgefox.edu if you have any questions.
Troubleshooting
If the lathe is sounding funny, tell the shop volunteer/supervisor so we can get that checked out.
If you feel like you're losing grip on the chisel while shaving it down, chances are that you are digging in too hard. Lighten up a little, and be patient.
If it doesn't seem to be cutting well, first check the tool's sharpness before digging in deeper. If the tool is not sharp, notify the shop volunteer/supervisor and grab another chisel that is sharp.
Maintenance
General maintenance
The wood lathe has few items that need to be maintained by the student or the Ace. Refer to the table below to see each procedure, how often it should occur, and the the last completion of the specific task.
Specific Maintenance Tasks
| Maintenance Procedure | Frequency | Done By |
|---|---|---|
| General Cleaning, vacuum shavings and dust | Before and after each use | Student |
| Check tightness of bolts, lubricate with 1 or 2 drops of lightweight oil on tailstock quill threads, index pin, and Toolslide camshaft and Toolslide front camshaft bore | Monthly | Ace |
| Lubricate tailstock Slot with 1 or 2 drops of lightweight oil | Every 6 Months | Ace |
