Difference between revisions of "Router Table"
| (65 intermediate revisions by 2 users not shown) | |||
| Line 4: | Line 4: | ||
|Is used in domain=Wood | |Is used in domain=Wood | ||
|Has name={{PAGENAME}} | |Has name={{PAGENAME}} | ||
| − | |Has icon=File: | + | |Has make=SawStop/Bora Portamate Motor |
| − | |Has icondesc= | + | |Has model= RT-LFT 4-Post |
| − | |Has iconwname= | + | |Has serial number=107015 |
| + | |Has life expectancy= | ||
| + | |Has year of manufacture or purchase= | ||
| + | |Has replacement cost= | ||
| + | |Has icon=File:Router Table Icon 2.png | ||
| + | |Has icondesc=Router Table Icon 2.png | ||
| + | |Has iconwname=Router Table Icon 2.png | ||
|Has image=File:Router Table.jpg | |Has image=File:Router Table.jpg | ||
| − | |Has imagedesc= | + | |Has imagedesc= |
| − | |Has description= | + | |Has description= |
| − | |Has certification=https://georgefox.instructure.com/courses/ | + | |Has certification=https://georgefox.instructure.com/courses/1212 |
| − | + | |Has ace=Needed;gdowler@georgefox.edu | |
| − | |||
| − | |||
| − | |Has ace=Needed; | ||
}} | }} | ||
[[{{#show: {{FULLPAGENAME}}|?Has icon|link=none}}|140px|left|top|{{#show: {{FULLPAGENAME}}|?Has icondesc}}]] | [[{{#show: {{FULLPAGENAME}}|?Has icon|link=none}}|140px|left|top|{{#show: {{FULLPAGENAME}}|?Has icondesc}}]] | ||
| − | [[{{#show: {{FULLPAGENAME}}|?Has image|link=none}}| | + | [[{{#show: {{FULLPAGENAME}}|?Has image|link=none}}|400px|thumb|upright=1.5|{{#show: {{FULLPAGENAME}}|?Has imagedesc}}]] |
Make: {{#show: {{PAGENAME}} |?Has make}} | Make: {{#show: {{PAGENAME}} |?Has make}} | ||
| Line 29: | Line 32: | ||
Location: {{#show: {{PAGENAME}} |?Is located in facility}} | Location: {{#show: {{PAGENAME}} |?Is located in facility}} | ||
| + | |||
| + | __TOC__ | ||
| + | |||
| + | ==Safety== | ||
| + | [[File:Safety First HD2.png|left|150px]] | ||
| + | Although the router table displays the SawStop logo, it does not have the SawStop technology. If your fingers come in contact with the spinning bit, the bit will not stop and it will be a very bad day for you. Remember... SAFETY FIRST! | ||
| + | |||
| + | * Always wear safety glasses in the wood shop and wear hearing protection as applicable. | ||
| + | * Always unplug the router table when changing the bit. | ||
| + | * Leave an eighth inch gap of exposed shank when mounting the bit in the collet. | ||
| + | * Lock the height adjustment before turning on the router table. | ||
| + | * Use the available feather boards and push blocks to keep your hands away from the spinning bit. | ||
| + | * When using the fence, always move your workpiece from right to left. | ||
| + | * Never position the fence so that the workpiece travels between the router bit and the fence. | ||
| + | * The material you are cutting needs to be free from nails, screws, staples, or other foreign objects. | ||
==Description== | ==Description== | ||
| − | A router table can be used to make custom moldings and make slots in workpieces. | + | A router table can be used to make custom moldings and make slots in workpieces. Router tables are extremely versatile in the types of cuts they can perform. Holes and channels of varying depths and nearly limitless shapes can be cut. The router table can also use special bits to cut bevels and chamfers along the edges of a workpiece. |
Introductory Video | Introductory Video | ||
| Line 41: | Line 59: | ||
==Documentation== | ==Documentation== | ||
| − | |||
| − | |||
====Terminology==== | ====Terminology==== | ||
| − | Each bit is made for a different job. The wood shop has a wide assortment, although less common types may be unavailable. It should be noted that different bit sizes and profiles will operate better at different speeds. | + | Each bit is made for a different job. The wood shop has a wide assortment, although less common types may be unavailable. It should be noted that different bit sizes and profiles will operate better at different speeds. A good rule of thumb for setting the router bit speed is: the larger the cutter the slower the speed. Usually the router table will be set to 20000 RPM. If you plan to use a larger bit and reduce the speed of the router, ask a shop supervisor for assistance. |
| + | [[File:Router Bit Chart.jpg|500px|right]] | ||
| + | [[Image:RouterBits.jpg|500px|none]] | ||
| − | + | Definitions | |
| − | [[ | + | [[Media:Portamate-PM-P254-Variable-Speed-3-1-4-HP-Router-Motor-Instructions.pdf|Router Table User Manual]] |
| − | |||
| + | ==Training== | ||
| − | + | ===Operation=== | |
| − | + | [[File:Router Feed Direction.jpg|500px|right]][[File:Router Incorrect Feed Direction.jpg|500px|right]] | |
| − | ==== | + | ====Changing a Bit==== |
| − | + | <span style="color:red">Always unplug the router before changing a bit.</span> | |
| − | + | Always raise the router collet above the throat plate when changing bits. Insert the bit until the cutting edge touches the collet then pull the bit out about an eighth inch and finger tighten the collet. It’s important to allow an eighth inch of space between the bit and the collet. Router bits can heat up quickly when in use. This heat causes expansion, and the eighth inch space between the bit and the collet allows for this expansion. Router bits that are not installed properly can come loose while making your cut. | |
| − | + | Use the two wrenches to tighten the locking nut on the collet. | |
| − | ==== | + | ====Setting the Fence==== |
| − | + | When setting the fence, the router fence does not need to be exactly parallel to the bit for most cuts. Usually, a router bit’s performance is not affected by the angle of the fence. This differs greatly from equipment like the table saw or bandsaw which have flat blades instead of a rounded bit. The important thing is to set the fence the proper distance away from the bit, and the bit will do the rest work. | |
| − | + | If your bit has a bearing guide, lay a straightedge against the fence and adjust it until there’s a paper-thin space between the outer edge of the bearing and the straightedge. | |
| − | + | ====Feed Direction==== | |
| − | + | When using the fence, always feed the workpiece from the right side of the router table to the left. The bit spins counterclockwise. Always push the workpiece against the cutter’s rotation. The force generated by the bit’s rotation helps push the workpiece against the fence. This is the proper way to make a controlled cut on the router table. It is dangerous to feed the workpiece from left to right because the router bit will pull the workpiece out of your hands and fling it across the room. | |
| − | + | The feed rate is how fast the workpiece moves through the router bit. A feed rate that is too fast can cause the surface of the wood to tearout. In other words, you will get a poor cut and the surface of the wood will be rough or chipped. A feed rate that is too slow can cause the wood to burn. See the troubleshooting section for more info on burning. | |
| − | + | ====Material Removal==== | |
| − | + | Be mindful of how much material you are removing in a single pass. If you attempt to remove too much material, you could end up straining the router motor, putting too much sideways pressure on the router bit, or cause tearout/burning on your workpiece. If you need to remove a lot of material, break it up into multiple smaller passes. If you are unsure how much material is "too much," ask a shop supervisor for assistance. Unfortunately, there is no magic number that indicates you are removing too much material. It's based on several factors including: the cross-sectional area of the material you plan to remove, the shape of the router bit, the speed of the router bit, and the hardness of the wood. With some experience, you will get a feel for how much material you can remove in a single pass. | |
| − | + | ===Demonstration=== | |
| − | + | Demonstrate you can safely setup the router table with a roundover bit. Remember to always unplug the router when changing tools or making adjustments to prevent an accidental turn-on situation. Perform a roundover cut on a piece of scrap wood. | |
| − | + | ===General Procedure=== | |
| − | + | Keep in mind as you use the router table that the motor has a soft-start feature. This means that the router bit will take a couple seconds to get up to speed. Don't start feeding your workpiece until the motor reaches steady state. Also, keep in mind that the router bit will coast down after it is turned off. | |
| − | + | Long and narrow stock is easily machined on a router table. Featherboards make it even easier; they hold the stock tight against the surface of the fence and table and let you can concentrate on a steady, even feed rate. In general, a router table will help you work with stock of dimensions that don't lend themselves to handheld router work. Long, narrow stock, such as that used to make moldings and trim are nearly impossible to work with a handheld router. Edge profiling a few hundred feet of a particular door or base molding could probably be done with handheld router and the aid of special shop-built rigging, but dong so would be an extremely inefficient choice, when a router table makes long runs of narrow stock routine. Small pieces of stock are also a challenge to work with a handheld router. Handheld work on small parts often involves a difficult balancing act. You have to keep the router perfectly upright on stock that doesn't do a good job of supporting the router base. To compound the problem, you have to have a way of holding the stock itself in place while you work. A router table leaves both of your hands free to hold on to small parts while the table surface provides a sturdy, flat support for the entire surface of the workpiece. | |
| − | + | Trimming the edge of a piece of stock to a flat, smooth, square surface or exactly following the contour of a pattern is one of the router's specialties. Attaching a straightedge or a template to a piece of stock is one of the quickest and most effective ways to clean up an edge, or to perfectly and repeatedly form the arched top of a frame and panel door or any other curved part. Using a router table for edge trimming and pattern work speeds the process by eliminating the need to hold both the workpiece and the pattern down while you make the cut. | |
| + | [[File:Wide Groove Router Table.png|500px|right]] | ||
| + | Cutting grooves, slots, dadoes and rabbets, sliding dovetails, mortises and tenons are all part of the router tables stock in trade. If you need to cut a wide groove, click on the image to the right. Start with the inside edge. To avoid a climb cut, consider the second cut when positioning the fence for the first. Push the fence back, then rout the rest. By routing the outer side, the bit continues to push the work against the fence. | ||
| − | + | Many woodworking operations call for stopped cuts - cuts that do not continue for the entire length of the stock. Stopped cuts can be either decorative, like a chamfer that begins and ends at a certain point on a table leg, or functional, as in the case of a mortise or a half blind dovetail pin. A router table can be set up in seconds to perform a stopped cut; the same operation with a handheld router or a table saw is often extremely cumbersome or dangerous. | |
| − | + | ==Certification== | |
| + | Complete the <strong>Wood Shop - {{PAGENAME}} Module</strong> at the link below to gain access to the {{PAGENAME}}. The Maker Hub Canvas course pertains to all facilities and equipment contained in the Maker Hub; simply complete the quizzes for the facilities/equipment you wish to use in the Maker Hub. Please email <span style="color:blue">makerhub@georgefox.edu</span> if you have any questions. | ||
| − | + | [https://georgefox.instructure.com/enroll/GH36RT Maker Hub Canvas Course] | |
| − | + | ==Troubleshooting== | |
| − | |||
| − | |||
| − | |||
| − | == | ||
| − | |||
| − | |||
| − | |||
| − | |||
| − | |||
| − | + | Occasionally routing can leave burn marks on the workpiece. This can happen when the workpiece is fed through the router too slowly, but it can also mean that the bit in the router has become dull. Let a shop supervisor know if a bit seems dull. Sometimes the burning is due to build up of resin and other gunk (a technical term) on the backside of the cutter which insulates the bit and allows for more heat to build up. Inspect the router bit before using, and make sure it looks clean. If the bit seems both clean and sharp, the cause of burning on your workpiece is either a feed rate that is too slow or a router bit speed that is too high. | |
| − | + | If you are shaping end grain with a router table, use a square push block behind your workpiece to support the trailing edge and prevent tearout. | |
| − | |||
| − | + | As a general rule, the miter gauge should not be used on the router table. But, if you have a special cut where you think the miter gauge would help, talk to the wood shop staff about setting it up. | |
| − | |||
==Maintenance== | ==Maintenance== | ||
| Line 131: | Line 141: | ||
!Done By | !Done By | ||
|- | |- | ||
| − | | | + | |Clean out router box |
| − | | | + | |As needed |
| − | | | + | |Technician |
|} | |} | ||
Latest revision as of 15:06, 22 August 2024
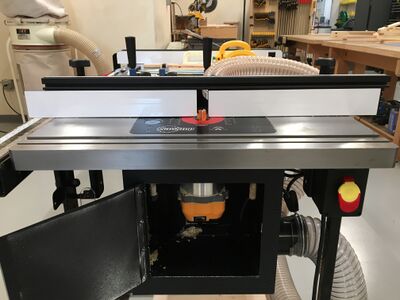
Make: SawStop/Bora Portamate Motor
Model: RT-LFT 4-Post
Serial Number: 107015
Ace: Needed (gdowler@georgefox.edu).
Location: Wood Shop
Safety
Although the router table displays the SawStop logo, it does not have the SawStop technology. If your fingers come in contact with the spinning bit, the bit will not stop and it will be a very bad day for you. Remember... SAFETY FIRST!
- Always wear safety glasses in the wood shop and wear hearing protection as applicable.
- Always unplug the router table when changing the bit.
- Leave an eighth inch gap of exposed shank when mounting the bit in the collet.
- Lock the height adjustment before turning on the router table.
- Use the available feather boards and push blocks to keep your hands away from the spinning bit.
- When using the fence, always move your workpiece from right to left.
- Never position the fence so that the workpiece travels between the router bit and the fence.
- The material you are cutting needs to be free from nails, screws, staples, or other foreign objects.
Description
A router table can be used to make custom moldings and make slots in workpieces. Router tables are extremely versatile in the types of cuts they can perform. Holes and channels of varying depths and nearly limitless shapes can be cut. The router table can also use special bits to cut bevels and chamfers along the edges of a workpiece.
Introductory Video
Things you can do with a router table
Documentation
Terminology
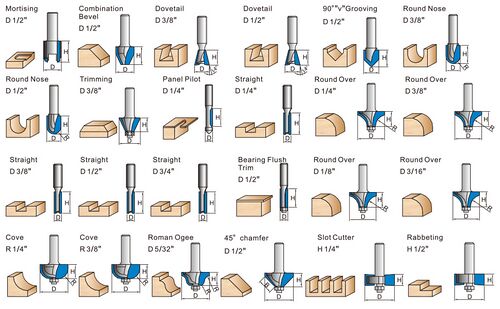
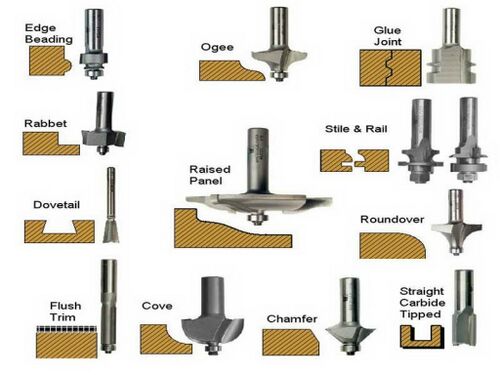
Each bit is made for a different job. The wood shop has a wide assortment, although less common types may be unavailable. It should be noted that different bit sizes and profiles will operate better at different speeds. A good rule of thumb for setting the router bit speed is: the larger the cutter the slower the speed. Usually the router table will be set to 20000 RPM. If you plan to use a larger bit and reduce the speed of the router, ask a shop supervisor for assistance.
Definitions
Training
Operation
Changing a Bit
Always unplug the router before changing a bit.
Always raise the router collet above the throat plate when changing bits. Insert the bit until the cutting edge touches the collet then pull the bit out about an eighth inch and finger tighten the collet. It’s important to allow an eighth inch of space between the bit and the collet. Router bits can heat up quickly when in use. This heat causes expansion, and the eighth inch space between the bit and the collet allows for this expansion. Router bits that are not installed properly can come loose while making your cut.
Use the two wrenches to tighten the locking nut on the collet.
Setting the Fence
When setting the fence, the router fence does not need to be exactly parallel to the bit for most cuts. Usually, a router bit’s performance is not affected by the angle of the fence. This differs greatly from equipment like the table saw or bandsaw which have flat blades instead of a rounded bit. The important thing is to set the fence the proper distance away from the bit, and the bit will do the rest work.
If your bit has a bearing guide, lay a straightedge against the fence and adjust it until there’s a paper-thin space between the outer edge of the bearing and the straightedge.
Feed Direction
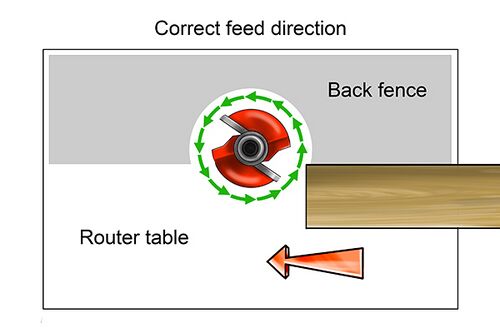
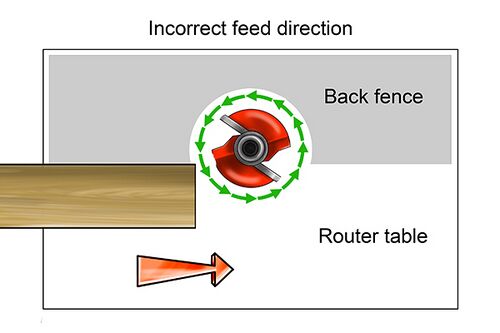
When using the fence, always feed the workpiece from the right side of the router table to the left. The bit spins counterclockwise. Always push the workpiece against the cutter’s rotation. The force generated by the bit’s rotation helps push the workpiece against the fence. This is the proper way to make a controlled cut on the router table. It is dangerous to feed the workpiece from left to right because the router bit will pull the workpiece out of your hands and fling it across the room.
The feed rate is how fast the workpiece moves through the router bit. A feed rate that is too fast can cause the surface of the wood to tearout. In other words, you will get a poor cut and the surface of the wood will be rough or chipped. A feed rate that is too slow can cause the wood to burn. See the troubleshooting section for more info on burning.
Material Removal
Be mindful of how much material you are removing in a single pass. If you attempt to remove too much material, you could end up straining the router motor, putting too much sideways pressure on the router bit, or cause tearout/burning on your workpiece. If you need to remove a lot of material, break it up into multiple smaller passes. If you are unsure how much material is "too much," ask a shop supervisor for assistance. Unfortunately, there is no magic number that indicates you are removing too much material. It's based on several factors including: the cross-sectional area of the material you plan to remove, the shape of the router bit, the speed of the router bit, and the hardness of the wood. With some experience, you will get a feel for how much material you can remove in a single pass.
Demonstration
Demonstrate you can safely setup the router table with a roundover bit. Remember to always unplug the router when changing tools or making adjustments to prevent an accidental turn-on situation. Perform a roundover cut on a piece of scrap wood.
General Procedure
Keep in mind as you use the router table that the motor has a soft-start feature. This means that the router bit will take a couple seconds to get up to speed. Don't start feeding your workpiece until the motor reaches steady state. Also, keep in mind that the router bit will coast down after it is turned off.
Long and narrow stock is easily machined on a router table. Featherboards make it even easier; they hold the stock tight against the surface of the fence and table and let you can concentrate on a steady, even feed rate. In general, a router table will help you work with stock of dimensions that don't lend themselves to handheld router work. Long, narrow stock, such as that used to make moldings and trim are nearly impossible to work with a handheld router. Edge profiling a few hundred feet of a particular door or base molding could probably be done with handheld router and the aid of special shop-built rigging, but dong so would be an extremely inefficient choice, when a router table makes long runs of narrow stock routine. Small pieces of stock are also a challenge to work with a handheld router. Handheld work on small parts often involves a difficult balancing act. You have to keep the router perfectly upright on stock that doesn't do a good job of supporting the router base. To compound the problem, you have to have a way of holding the stock itself in place while you work. A router table leaves both of your hands free to hold on to small parts while the table surface provides a sturdy, flat support for the entire surface of the workpiece.
Trimming the edge of a piece of stock to a flat, smooth, square surface or exactly following the contour of a pattern is one of the router's specialties. Attaching a straightedge or a template to a piece of stock is one of the quickest and most effective ways to clean up an edge, or to perfectly and repeatedly form the arched top of a frame and panel door or any other curved part. Using a router table for edge trimming and pattern work speeds the process by eliminating the need to hold both the workpiece and the pattern down while you make the cut.
Cutting grooves, slots, dadoes and rabbets, sliding dovetails, mortises and tenons are all part of the router tables stock in trade. If you need to cut a wide groove, click on the image to the right. Start with the inside edge. To avoid a climb cut, consider the second cut when positioning the fence for the first. Push the fence back, then rout the rest. By routing the outer side, the bit continues to push the work against the fence.
Many woodworking operations call for stopped cuts - cuts that do not continue for the entire length of the stock. Stopped cuts can be either decorative, like a chamfer that begins and ends at a certain point on a table leg, or functional, as in the case of a mortise or a half blind dovetail pin. A router table can be set up in seconds to perform a stopped cut; the same operation with a handheld router or a table saw is often extremely cumbersome or dangerous.
Certification
Complete the Wood Shop - Router Table Module at the link below to gain access to the Router Table. The Maker Hub Canvas course pertains to all facilities and equipment contained in the Maker Hub; simply complete the quizzes for the facilities/equipment you wish to use in the Maker Hub. Please email makerhub@georgefox.edu if you have any questions.
Troubleshooting
Occasionally routing can leave burn marks on the workpiece. This can happen when the workpiece is fed through the router too slowly, but it can also mean that the bit in the router has become dull. Let a shop supervisor know if a bit seems dull. Sometimes the burning is due to build up of resin and other gunk (a technical term) on the backside of the cutter which insulates the bit and allows for more heat to build up. Inspect the router bit before using, and make sure it looks clean. If the bit seems both clean and sharp, the cause of burning on your workpiece is either a feed rate that is too slow or a router bit speed that is too high.
If you are shaping end grain with a router table, use a square push block behind your workpiece to support the trailing edge and prevent tearout.
As a general rule, the miter gauge should not be used on the router table. But, if you have a special cut where you think the miter gauge would help, talk to the wood shop staff about setting it up.
Maintenance
General maintenance
- Make sure cutter bits are clean.
- Remove and clean the collets as needed.
- Make sure any adjustment screws are tight.
Specific Maintenance Tasks
| Maintenance Procedure | Frequency | Done By |
|---|---|---|
| Clean out router box | As needed | Technician |
