Difference between revisions of "Vinyl Printer+Cutter"
| Line 64: | Line 64: | ||
Preparing Graphics: | Preparing Graphics: | ||
| − | # Versaworks uses .eps files to perform jobs which makes Adobe Illustrator . | + | # Versaworks uses .eps files to perform jobs which makes Adobe Illustrator useful for setting up graphics. There is no correct way to set up a graphic for the printer which makes it easy to create a graphic in a program of choice and then simply add a cut line in illustrator before printing. However, a vector file will work the best because a cut line can be added around each individual layer (in Illustrator each shape/color is assigned to a specific layer) within the image. |
| + | # Open the graphic in Illustrator and perform any desired editing. | ||
| + | # In essence, a cut line is a 0.25 pt line (called a stroke in Illustrator) that is correctly colored and labeled so Versaworks can read it properly. The stroke can be added around specific layers (great for logos), or around the entire graphic (better for images). The advantage of adding a stroke around each layer is that it is possible to completely weed out vinyl between two parts of an image instead of leaving a piece of uncolored vinyl. For details on adding the cut line follow the steps below. | ||
| + | #* Select the entire graphic and add a 0.25 stroke to the graphic. The [Stroke] option can be found in the toolbar at the top of the screen. | ||
| + | #* Click on the color options to the left of the [Stroke] option and then click on [New Swatch] on the bottom edge of the box. A window will open up. | ||
| + | #* Name the new swatch [CutContour]. Make sure to use the exact capitalization or it will not work properly/. | ||
| + | #* Change the color type from [Process Color] to [Spot Colour] | ||
| + | #* Make sure that the color system is set to CMYK | ||
| + | #* Drag the magenta bar (M) all the way up to 100 and make sure the other sliders are at 0. | ||
| + | #* Hit okay. At this point there should be a bright pink line surrounding the graphic and the graphic is ready to be printed. | ||
| + | # | ||
==Safety== | ==Safety== | ||
Revision as of 16:56, 10 June 2019
Make: Roland
Model: BN-20
Ace: Summer Martindale (Makerhub@georgefox.edu).
Location: The Hub
Description
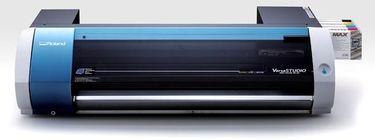
Vinyl Printing is the process of applying ink to vinyl sheets to produce graphics using a conventional inkjet printing method with solvent based inks. This is useful for making images into stickers, creating t-shirt graphics, and any task where the appearance of vinyl needs to be changed. Printers similar to this are standard in small scale custom clothing companies due to how easy it is to take a graphic from Adobe Illustrator to a piece of vinyl. The BN-20 packs everything into one, powerful, profit-producing package. With award-winning eco-solvent inks including metallic and white options, a range of material compatibility and integrated contour cutting, it is easily the most versatile print device in its class. The BN-20 is perfect for creating t-shirt graphics, poster prints, stickers and decals – all from the comfort of your desktop.
Documentation
Terminology
- Graphic - The image, logo, lettering or similar design that is being printed.
- Adobe Illustrator - The software used to set up graphics to be printed.
- Weeding - Removing the excess vinyl material with the tools found in the drawer below the computer.
- Versawoks - The software that interacts with the printer to perform a print.
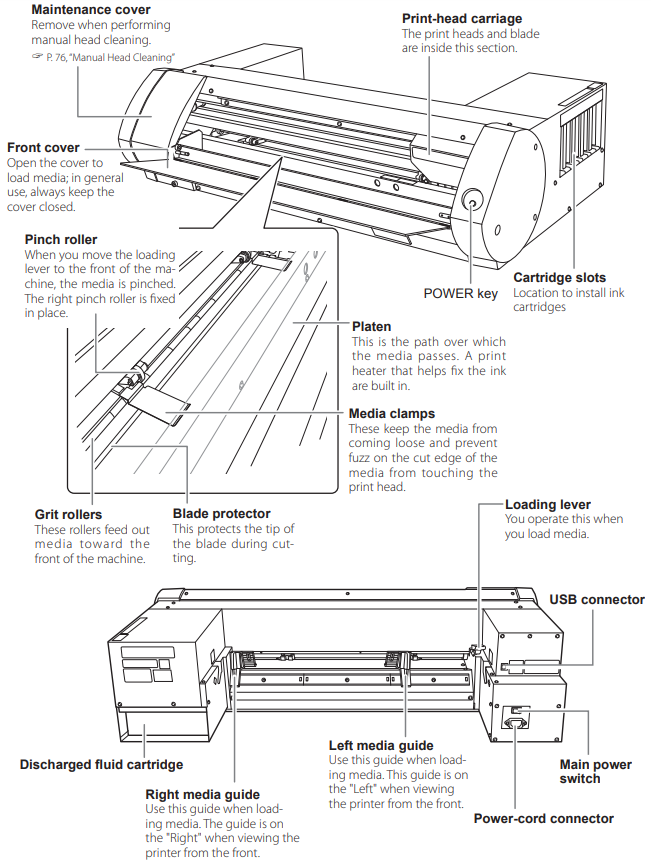
- See below for specific machine terminology.
User Manual
This user manual does a good job of visually showing the details of operating the printer.
Training
Overview
Almost any file type can be used as a graphic when using the vinyl printer but they all must be brought into Illustrator to add a cut line. Note that a vector file such as a pdf will work the best. The cut line tells the printer to cut out the image that is being printed so it can be weeded properly before it is applied. There are many ways to create a cut line in Illustrator and it is up to the user to determine which process will be the easiest for their graphic. Once a cut line has been created, the file is saved as an .eps and then opened in Versaworks to finalize any print settings before performing the print. After the print is completed it should be left to dry for 20 minutes before being applied to another object.
Demonstration
Print out and weed a graphic of choice. If you are indecisive use a George Fox logo from the website.
General Procedure
Loading Material:
- The vinyl printer is capable of printing on any type or size of vinyl but matte vinyls will provide the best results. Sticker vinyls can be found on the vinyl cutter or in the cabinet under the computer while heat transfer vinyls can be found in the vinyl printer or in the cabinet to the right of the printer. Scrap pieces can be found in the bin next to the computer and are loaded into the printer just like a roll is.
- Press the secondary power button to turn on the printer.
- The loading process always begins by pushing the loading lever backwards. This opens the media clamps so the vinyl can be slid through the printer.
- The media guides are critical to keeping the vinyl in place while printing and must be adjusted to fit the width of the vinyl. Do so by sliding the left media guide to the edge of the vinyl piece. When doing this make sure the pinch roller is above a grit roller or the printer will NOT work. You may have to play with the piece orientation or width to make this possible.
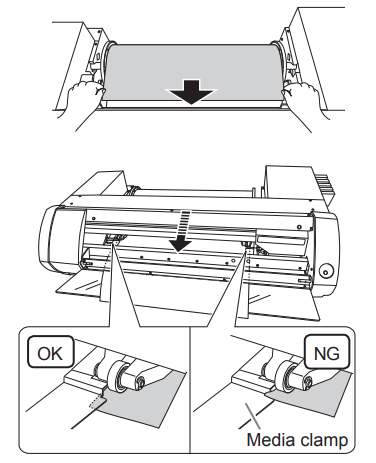
- Feed the vinyl through the printer from the back of machine so that it passes under the media clamps. The purpose of the media clamps is to keep the edges of the vinyl from interfering with the print head so this is an important piece to remember. Feel free to reference the image below.
- Finish the loading process by pulling the loading lever forward and making sure the door is closed. If everything is done correctly the printer will move around the material a bit and then sit quietly. If there is beeping then it should be troubleshooted.
Preparing Graphics:
- Versaworks uses .eps files to perform jobs which makes Adobe Illustrator useful for setting up graphics. There is no correct way to set up a graphic for the printer which makes it easy to create a graphic in a program of choice and then simply add a cut line in illustrator before printing. However, a vector file will work the best because a cut line can be added around each individual layer (in Illustrator each shape/color is assigned to a specific layer) within the image.
- Open the graphic in Illustrator and perform any desired editing.
- In essence, a cut line is a 0.25 pt line (called a stroke in Illustrator) that is correctly colored and labeled so Versaworks can read it properly. The stroke can be added around specific layers (great for logos), or around the entire graphic (better for images). The advantage of adding a stroke around each layer is that it is possible to completely weed out vinyl between two parts of an image instead of leaving a piece of uncolored vinyl. For details on adding the cut line follow the steps below.
- Select the entire graphic and add a 0.25 stroke to the graphic. The [Stroke] option can be found in the toolbar at the top of the screen.
- Click on the color options to the left of the [Stroke] option and then click on [New Swatch] on the bottom edge of the box. A window will open up.
- Name the new swatch [CutContour]. Make sure to use the exact capitalization or it will not work properly/.
- Change the color type from [Process Color] to [Spot Colour]
- Make sure that the color system is set to CMYK
- Drag the magenta bar (M) all the way up to 100 and make sure the other sliders are at 0.
- Hit okay. At this point there should be a bright pink line surrounding the graphic and the graphic is ready to be printed.
Safety
- Never turn off the main power supply. The printer must routinely empty the print head to prevent it from clogging
Certification
Foxtale Quiz
Troubleshooting
Maintenance
General maintenance
Insert text
Specific Maintenance Tasks
| Maintenance Procedure | Frequency | Done By |
|---|---|---|
| Sample | Sample | Sample |


