MIG Welder
Make: Miller Electric
Model: Millermatic 210
Ace: Wyatt Bertis (wbertis22@georgefox.edu).
Location: Welding Shop
Description
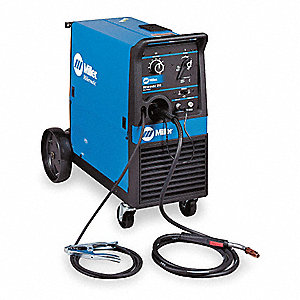
The Millermatic 210 is a wire feed metal inert gas (MIG) welder that is meant for light industrial use. Metal inert gas is a welding process in which an electric arc forms between a consumable MIG wire electrode and the base metal, which heats the base metal, causing them to melt and join. Along with the wire electrode, a shielding gas feeds through the welding gun, which shields the process from contaminants in the air. This is the easiest and most common type of welding which makes it perfect for those learning to weld. It uses 72/25 CO2 and Argon gas mixture to shield the molten weld from oxygen. If the weld pool is exposed to oxygen, it can create a handful of problems such as porosity and excessive spatter in the bead. This welder is capable of welding carbon steel as well as stainless steel. Below is a short video explaining MIG welding. Before completing the training on this machine you must complete the Virtual Reality Welding Station training and spend some time practicing with it to get a feel for the welding process. This purpose of this wiki is to explain the operation of the Millermatic 210 not the actual welding technique which is learned on the VR Welder.
Documentation
Terminology
- MIG Welding - Metal inert gas is a welding process in which an electric arc forms between a consumable MIG wire electrode and the base metal, which heats the base metal, causing them to melt and join. Along with the wire electrode, a shielding gas feeds through the welding gun, which shields the process from contaminants in the air.
- Weld Metal/Electrode - The metal added to the base metal to create a weld.
- Gun - The piece that is held while welding and feeds the weld metal into the base metal.
- Base metal - The metal pieces that are being joined together.
- Coupons - Small pieces of metal used to practice welding.
Training
Overview
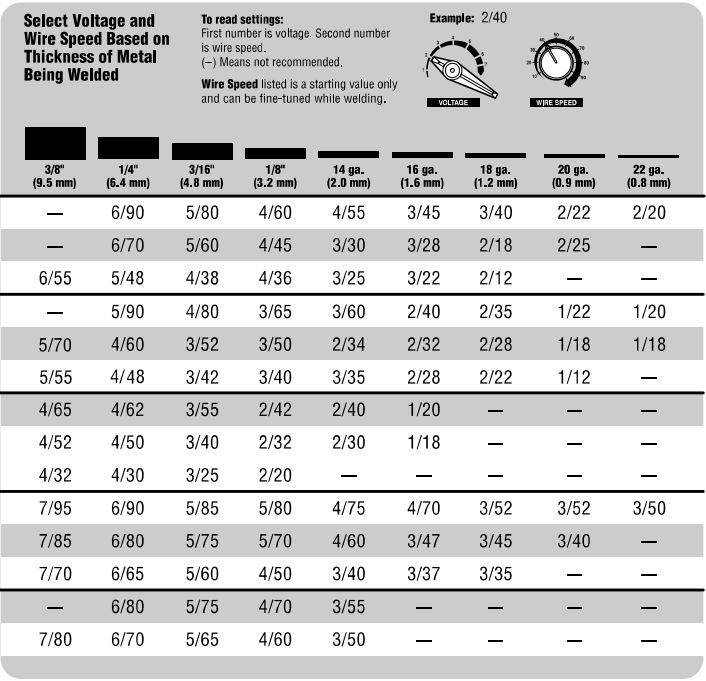
MIG welding may be the simplest welding method to use but that does not mean it is easy. First, it is important to wear the correct safety gear, i.e. closed shoes, pants, a welding coat, a welding helmet, and welding gloves, otherwise you will be burned by the UV light emitted by the welding arc. You must also make sue the machine is set up properly. To do this, the gas canister should be opened and regulator adjusted to 15 CFH. Depending on the material you are welding the voltage and wire feed speed will very; you can find what values these should be set to by referencing the chart inside the cover of the welder. Once the welder settings are correct, set up your work pieces using clamps and magnets to hold them in position and clipping the ground clamp to the work piece or the metal table as long as there is a clean contact between the table and the work piece. The most difficult piece is keeping the correct gun angle, keeping a consistent travel speed/pattern, and maintaining the correct distance from the work piece. If you have spent time on the welding simulator then the gun angle and travel speed/pattern should be simple to replicate. It is more difficult to visually reach the correct distance from the material but if the welder is making a nice sizzling (just like frying bacon) sound then it should be correct. If there is a lot of popping the the gun is too far away and if there is more of a bubbling sound then it is too close. After performing any welds make sure to reset the space by putting away any scrap metal and other debris.
Demonstration
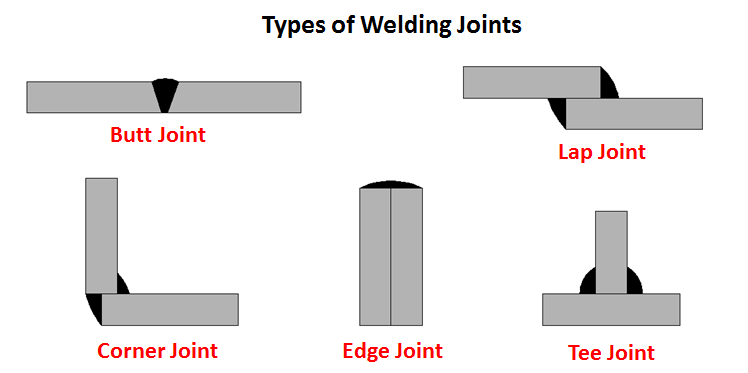
Perform several weld lines and one of lap, butt, or Tee joint welds. These should be performed on the coupons found in the weld shop. See the image below to see the different types of welds.
General Procedure
Prior to Welding:
- Place the fume hood over the area you will be welding and make sure it is on. The power switch is located on the wall next to the door and light switch.
- Attach the ground clamp to the metal bench your work piece will be on. Ideally, place the ground clamp on the base metal itself to create the smoothest path for the electrical current.
- Ensure the work piece is touching the conductive surface of the table. This is critical if the clamp is not touching the base metal.
- Ensure the adjusting screw on the tank regulator is loose (Do not unscrew all the way).
- Slowly open cylinder valve all the way. Suddenly opening the valve could cause damage to the regulator.
- Slowly turn the adjusting screw (clockwise) to increase pressure to 25 CFH. At first it will spin freely but you will begin to feel resistance as the pressure begins to increase on the leftmost pressure gauge.
- Identify the material type and thickness that you will be welding.
- Determine the wire feed rate and voltage to fit your material and wire size. To do this, refer to MIG welding chart for specified adjustments specific to your application. A welding chart is included below for reference and the same chart is mounted inside the cover of the welder. This chart also depends on the wire size which is usually 0.035".
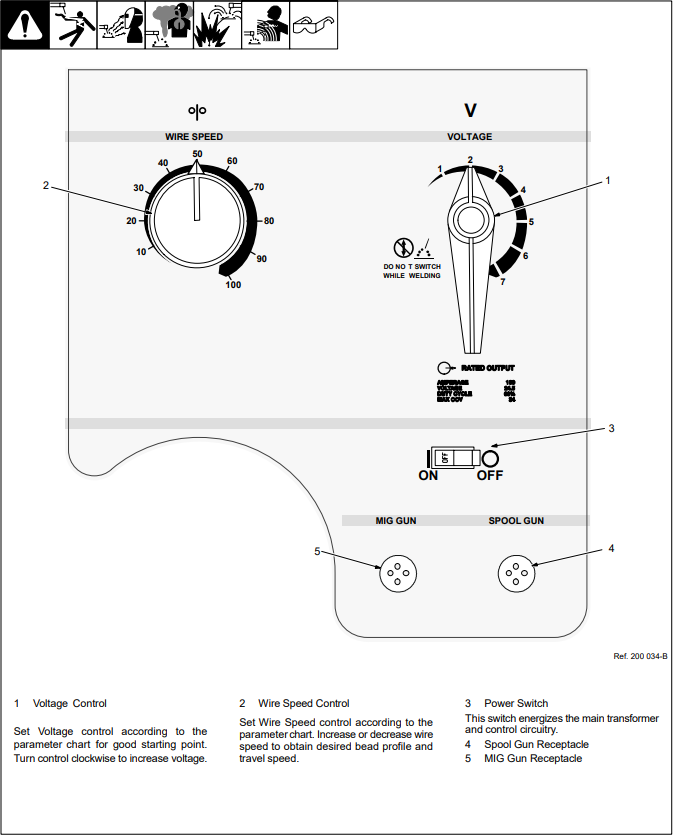
- Turn on the welder and adjust wire speed and voltage to match the parameters layed out by the welding chart. Refer to the image below to see the controls for doing this.
- Ensure you are wearing all necessary protective gear. This should include closed shoes, pants, a welding coat, a welding helmet, and welding gloves. There should be no skin exposed to the welding arc or it will cause burns.
- Ensure the welding gun has proper amount of wire protruding from tip (about ¼ inch) and that the gun nozzle is clean of any debris. You can use pliers to scrape off any debris in the nozzle. If too long, trim excess with the welding pliers. If to short, pull the trigger while the gun is not in contact with anything and more wire will be fed out.
Perform a Weld:
- Set up the work pieces in your desired configuration. Magnets and metal clamps are helpful for doing this and can be found on the tray below the tabletop.
- Tack the pieces together in a few places by holding the gun at the proper angle and holding down the trigger for 2-3 seconds. Before pulling the trigger make sure to say "welding" to let everyone in the room know you are about to start. If you do not know the correct angle to hold the gun go practice some more on the Virtual Reality Welding Station until you are comfortable with the gun.
- Perform as many welds as needed. If you are doing everything right the noise should sound like sizzling bacon. Also, you may need to periodically trim the wire between welds to keep the correct distance from the work piece.
After Welding
- Close gas cylinder valve.
- Bleed any remaining gas by depressing trigger until regulator drops to 0. Make sure the gun is not in contact with anything while doing this.
- Back out adjusting screw on regulator (Do Not unscrew all the way).
- Turn off the welder.
- Carefully coil the gun and return it to the welder. Make sure it does not get kinked.
- Remove the ground clamp and clean up any scraps and slag from the work area.
Safety
- Touching live electrical parts can cause fatal shocks or severe burns. The electrode and work circuit is electrically live whenever the output is on. The input power circuit and machine internal circuits are also live when power is on. In semiautomatic or automatic wire welding, the wire, wire reel, drive roll housing, and all metal parts touching the welding wire are electrically live.
- Don’t weld lead, zinc, copper, cadmium, or beryllium. Welding these materials can be harmful if not equipped with proper safety gear and training.
- Don’t weld in wet gear or standing water because this could create a new path for the electrical current to travel and cause a severe electrical shock.
- Always turn gas and the welder off when you are done in the welding shop to ensure there are no leaks that could cause asphyxiation (suffocating from lack of oxygen).
- Never weld without a welding helmet. Arc rays from the welding process produce intense visible and invisible (ultraviolet and infrared) rays that can burn eyes and skin. Sparks fly off from the weld.
- Never weld without gloves. Gloves protect your hands from the heat as well as the arc rays. No bare skin should be exposed.
- Don't weld with the vent hood off. Welding produces fumes and gases. Breathing these fumes and gases can be hazardous to your health. Asphyxiation can also occur due to the confined nature of the welding shop and the use of welding gasses.
- Always weld with the door open to lower the risk of asphyxiation.
- Don't weld with the gas off. This can damage the machine.
- Don’t unscrew the regulator adjusting screw all the way out. This could damage the valve.
- Please avoid touching the hot metal surrounding the weld, even if you are wearing welding gloves. You could get burned and the heat may damage the gloves.
- Avoid stepping on or kinking the cable attached to the gun. This can interfere with the wire feeding system and cause permanent damage.
Certification
Troubleshooting
- Wire feeds from the gun but welding doesn't occur - Check that the ground clamp has solid contact with the work piece and that there is solid contact with the table if the clamp is on the table.
- The welding process is burning through the work piece - Double check the welding parameters chart to ensure the wire speed and voltage are correct.
- Trouble starting the weld at the correct distance - Trim the wire to around 1/4" so that the gun can be closer to the work piece.
- Wire feeding at an erratic rate - Readjust drive roll pressure; clean the gun liner and replace if necessary. See the user manual for details on doing this.
Maintenance
General maintenance
Welding environments are often dirty so the Millermatic 210 holds up well to to dust by design and it is not critical to have it squeaky clean as a result. However, it is still recommended to wipe down the machine on occasion to prevent an excess of dirt buildup. It is important to clean slag buildup from the nozzle of the gun to increase its longevity and to inspect/repair the weld cable. To clean the nozzle, twist it off and then scrape away any slag with a pair of pliers. At this point you can apply a light coat of nozzle gel to the end of the nozzle to help prevent slag from sticking (this is found on the table to the left of the welder). Another routine maintenance procedure is the lubrication of the drive motor so that the wire feed system will keep functioning properly. For details on doing this refer to the user manual.
Specific Maintenance Tasks
| Maintenance Procedure | Frequency | Done By | Last Completed |
|---|---|---|---|
| Clean slag from the gun nozzle | As needed | Student | N/A |
| Inspect/Repair cracked weld cables | Every 3 months | Ace | |
| Clean and tighten weld terminals | Every 3 months | Ace | |
| Blow out or vacuum inside of welder | Every 6 months | Ace | |
| Remove drive roll and carrier and lubricate | Every 6 months | Ace |


