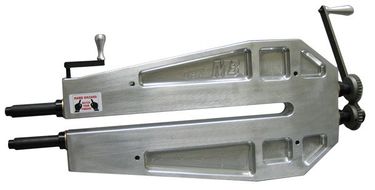
Bead Roller
Make: Mittler Brothers
Model: 210-24M
Ace: Needed (Makerhub@georgefox.edu).
Location: Machine Shop
Description
A bead roller is a machine used for forming and reinforcing sheet metal. Metal is placed between the rollers (dies) and the material is formed to give extra strength and rigidity. There are many different types of rollers and they can be changed out depending on the needed application. In addition to strengthening sheet metal, the bead roller can also be used to create artistic patterns such as the ones below.
- Video showing the bead rolling process.
Documentation
Training
Operation
This machine is best used with a 2 person team. One person needs to slowly crank the handle while the other guides the material through the rollers. Be aware of the following machine maximum capacity.
- 19 Ga (0.04”) Mild Steel
- 16 Ga (0.06”) Aluminum
- 21 Ga (0.035”) Stainless
Demonstration
Roll a bead down the center of a 5x5” piece of sheet metal Procedures Begin by tracing the area of your desired bead on the sheet metal. Choose the correct die for the desired bead shape and slide it onto the end. Next, loosen the tensioning bolt, and place the sheet metal between the two forming dies. Tighten the tensioning bolt by turning it two revolutions after both dies contact the sheet metal. Make sure the sheet metal is contacting the traced line where you would like the bead to begin. Turn the handle on the opposite side as you guide the metal through the dies. It may be easier to have a second person do this to allow the first person to more accurately guide the sheet metal through the beads. If you are rolling the bead to the edge of the metal, gently slip it out after finishing rolling. If you intend for you bead to stop in the middle of the metal, then stop turning the handle and loosen the tensioning bolt till the metal can slip out. You can adjust the tensioning bolt to make multiple passes or if you want smaller beads, but typically the tensioning bolt should be rotated twice for single passes.
General Procedure
1. Begin by tracing the area of your desired bead on the sheet metal.
2. Choose the correct die for the desired bead shape and slide it onto the end.
3. Next, loosen the tensioning bolt, and place the sheet metal between the two forming dies.
4. Tighten the tensioning bolt by turning it two revolutions after both dies contact the sheet metal. Make sure the sheet metal is contacting the traced line where you would like the bead to begin.
5. Turn the handle on the opposite side as you guide the metal through the dies. It may be easier to have a second person do this to allow the first person to more accurately guide the sheet metal through the beads.
6. If you are rolling the bead to the edge of the metal, gently slip it out after finishing rolling. If you intend for you bead to stop in the middle of the metal, then stop turning the handle and loosen the tensioning bolt till the metal can slip out.
7. You can adjust the tensioning bolt to make multiple passes or if you want smaller beads, but typically the tensioning bolt should be rotated twice for single passes.
Safety
- Be aware of the location of your fingers in relation to the rollers and gears to avoid pinching/smashing.
Certification
Complete the Machine Shop - Bead Roller Module at the link below to gain access to the Bead Roller. The Maker Hub Canvas course pertains to all facilities and equipment contained in the Maker Hub; simply complete the quizzes for the facilities/equipment you wish to use in the Maker Hub. Please email makerhub@georgefox.edu if you have any questions.
Troubleshooting
Maintenance
General maintenance
Insert text
Specific Maintenance Tasks
| Maintenance Procedure | Frequency | Done By |
|---|---|---|
| Sample | Sample | Sample |
