Mug Press
Make: Heat Press Nation
Model: HPN-SIG-MUG
Ace: Needed (makerhub@georgefox.edu).
Location: The Hub
Description
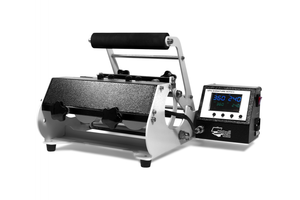
The HPN Signature Series Mug Cup Heat Press machine is a professional grade mug press designed to easily and efficiently heat transfer custom images onto standard mugs and water bottles. From small sized graphics such as names and logos to full wrap, edge to edge images the HPN Signature Series Mug Cup Heat Press delivers exceptionally high quality sublimation transfers every time. Here is an example of it in use:
Documentation
Terminology
- SV - Stands for set value and is used to indicate the parameters that the press should be operating at.
- CV - Stands for present value and indicates the current value of the heat press parameters.
User Manual
Training
Overview
The operation of the mug press is pretty simple. First, select a heating element that fits your glass or mug and fasten it into place using the black screws. There is no formula for selecting the correct element other than putting your mug inside and making sure it fits snug. Adjust the pressure using the large black knobs so that there is a firm, even pressure over the mug. Next, set the time and temperature. Feel free to experiment with different values as there is not an exact formula, but for dye sublimation set the temperature around 300°F and 325°F for 15 seconds works. If the graphic begins to peel off when removing the paper then the time should be increased and if the graphic colors change when being applied the temperature should be decreased. Also it is important to use the Teflon sheets found in the t shirt heat press to prevent sticking to the heating element if using the plastic transfer paper. After the time and temperature are set place the mug in the element and clamp down. The timer will beep once the transfer is complete. For complete details see the general procedure.
Demonstration
A mug or glass is required in order to perform a transfer on this machine which makes it difficult to perform simple test or demonstration transfers. Consequently, the demonstration will be pressing a graphic of choice onto a mug or glass.
General Procedure
- Select a heating element. Heating elements come in different sizes with their own connection cord. This is not an exact science, simply slide the mug into the element and make sure it can wrap around it with a snug fit.
- Use the black set screws to secure the heating element into the press and plug it into the controller. Make sure to screw in the plug as well to ensure a good connection.
- Once the heating element is installed you will want to adjust the pressure applied to the mug using the four large pressure adjustment knobs. The pressure should be evenly distributed across the mugs's surface and firm without risk of crushing it.
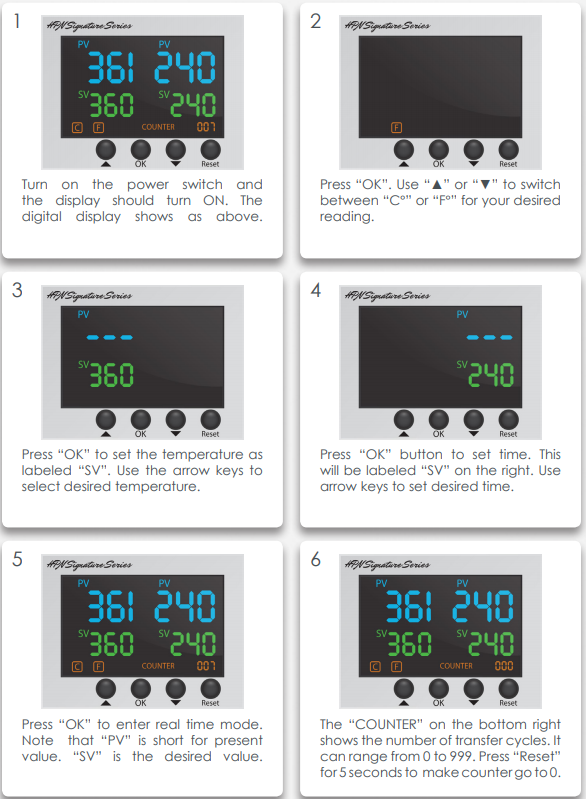
- Adjust the time and temperature. 305 °F for 15 seconds is recommended as a starting point but feel free to try new things to improve the results. See the image below for details on changing the time and temp.
- Place the graphic onto the mug. Tape may be helpful so that the graphic does not shift after it is placed into the press.
- Put the mug into the press and clamp down until the timer beeps.
- Remove the mug from the press and wait about 30 seconds before removing the paper.
- Reset the space by turning off the machine, throwing away any scraps and wiping any debris off the machine.
Safety
- This machine uses heat to operate so be aware of the heating element when it is running to avoid burns.
- Do not leave the heating element on any longer than necessary if there is nothing inside it. Long periods of time without something in the press can damage the heating element.
Certification
Note that this quiz includes information from the heat press so make sure to review the heat press wiki before taking it.
Troubleshooting
- Getting the graphic to stick properly can be very difficult. If it does not stick the the time and temperature should be increased but not too much or the vinyl will melt. It will also help to wait for things to cool before removing the backing.
- If the vinyl comes out looking melted then it was most likely left in too long; reduce the time.
- If the vinyl is wrinkled then it probably shifted while being clamped; secure the vinyl with tape before clamping.
Maintenance
General maintenance
The only maintenance needed on this machine is general cleaning. Use a paper towel and cleaner if necessary to wipe of any dust and vinyl debris.
Specific Maintenance Tasks
| Maintenance Procedure | Frequency | Done By |
|---|---|---|
| General Cleaning | As needed | Student |

