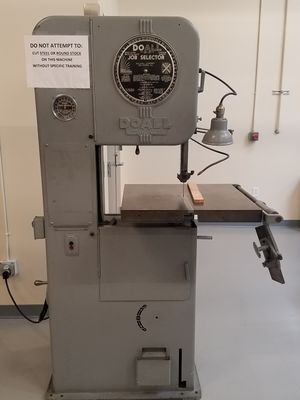
Vertical Bandsaw
Make: DoALL
Model: ML
Ace: Needed (Makerhub@georgefox.edu).
Location: Machine Shop
Description
A Vertical Bandsaw is just like any other type of bandsaw in that it is a power tool used to cut various metal and wood pieces. The saw consists of a solid band of metal with edged teeth on it for ease of cutting. Those looking for uniform cutting results will make use of this type of saw. While their main function is to cut curved or unusual shapes, they can also be used for straight cutting. These types of saws, specifically designed for metal cutting, are available in vertical and horizontal varieties.
Documentation
Terminology
Blade Kerf - The material lost due to the width of the blade
Blade Guide - Guide the blade to keep it cutting straight. Should be adjusted to ¼ in above material being cut.
Adjustment Knob - adjusts the height of the blade guide. Located at the back of the machine.
Adjustment Lock - locks the blade guide in place. Located at the back of the machine.
Fence - Guides the stock through the blade. Attached to the side of the table.
Training
Overview
A Vertical Bandsaw is just like any other type of bandsaw in that it is a power tool used to cut various metal and wood pieces. The saw consists of a solid band of metal with edged teeth on it for ease of cutting. Those looking for uniform cutting results will make use of this type of saw. While their main function is to cut curved or unusual shapes, they can also be used for straight cutting. These types of saws, specifically designed for metal cutting, are available in vertical and horizontal varieties.
Demonstration
To show a complete knowledge of the Vertical Bandsaw, the student will cut a piece of acrylic stock.
General Procedure
- The general procedure and additional knowledge can be found in the video above!
- Unlock the Blade Guide by turning the knob labeled "Lock" on the back of the machine. This allows you to alter the height of the blade.
- Set the Blade Guide Height by turning the knob labeled "Adjustment" on the back of the machine. A good height is about 1/4" above the piece you are cutting.
- Lock the Blade Guide by turning the knob labeled "Lock" on the back of the machine. This will secure the blade and provide a better cut.
- Check the stock height by placing he stock next to the blade to ensure the 1/4" margin is there. Double checking is always a good thing.
- Aim the Blow Off Nozzle. This blows away all the shavings that occur during the cutting process. Aim directly where the blade will come in contact with the stock.
- Make use of the fence. This is the pushing tool that is hanging from the bottom of the machine that guides the stock through the blade. Bring it up against your piece.
- Turn on the machine. The Black button is On, the Red button is Off.
- Now you are ready to begin cutting! Apply a gentle, steady pressure using the fence so that the acrylic piece is getting cut by the blade.
- Once you are finished cutting the piece, turn off the machine, remove the fence and the piece from the machine.
- Reset the Space! Use the shop vacuum to remove all shavings on and around the machine.
Safety
Insert text
Certification
Foxtale Quiz
Troubleshooting
Maintenance
General maintenance
Insert text
Specific Maintenance Tasks
| Maintenance Procedure | Frequency | Done By |
|---|---|---|
| Sample | Sample | Sample |
A vertical bandsaw is just like any other type of bandsaw in that it is a power tool used to cut various metal and wood pieces. The saw consists of a solid band of metal with edged teeth on it for ease of cutting. Those looking for uniform cutting results will make use of this type of saw. While their main function is to cut curved or unusual shapes, they can also be used for straight cutting. These types of saws, specifically designed for metal cutting, are available in vertical and horizontal varieties.
The current Ace of the Vertical Bandsaw is Needed (Makerhub@georgefox.edu).
Accessories
Roller stand
Documentation
Training
This video contains specific information for using the Horizontal Bandsaw in the Maker Hub as well as a basic overview of what will be expected in your live demonstration.
