Prusa 3D Printer
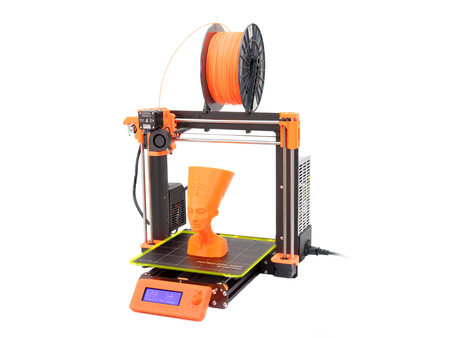
The Prusa i3 MK3 is a 3D printer that includes a removable heatbed, filament sensor, and other unique features in order to rapidly prototype projects. The Prusa i3 MK3 comes in two different variants, single filament, and multi filament. It employs FDM Printing.
The current Ace of the Prusa 3D Printer is Ellie-Annah Strauss (estrauss21@georgefox.edu).
Why pick the Prusa?
The Prusa i3 MK3 is a powerful prototyping device that works best with smaller prints, with the print bed being approximately 8" x 8" x 9". The Prusa has a hard time with more complex geometric shapes, but it excels at printing smaller optimal quality models for testing and trying out products or ideas.
Documentation
Training
Terminology
Nozzle/Extruder
The nozzle (or extruder) is the part of a 3D printer which deposits the molten plastic filament onto the 3D printer bed. The extruder can reach 200°-300°C, depending on the filament used, but typically stays around 215°C for regular prints.
Heatbed
The heatbed is a 9.83" x 8.3" x 8.3" plate where the filament will be "printed" on. The bed heats up to around 60°C. Heated beds typically prevent the plastic from warping by keeping it warm. Warping is a common issue that happens on 3D printers, where the plastic of the print cools at an uneven rate, leaving the print wavy and not the way you intentioned.
Feeder
The feeder is the part of the 3D printer that "feeds" the filament to the nozzle. Sometimes "feeder" and "extruder" are used synonomously, so it's important when you're teaching someone to differentiate whether or not you're talking about the nozzle extruder or the feeder extruder.
Feeders are typically composed of stepper motors, gears, and sometimes bolts and pulleys to guide the filament to the hotend.
Fan
There are usually two fans on the nozzle of a 3D printer, and they serve the purpose of cooling the plastic as soon as it comes out of the nozzle. If the plastic is super hot, we don't want it to move as soon as it is in place on the part we're making, otherwise our part will turn out warped or failed. The fans are put in place to strategically cool the plastic as soon as it comes out of the nozzle.
You are able to turn the fan speeds up and down in the slicer software (if that is a provided feature), but you can manually configure it on the printer as well.
Stepper Motor
There are two main places where you'll find stepper motors on a 3D printer. There's a motor for each axes, one for the x, y, and z. These motors receive instructions from the gcode to move the certain axes at certain points to create your print.
There is also a stepper motor in the extruder setup, pushing and pulling the filament whenever more or less is needed for the current print.
Infill
Infill has to do with a 3D print's structural integrity. It can be multiple shapes and patterns (providing different strength optimizations), different sizes, and different thicknesses. Infill ranges anywhere from 0% (hollow) to 100% (solid). It is very unlikely you'll ever want a print to be 100% infill, because it takes an insane amount of filament and a lot of time to complete.
Most 3D prints are 20% infill since it is the most optimal choice for cost efficiency and durability.
If your concern is cost, a lesser infill density is a good way to go. If strength and mass is important, a higher density (between 30%-50%) is a good estimate. When using a higher infill, always double check to make sure it's a good idea for your part, and that you're using the right machine. Other 3D printers in the prototype lab have the option of a stronger filament than PLA or ABS, so it may be a better idea to print for strength on those rather than the Prusas.
Filament
There are many different kinds of filament you can use on the 3D printer, ranging from PLA, to ABS, TPU to Nylon. The most common of these are PLA and ABS.
PLA stands for Polylactic Acid, it is the most common desktop 3D printing filament because it is odorless and very hard to warp on its own, therefore not always a need for a heated bed.
ABS stands for Acrylonitrile Butadiene Styrene. It's one of the most commercial versions of plastic available (found in legos, packaging, and more)--it's durable, scratch resistant, and tough. Heated beds are a must with ABS filament because it is so temperature sensitive, so it warps very easily.
Sizing of Filament
There are two mainstream sizes of filament, 3.00mm and 1.75mm. The 3.00mm filament is typically used on higher end machines--printing stronger and more detailed models. Hobbyist printers lean towards the 1.75mm filament, for marketing purposes as well as hardware purposes. The Prusa i3's use 1.75mm filament.
CAD Modeling and Thingiverse
There are two ways you can 3D print models. You can either design your own with a CAD (computer-aided design) software, or you can find something similar to what you want on websites like Thingiverse. Thingiverse has all sorts of community-contributed designs, which you can download the .stl files for, slice, and print the models.
As for modeling your own projects, there are multiple softwares you can use such as SolidWorks, AutoCAD, Autodesk Inventor, FreeCAD, and many more.
Slicing
Each 3D printer uses a slicer software, a software where you can import the model file (usually an .stl file) onto a computerized build plate, resize, change up the nozzle and bed temperatures, adjust the infill and precision, and more. The slicer software takes into consideration all your configurations, then "slices" it into a .gcode file, a set of instructions for the x, y, and z dimensions. The 3D printer can read and tell the stepper motors what to do from the set of instructions within the gcode.
The slicer software used for the Prusa i3 MK3 is called PrusaControl.
Usage
Picking a Model
Once you have a model you would like to print (which you can find on either thingiverse or model yourself), you will be using a software called PrusaControl to slice your .stl files into a .gcode file, which the printer will interpret and print your model from.
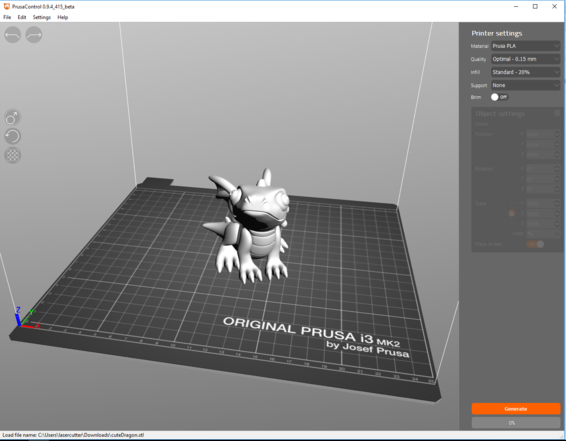
When you open PrusaControl, it looks like this:
At the top, you have your basic toolbar where you can import a file. To do this, click on "File > Import Model File", and you'll be presented with your filesystem to choose whatever model you have ready.
To the right is the settings you'll most likely be working with, such as the material, quality, infill, support, and sizing.
On the Prusa's, we currently only use PLA, so we'll always be keeping the Material option as Prusa PLA.
The quality of the print has to do with the size of each individual layer. The finer the quality, the longer the time is to print your model. Almost always you'll want your print to be Optimal quality (0.15mm), since about all prints turn out good with that setting. Talk to a supervisor if you feel like your print needs more definition.
Next, you'll change the infill. If you don't know how much infill you need, check out the definition of infill above or talk to the supervisor for help. This option will almost always stay at 20% infill.
Now we come to support! Support is extra material printed around your model to support tougher geometric angles that the printer can't get to on its own. It is easily torn off at the end of the print.
The Brim option is for bed adhesion. You will typically want this option, since it helps prevent the warping of the part you are printing. A brim is most important for prints that have a small surface area that is in contact with the plate.
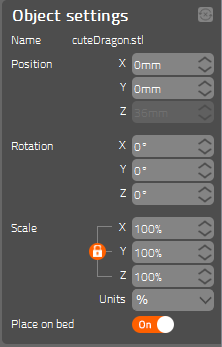
On the right you will see the object settings! If you click on the model you imported, these settings will highlight so you can change them. In the Position settings, you can adjust where on the printer bed you would like your print to start. Due to automatic bed leveling, the center of the printer bed is always the best place to put your model. If you are printing multiple parts, then arrange everything from the center outwards. You can click and drag your model around and see the change in the X and Y coordinates, and if you need it to be super precise, you can use the keyboard to change the values in the Position settings.
For the Rotation settings, you want to make sure that the flattest part of the model is the one that is face down on the printer bed. Prusas don't do well with odd geometry and angles (that's a job for the Formlab 2!), so make sure to keep the flat parts of your print on the printer bed.
Scale is important, it determines how large you want your print to be. If you modeled your print to specific dimensions, PrusaControl will import it with the correct dimensions, and you can skip this section. If it is too large, you can scale the model down to 70%-90% and see how that affects the size, and vice versa, changing the scale to 110%-130% if need be.
Place on bed should always be on.
When all those settings are complete, you can click "Generate" in the bottom right corner, and PrusaControl will give you a time and filament estimate for your print. If they seem reasonable, you can save the newly "sliced" .gcode file to the SD card that will go into the printer! If not, you can always go back and adjust the settings to fit your time and/or filament needs.
Starting A Print
Once you have the gcode file on the SD card, put the SD card into the Prusa (on the left side of the orange menu), and turn the printer on. The printer will read the SD card and initialize itself, then you can start. In the menu, there is an option you want called "Print from SD Card". That will take you to a list of all the .gcode files on the SD card. Search until you find your own, and select it. Make sure there is enough filament on the printer for your print, or it will fail midway!
Naturally, the printer will set itself up for PLA settings, which is approximately 215°C for the extruder, and 60°C for the heated bed. This will take a few minutes. Often filament will start oozing out of the nozzle once it is fully heated, but don't worry, the printer will clean off the filament after calibration. Make sure that there are no filament strings attached to the nozzle as the print is starting.
For smaller prints, you want to make sure to watch the print until it is around 30% completion, which is given on the menu screen as the Prusa is printing. For bigger prints, it takes a longer time to get to 30%, so it is recommended to watch it until 10%-15% completion. If the print contains a lot of support, it is wise not to run it overnight, since lots of support on certain prints can cause failure more easily.
Finishing A Print
When the print completes successfully, the Prusa will delightfully present the print by moving the print bed forward, and the extruder will go back to the homing location. On the menu screen it will display how long the last print took, and the other normal settings like the temperature of the print bed and nozzle. To get the print off of the bed, take the magnetic steel bed off and bend it just slightly to pop the brim of the print off of the bed. From there you can take the print off carefully by hand.
If the print was successful, congratulations! If not, time to diagnose the problem and try again.
Put the magnetic bed back onto the Prusa, and if there are no more prints needing to be done, power it off.
Loading New Filament
When the printer runs out of filament, typically you'll want to find a shop aid to help you change the filament. All you need to do is go to the menu, select the "Unload Filament" option, and the printer should start heating up. Once it heats up, it'll unload the filament and you can pull it out of the extruder.
As for loading new filament, find the option in the menu labelled "Autoload Filament", and the printer will walk you through the instructions for loading the new spool of filament.
Pausing or Stopping a Print
To pause a print in the middle of the job, press the knob and it'll pull up a printing menu. There are two options near the bottom, "Stop Print" and "Pause Print". If the print is failing, you definitely want to stop it. If you need to change filament or think you can save the print before it fails anymore, you can pause the print.
Octoprint
- Prusa 1: http://10.90.12.73/#control
- Prusa 2: http://10.90.12.74/#control
- Prusa 3: http://10.90.12.80/#control
- Gerald: http://10.90.12.94/#control
Common Print Failures
Here are some ways your print can fail in the beginning, and how to troubleshoot it:
- Brim is pulled off of bed and dragged around by the nozzle: If it's just starting the brim of the print and having trouble adhering to the bed, you can pull off the first few rounds of the brim and let the print continue. Sometimes the outer part of the brim has more trouble adhering than the inner parts. If it continues to fail, stop the print. Make sure you have the best orientation possible for your part, make sure the nozzle of the printer is clean, and try starting the print again. If it continues to fail, find a supervisor to help you.
- Parts of the print detach mid-print: Stop the print. Often if parts of the print detach from the model it is due to failure to adhere to support. Ask a supervisor if the geometry of your part is too complex for the Prusas. If not, adjust the sizing, change around some support settings, and try the print again. If it continues to fail, try to break the part into smaller prints and assemble them when done.
- Extruded filament is too thin/not adhering to layers OR Filament will not come out of nozzle: When the filament is too thin or not coming out, there is often a blockage or small piece of filament in the extruder. Ask a supervisor for help.
- Print will not adhere to bed: If your 3D print will not adhere to the bed after lots of tries, the last resort can be some glue stick. For trickier prints with small bases, sometimes this is the trick. Always make sure you try the brim option before using the glue stick on the printer. When the print is finished, clean off the printer bed.
- Support fails: If the support gets really stringy as the print continues and in turn fails the print, see if you can have a supervisor help you change the density of the support. Double check that the printer is not shaking too much as you print your model. If you still don't know what to do after your print fails, ask a supervisor.
- First layer of print warps: If the first layer of your print warps and affects the rest of your print, lower the bed temperature, and start the print again. If it continues to warp, try adding some adhesive on the printer bed.
If your issue is not found here, ask the supervisor for help, or you can research on this website: https://all3dp.com/1/common-3d-printing-problems-troubleshooting-3d-printer-issues/#section-fdm-3d-printing-problems-my-print-failed
Troubleshooting Errors
Failed Calibration:
If the printer fails while calibrating, there will be an error message that suggests you clean the nozzle off and retry the print.
Crash Detected
When the nozzle hits something it's not used to, such as an obstruction in the print, the print bed, or something else that stops the extruder from moving, the printer will error and say it crashed. It will ask you to clean off any excess filament and stuff that gets in the way of the extruder. If it continues to fail because of a crash, ask a supervisor for help.


