Difference between revisions of "Sewing Machine"
| Line 114: | Line 114: | ||
|Lubricate mechanisms | |Lubricate mechanisms | ||
|Semester | |Semester | ||
| − | | | + | |Tech |
|- | |- | ||
|Clean machine interior | |Clean machine interior | ||
| Line 120: | Line 120: | ||
|Tech | |Tech | ||
|- | |- | ||
| − | |Change the | + | |Change the needle |
|As Needed | |As Needed | ||
|Tech | |Tech | ||
|} | |} | ||
Revision as of 10:34, 5 January 2022
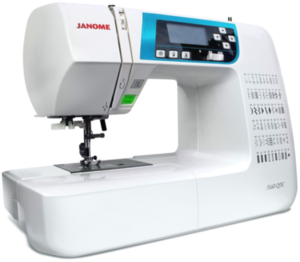
Make: Janome
Model: 3160QDC
Serial Number: 8H2036666 / 8H2036653
Ace: Sara Wytsma (swytsma23@georgefox.edu).
Location: The Hub
Description
There are currently four Janome 3160 QDC sewing machines available for use in the Maker Hub. These machines feature 60 different stitch patterns. It has automatic fabric feeding, one hand needle threader and easy to follow instructions, making it an ideal machine for first time sewers. Some of its more advanced features include buttons for lock stitch, needle up or down and automatic thread cutting. It has a add on platform that can be attached to make sewing larger materials a breeze.
Here is an example of this piece of equipment being used.
Documentation
Terminology
- Spool - Holder used for thread.
- Bobbin - Cylinder or spindle holder in which thread is wound thread that comes from the bottom
- Presser foot - piece of metal that keeps fabric in place when sewing.
Training
All information on these specific machines can be found in the User Manual and on the Product Home Page
How to set up the machine. This video shows a similar set up process to our machines, but be sure to compare to the manual.
A quick video on basic stitching techniques:
YouTube is a great resource for learning new things. If you are new to sewing, try watching a few videos to get a general understanding before jumping into sewing.
Operation
Winding the bobbin
- Once you picked the type/color of thread spool, first get some of it loose and out and secondly place it on the large spool holder (skinny tub). Then, add the spool cap. It's side will depend on the type/ style of thread spool you picked.
- As you follow the guide images, put the thread around the metal knob (upper thread guide). Then slide the thread through one of the holes in the bobbin and place it in the bobbin winder spindle (small metal tube) that its on the right top of the machine. Slide the bobbin winder shaft over to lock it.
- Hold the thread for couple seconds at the beginning as you press the presser foot gently and slow. Once it took off evenly or uniform, you can let go of the thread and go faster with the presser foot
- Cut the thread once you are done and place the bobbin unto the machine. The top drop in bobbin is covered by a plastic cover that you can remove by gently pulling the hook cover release button . Drop the bobbin and wrap the thread around a clip is also under the plastic cover. finally, put the cover on.
Threading the machine
- Grab onto the thread from the thread spool and run the thread through the knob and going down then up, following the image guide around and make sure it is catching all parts. At the end thread the needle.
Demonstration
Demonstrate you can safely setup the sewing machine and sew a mini pillow. You will also need to demonstrate how to wind the bobbin and thread the machine.
General Procedure
- Wind the bobbin and thread the machine
- Pick 2 pieces of fabric and turn them inside out (flip them) because when you sew it you turned it back inside out in order to not see the seams. Line those 2 pieces up.
- Pick an edge that you will not turned inside out and therefore not sew until the end. Start sewing from that right edge going clockwise direction. You can use the basic stitch since you will not see it anyways.
- When you get to the corner, press stop and wait until the machine stops. Make sure the needle is down and put the kickstand up. Rotate the piece and then put the kickstand down again and continue. Do the same thing to do the last side and press stop. Wait until the machine stop and you are done. Cut the ends and pull it inside out
- Put he stuffing inside and fold the insides of the edge that is open and put pins to hold it into place and start sewing the last side.
Safety
There are several hazards you need to be aware of when using a sewing machine.
- Keep your fingers away from moving parts.
- Never place your finger under the needle.
Certification
Troubleshooting
There are many different types of problems you can have while using a sewing machine, but here are a few basic problems.
1. The needle thread breaks: Check the threading of the needle as it may not be threaded properly.
2. The needle breaks: Make sure the needle is installed correctly and is tight. Verify you are using the correct pressure foot.
3. Machine does not run smoothly: Verify the hook race and bobbin holder are free from lint.
Maintenance
General maintenance
Keep the sewing machine clean and free from lint. Make sure to reset the space when you are done sewing.
Specific Maintenance Tasks
| Maintenance Procedure | Frequency | Done By |
|---|---|---|
| Lubricate mechanisms | Semester | Tech |
| Clean machine interior | Monthly | Tech |
| Change the needle | As Needed | Tech |

