Difference between revisions of "Blast Cabinet"
| Line 47: | Line 47: | ||
==Training== | ==Training== | ||
====Operation==== | ====Operation==== | ||
| − | + | Operating the blast cabinet requires you to have a basic understanding of how the machine works. Our machine uses glass beads, but can handle using other media. Many different types of media are used in industry including but not limited to glass, sand, walnut shells, and soda. Sand is one of the more aggressive media materials and works good on heavy rust. When the machine foot pedal is pressed the air passing through the nozzle creates a vacuum and draws the glass beads from the bottom of the machine up into the air stream in the nozzle. It is very important not to step on the pedal when the cabinet door is open. The door prevents media dust from flying out into the room. It's also very important to only point the nozzle away from the glass and gloves. The nozzle will destroy the glass window protector as well as put holes in the gloves if careless. Always make sure that materials are free from heavy grease and dirt before trying to blast them. There is a vacuum system with a filter attached to the side of the cabinet. This system pulls a vacuum on the cabinet and helps filter the dust created. | |
====Demonstration==== | ====Demonstration==== | ||
Revision as of 16:16, 28 May 2020
Make: Skat Blast
Model: SC-40
Ace: Needed (Makerhub@georgefox.edu).
Location: Welding Shop
Description
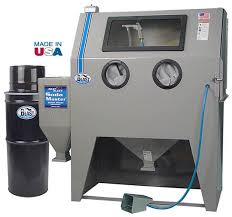
The blast cabinet is very useful for cleaning and prepping materials for painting and welding. The blast cabinet has a working area of 28" x 40" and contains tiny glass bead media in the bottom section. There is a large wire mesh that divides the upper and lower sections of the cabinet. The air passing through the nozzle creates a vacuum and draws the glass beads from the bottom of the machine up into the air stream in the nozzle. The machine requires 80-125 psi shop air. Glass beads are rapidly accelerated into the part you are bead blasting. The beads fall back into the bottom of the cabinet and are recycled through the system. The beads will wear down the material to bare metal. You can also use the cabinet to bead blast acrylic with a stencil to make frosted looking designs. There are many types of media that can be run in a blast cabinet. With the proper media people create designs in stone and wood. We currently are using glass beads which tend to be less aggressive.
Here is an example of this piece of equipment being used.
Documentation
Terminology
Blast Media - The abrasive material used in the blast cabinet.
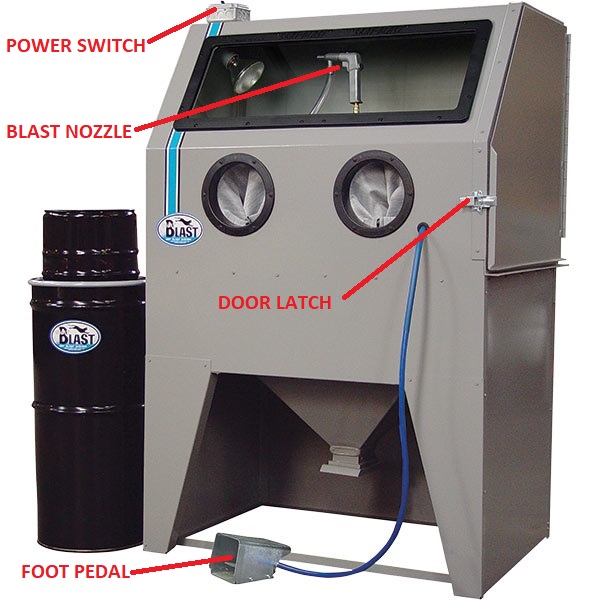
Foot Pedal - This is the foot actuated air switch to turn on/off the flow of air/blast media.
Training
Operation
Operating the blast cabinet requires you to have a basic understanding of how the machine works. Our machine uses glass beads, but can handle using other media. Many different types of media are used in industry including but not limited to glass, sand, walnut shells, and soda. Sand is one of the more aggressive media materials and works good on heavy rust. When the machine foot pedal is pressed the air passing through the nozzle creates a vacuum and draws the glass beads from the bottom of the machine up into the air stream in the nozzle. It is very important not to step on the pedal when the cabinet door is open. The door prevents media dust from flying out into the room. It's also very important to only point the nozzle away from the glass and gloves. The nozzle will destroy the glass window protector as well as put holes in the gloves if careless. Always make sure that materials are free from heavy grease and dirt before trying to blast them. There is a vacuum system with a filter attached to the side of the cabinet. This system pulls a vacuum on the cabinet and helps filter the dust created.
Demonstration
Demonstrate you can safely setup the blast cabinet and use a stencil to produce a design on acrylic. The stencil will protect certain areas of acrylic from the glass beads. The beads causes the acrylic to have a frosted look.
General Procedure
- Tape existing stencil to a piece of acrylic scrap. The stencil will only allow abrasion in the areas desired.
- Open the cabinet door using the door latch.
- Place the stencil/acrylic into sandblast cabinet
- Make sure to secure the door using the latch. If the door is left open it will create a cloud of dust that should not be inhaled.
- Turn on the cabinet light and fan with the power switch located on the top left of the machine.
- Insert your arms into the gloves and position yourself for a clear view into the cabinet.
- You may need to hold the corner of the part down while blasting, manually aim where the stencil doesn't cover the acrylic. Do not point the gun at your gloves or the window.
- Position your foot in the foot pedal mechanism. Once the pedal is depressed sand will blast out of the nozzle.
- Keep the nozzle 3 to 4" away from the acrylic and keep the nozzle moving so it keeps a consistent frost pattern.
- Before removing parts, wait 5-10 mins after turning off the power switch. This allows time for the dust in the cabinet to settle.
- Once you remove parts make sure to close the cabinet door and turn the power switch to the off position.
Safety
- Make sure the cabinet door is closed before stepping on the air activation pedal to prevent a dust cloud.
- Keep the activation pedal clear when loading the cabinet to prevent accidental blasting.
- After you are done using the blaster let the dust in the cabinet settle prior to opening the door.
- Inhaling the dust produced by the cabinet is bad for your lungs.
- Never point the nozzle towards your hand or the window in the cabinet.
Certification
Troubleshooting
If abrasive stops flowing most likely the nozzle is clogged. To unclog a nozzle you will need to press the tip flat against a solid piece of material and quickly cycle the foot pedal. This process should force air down the siphon tube and blow out any clogs. Make sure the cabinet door is closed before attempting this. If this does not resolve the issue you will need to contact the technician.
Maintenance
General maintenance
The plastic window cover needs to be replaced when it gets damaged by the glass beads. If you notice the window is hazy and difficult see through let the technician know.
Specific Maintenance Tasks
| Maintenance Procedure | Frequency | Done By |
|---|---|---|
| Nozzle Change | As Needed | Ace/Tech |


