Difference between revisions of "Heat Press"
| Line 44: | Line 44: | ||
This manual covers the use, calibration, and safety of the heat press - [https://assets.stahls.com/stahls/content/pdf/HeatPressManuals/Hotronix-MAXX-Digital-Clam-Press-Operators-Manual.pdf Operator's Manual]. | This manual covers the use, calibration, and safety of the heat press - [https://assets.stahls.com/stahls/content/pdf/HeatPressManuals/Hotronix-MAXX-Digital-Clam-Press-Operators-Manual.pdf Operator's Manual]. | ||
| − | == | + | == Training == |
| − | === '''Overview''' === | + | ==== '''Overview''' ==== |
Overall, the operation of the heat press is very simple with most of the work occurring when setting the temperature and press time. The temperature of the heat press can be precisely set anywhere between 200°F and 450°F while being regulated within one degree of the set temperature. When applying graphics created by the vinyl printer, it is recommended that temperature be set between 300°F and 325°F (305°F works well) but other temperatures can be experimented with if the graphics are not transferring as desired. The time should be set 15 seconds as this will ensure a proper transfer without overheating the vinyl or the material it is being applied to. If the vinyl begins to peel off when removing the transfer paper then the time can be lengthened past 15 seconds, and inversely the time can be decreased if there is concern about melting the material. After the time at temperature has been set, the material should be placed between the platens and pressed for 2-3 seconds to remove any wrinkles. At this point the graphic can be placed at the desired location on the material and pressed until the timer expires. | Overall, the operation of the heat press is very simple with most of the work occurring when setting the temperature and press time. The temperature of the heat press can be precisely set anywhere between 200°F and 450°F while being regulated within one degree of the set temperature. When applying graphics created by the vinyl printer, it is recommended that temperature be set between 300°F and 325°F (305°F works well) but other temperatures can be experimented with if the graphics are not transferring as desired. The time should be set 15 seconds as this will ensure a proper transfer without overheating the vinyl or the material it is being applied to. If the vinyl begins to peel off when removing the transfer paper then the time can be lengthened past 15 seconds, and inversely the time can be decreased if there is concern about melting the material. After the time at temperature has been set, the material should be placed between the platens and pressed for 2-3 seconds to remove any wrinkles. At this point the graphic can be placed at the desired location on the material and pressed until the timer expires. | ||
| − | === General Use === | + | ==== General Use ==== |
| − | === | + | ==== Demonstration ==== |
| − | == | + | == Certification == |
| − | == | + | == Troubleshooting == |
| − | == | + | == Maintenance == |
| − | === General Maintenance === | + | ==== General Maintenance ==== |
Due to its simplicity and limited number of moving parts this machine requires a minimal amount of maintenance. The little maintenance required consists of wiping down the machine after each use to ensure there is no dust or vinyl transferring left on the machine. To do this, grab a paper towel from either the prototype lab or the sink next to the tool room and wipe over the machine. Pay special attention to the upper platen as it is the surface that transfers heat to the vinyl. For more information on when this should be done and who should do it see the table below. | Due to its simplicity and limited number of moving parts this machine requires a minimal amount of maintenance. The little maintenance required consists of wiping down the machine after each use to ensure there is no dust or vinyl transferring left on the machine. To do this, grab a paper towel from either the prototype lab or the sink next to the tool room and wipe over the machine. Pay special attention to the upper platen as it is the surface that transfers heat to the vinyl. For more information on when this should be done and who should do it see the table below. | ||
| − | === Specific Maintenance Tasks === | + | ==== Specific Maintenance Tasks ==== |
{| class="wikitable" | {| class="wikitable" | ||
!Maintenance Procedure | !Maintenance Procedure | ||
Revision as of 12:40, 30 May 2019
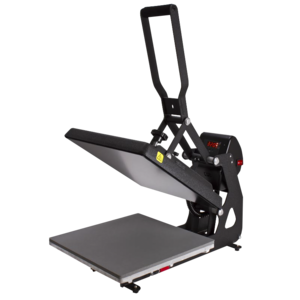
Model: Stahls MAXX Clam Heat Press
Serial Number:
Ace: Needed (Makerhub@georgefox.edu).
Description
The heat press is a machine used to transfer graphics onto items like T-shirts, bags, jerseys and more. Materials that can be transferred include heat transfer vinyl (HTV), screen printed transfers, rhinestones, and more. Within the Hub, the heat press works in conjunction with the vinyl printer and cutter to adhere vinyl to cloth and is commonly used to make custom t-shirts or to add logos to clothing. A brief video about the heat press can be seen here.
Documentation
Terminology
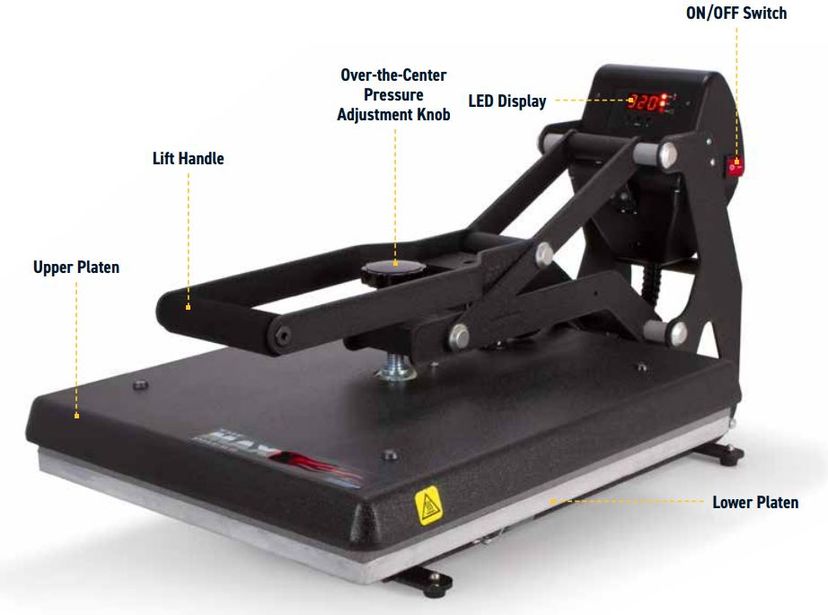
- Platen - The flat plates on the top and bottom of the machine which apply pressure to the material along with heat.
- Pressure Adjustment Knob - The knob located over the center of the upper platen which is used to adjust the pressure applied to the material.
- Lift Handle - The large handle used to raise or lower the upper platen
- Graphic - The design that is being transferred such as a logo printed on heat transfer vinyl.
- Material - The item on which the graphic is transferred. In many cases this is a t-shirt.
- Transfer Paper - The clear material on top of the graphic. This should be left on until after the transfer has occurred.
Manuals
This manual covers the use, calibration, and safety of the heat press - Operator's Manual.
Training
Overview
Overall, the operation of the heat press is very simple with most of the work occurring when setting the temperature and press time. The temperature of the heat press can be precisely set anywhere between 200°F and 450°F while being regulated within one degree of the set temperature. When applying graphics created by the vinyl printer, it is recommended that temperature be set between 300°F and 325°F (305°F works well) but other temperatures can be experimented with if the graphics are not transferring as desired. The time should be set 15 seconds as this will ensure a proper transfer without overheating the vinyl or the material it is being applied to. If the vinyl begins to peel off when removing the transfer paper then the time can be lengthened past 15 seconds, and inversely the time can be decreased if there is concern about melting the material. After the time at temperature has been set, the material should be placed between the platens and pressed for 2-3 seconds to remove any wrinkles. At this point the graphic can be placed at the desired location on the material and pressed until the timer expires.
General Use
Demonstration
Certification
Troubleshooting
Maintenance
General Maintenance
Due to its simplicity and limited number of moving parts this machine requires a minimal amount of maintenance. The little maintenance required consists of wiping down the machine after each use to ensure there is no dust or vinyl transferring left on the machine. To do this, grab a paper towel from either the prototype lab or the sink next to the tool room and wipe over the machine. Pay special attention to the upper platen as it is the surface that transfers heat to the vinyl. For more information on when this should be done and who should do it see the table below.
Specific Maintenance Tasks
| Maintenance Procedure | Frequency | Done By |
|---|---|---|
| Machine wipe down | After each use | The student |

