Difference between revisions of "Heavy Duty Sewing Machine"
| (64 intermediate revisions by 5 users not shown) | |||
| Line 4: | Line 4: | ||
|Is used in domain=Cloth | |Is used in domain=Cloth | ||
|Has name={{PAGENAME}} | |Has name={{PAGENAME}} | ||
| − | |Has icon=File: | + | |Has make=Consew |
| + | |Has model=206RB | ||
| + | |Has serial number= | ||
| + | |Has life expectancy= | ||
| + | |Has year of manufacture or purchase= | ||
| + | |Has replacement cost= | ||
| + | |Has icon=File:Heavy Duty Sewing Machine.png | ||
|Has icondesc= | |Has icondesc= | ||
|Has iconwname= | |Has iconwname= | ||
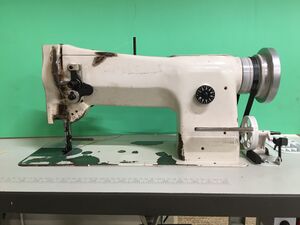
| − | |Has image=File: | + | |Has image=File:Heavy Duty Sewing Machine 2.jpg |
|Has imagedesc= | |Has imagedesc= | ||
|Has description= | |Has description= | ||
|Has certification= | |Has certification= | ||
| − | + | |Has ace=Dan Schutter (text him at 503-317-5614) | |
| − | |||
| − | |Has ace= | ||
}} | }} | ||
| − | [[{{#show: {{FULLPAGENAME}}|?Has icon|link=none}}| | + | [[{{#show: {{FULLPAGENAME}}|?Has icon|link=none}}|140px|left|top|{{#show: {{FULLPAGENAME}}|?Has icondesc}}]] |
[[{{#show: {{FULLPAGENAME}}|?Has image|link=none}}|300px|thumb|upright=1.5|{{#show: {{FULLPAGENAME}}|?Has imagedesc}}]] | [[{{#show: {{FULLPAGENAME}}|?Has image|link=none}}|300px|thumb|upright=1.5|{{#show: {{FULLPAGENAME}}|?Has imagedesc}}]] | ||
| Line 21: | Line 25: | ||
Model: {{#show: {{PAGENAME}} |?Has model}} | Model: {{#show: {{PAGENAME}} |?Has model}} | ||
| + | |||
| + | Serial Number: {{#show: {{PAGENAME}} |?Has serial number}} | ||
Ace: {{#show: {{PAGENAME}} |?Has ace.Has name}} ({{#show: {{PAGENAME}} |?Has ace.Has email address}}). | Ace: {{#show: {{PAGENAME}} |?Has ace.Has name}} ({{#show: {{PAGENAME}} |?Has ace.Has email address}}). | ||
Location: {{#show: {{PAGENAME}} |?Is located in facility}} | Location: {{#show: {{PAGENAME}} |?Is located in facility}} | ||
| + | |||
| + | |||
| + | __TOC__ | ||
| + | |||
| + | ==Safety First== | ||
| + | [[File:Safety First HD2.png|left|150px]] | ||
| + | Here are some safety instructions for the {{PAGENAME}}. Remember... SAFETY FIRST!!! | ||
| + | *'''Sharp Hazard''' – needles are very sharp and can pierce your skin. Turn off the sewing machine when inserting/removing needles to avoid bumping the foot pedal and moving the needle assembly. Never place your fingers directly underneath the needle. | ||
| + | *'''Crush Hazard''' – be aware of all moving parts and keep your fingers away from any pinch points. | ||
| + | *'''Entanglement''' – ensure that loose clothing, long hair, or any other dangling/loose items do not become entangled in the machine. Hair that extends below the collar should be tied up. | ||
| + | *'''Eye Injury''' – needles can break if they hit a solid object while sewing. The broken tip can fly off and become lodged in your eye. Wear safety glasses when using the heavy duty sewing machine. | ||
| + | *While it is improbable that you will use pins with this machine, do not sew over pins. This can break or bend the needle. | ||
| + | *Ensure the needle you are using is undamaged. | ||
| + | *Make sure the needle is installed correctly. | ||
| + | *Be very careful to keep loose clothing and hair away from the pulley. If it grabs a loose sleeve, it could break your hand; if it grabs your hair, it could remove a piece your scalp. No dangling necklaces or earrings either! (Don't make me explain this.) | ||
| + | *For the safety of the machine always remove the bobbin from the machine before using the winding mechanism. Also, do not turn the handwheel manually without being certain to hold the thread tails for bobbin and spool to make certain they do not become entangled in the bobbin case. | ||
==Description== | ==Description== | ||
| − | We | + | These are the things to know in order to succeed on the Consew: |
| + | |||
| + | Become familiar with the contents of the manual located in the top drawer of the storage unit under the serger/sewing machine table. It's full of misspellings and grammatical errors for now, nevertheless, it's helpful. Where it ceases to be helpful is in the description of the clutch motor which our Consew no longer possesses; our Consew has a servo motor. To understand why you should be happy about this, please view the first 5'44" of this video: | ||
| + | |||
| + | {{#evu:https://www.youtube.com/watch?v=lavkvsU5ltk&ab_channel=AlexanderDyer}} | ||
| + | |||
| + | Please refer to the manual to learn the anatomy of the machine. | ||
| + | |||
| + | *Question regarding the thread controller spring, because they’ll need to make that adjustment themselves and should know what it is, where it is, and how to do that. | ||
| + | |||
| + | *Make sure the bobbin case is empty before trying to fill another bobbin. If there is a bobbin left in the bobbin case when winding a new bobbin a thread jam will occur in the bobbin case. Congratulations! You just broke it! | ||
| + | |||
| + | RE: Changing the needle | ||
| + | |||
| + | It’s easy to do, but will you want the students to seek the help of the ace or a tech? | ||
| + | |||
| + | I verified a screwdriver key, such as the ones purchased for the Janomes, will work for loosening the screw holding the needle in place. One has been added to the notions drawer in the worktable for the Consew. | ||
| + | |||
| + | RE: Demo and instructions for it, (These things need to included.) | ||
| + | |||
| + | *Following the safety protocol. | ||
| + | |||
| + | *Threading the machine | ||
| + | |||
| + | *Filling the bobbin, because people are going to need thread to match their project. | ||
| + | |||
| + | *We need a demo project or projects to choose from. Leather or upholstery? | ||
| + | |||
| + | *They should have to prove they can remove and replace the needle. This is where they need to know what the scarf is and which direction it should face. | ||
| + | |||
| + | *Double checking the stitch speed and stitch length, and that they know how to change those settings. | ||
| + | |||
| + | *Adjusting thread controller spring is simple and should be known and demonstrated since its function is dependent on the materials being used. | ||
| + | |||
| + | *In the instruction for the demo students should be encouraged to do test samples before stitching on their actual project. | ||
| + | |||
| + | *I think for the most inexperienced it would be helpful to remind them ‘righty-tight/lefty-loosey re: the tension knob. | ||
| + | |||
| + | *Stitch length dial works differently than the instruction book says; there is no stopper. | ||
| + | |||
| + | *Part of reformatting the uploaded/downloaded instruction manual should be marking which adjustments listed in the contents should only be performed by the tech. (Or maybe those parts of the manual shouldn’t be on the WIKI at all, in order to avoid confusion.) | ||
| + | |||
| + | General remarks: | ||
| + | |||
| + | Do we need a toolkit especially for the Consew? Something like the sewing kits that we have for the Janomes. One that has upholstery sewing needles, etc. . . . We don’t really have any instructions for how to sew with an industrial, not even in the manual. Things like checking for your thread tails to make sure they're behind the work and won't become entangled in the stitching. Or where your hands should be while stitching. Or what landmarks on the machine to use to find and guide your stitch path. Where you should be sitting The end result of following the instructions on the WIKI will be the ability to operate the machine safely, not the ability to succeed at making anything on it. | ||
| + | |||
| + | The Videos: | ||
| + | |||
| + | [https://makernexuswiki.com/wiki/Consew_206RB-4_Walking_Foot_Industrial_Sewing_Machine Sewing Wiki] | ||
| + | This is the wiki for some folks who have a very similar machine. Most of their links look good, but should be viewed before being adopted--just to be sure they're relevant. The text is very good--terms and directions are clear and correct; I'd imitate that as much as possible. | ||
| + | |||
| + | [https://www.superiorthreads.com/education/thread-twist-explained 'S' & 'Z' Twists] | ||
| + | 'S' and 'Z' twists are very clearly explained. On the Consew you must use 'left twisted thread for upper/needle thread, but you can use either right or left twisted thread for lower/bobbin thread.' According to the folks at Superior the terms left and right twist are not correct terminology. They have a video embedded in the article that explains everything. The Consew needs Z-twist for the needle; Z-twist is the same as left twist. It might be nice to have a loupe among our tools, so students can check this before they thread the machine. | ||
| + | |||
| + | Let me know if you'd like me to find any other instructional materials. | ||
| + | |||
Here is an example of this piece of equipment being used. | Here is an example of this piece of equipment being used. | ||
| + | {{#evu:https://www.youtube.com/watch?v=tfckzCBM6AU}} | ||
| − | + | {{#evu:https://www.youtube.com/watch?v=kzwqt66-VUQ}} | |
==Documentation== | ==Documentation== | ||
| Line 38: | Line 116: | ||
====Terminology==== | ====Terminology==== | ||
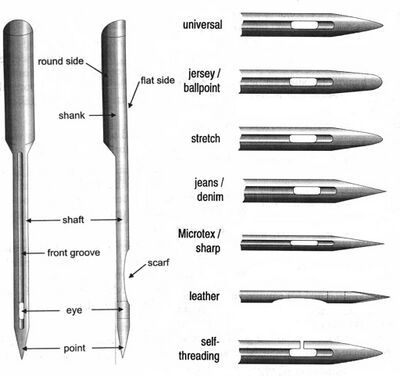
| − | + | [[File:1024px-Sewing-machine-needles-types.jpg|400px|thumb|right|The scarf of the needle is referenced in the "changing the needle" instructions in the user manual.]] | |
| + | |||
| + | * Bobbin: The metal drum that holds the lower thread. | ||
| + | * Foot: | ||
User Manual | User Manual | ||
| Line 45: | Line 126: | ||
====Operation==== | ====Operation==== | ||
| − | + | Make sure the dots on the handwheel and frame are aligned before removing or inserting a bobbin. | |
| + | |||
| + | |||
| + | You will need to know how to replace a broken or damaged needle. The needle must be seated with the scarf to the right. You can be certain the needle is fully seated when you cannot push it up any further in the needle bar. See this article regarding a needle's structure: https://en.wikipedia.org/wiki/Sewing_machine_needle | ||
| + | |||
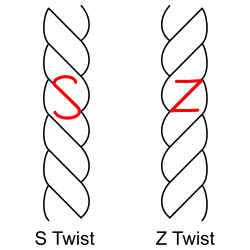
| + | [[File:S-and-z-twist-figure.png|250px|thumb|right|The difference between S-twist and Z-twist thread.]] | ||
| + | |||
| + | On the Consew you must use z- or left twist thread for upper/needle thread, but you can use either s-/right or z-/left twisted thread for lower/bobbin thread. If you use the wrong thread in the needle it will unravel, and the machine will jam. To learn more about this, see [https://www.servicethread.com/blog/left-twist-vs.-right-twist-industrial-sewing-thread-differences-and-applications this explanation]. | ||
====Demonstration==== | ====Demonstration==== | ||
| − | + | RE: Safety protocol | |
| − | + | *Eye protection | |
| − | + | *Removing and replacing the needle. Needs to be part of the training/demo. | |
| − | |||
| − | |||
| − | |||
==Certification== | ==Certification== | ||
| + | Complete <strong>The Hub - {{PAGENAME}} Module</strong> at the link below to gain access to the {{PAGENAME}}. The Maker Hub Canvas course pertains to all facilities and equipment contained in the Maker Hub; simply complete the quizzes for the facilities/equipment you wish to use in the Maker Hub. Please email <span style="color:blue">makerhub@georgefox.edu</span> if you have any questions. | ||
| − | + | [https://georgefox.instructure.com/enroll/R6RF69 Maker Hub Canvas Course] | |
==Troubleshooting== | ==Troubleshooting== | ||
| + | |||
| + | Every time you change the needle make sure it is still aligned over the needle hole by turning the flywheel one complete rotation toward you. If the needle does not pass cleanly through the needle hole, tell Justin. Do not sew! | ||
| + | |||
| + | If the machine is skipping stitches it needs a timing adjustment; don’t sew—tell Justin. | ||
| + | |||
| + | Irregular stitch length or overheating; don’t sew—tell Justin. | ||
==Maintenance== | ==Maintenance== | ||
====General maintenance==== | ====General maintenance==== | ||
| − | + | *Clean lint, thread, and debris from feed dogs, bobbin area, and under needle plate after each use. | |
| + | *Oil moving parts according to the manual - use sewing machine oil only and avoid over-oiling. | ||
| + | *Check belt tension and condition - replace if frayed, cracked, or slipping. | ||
| + | *Inspect needle for bending, dullness, or burrs - replace regularly to maintain stitch quality. | ||
| + | *Keep tension discs clean and free of lint or residue. | ||
| + | *Verify presser foot pressure and feed timing periodically - adjust as needed for consistent fabric feeding. | ||
| + | *Tighten screws, nuts, and bolts to prevent vibration-related loosening. | ||
====Specific Maintenance Tasks==== | ====Specific Maintenance Tasks==== | ||
| Line 75: | Line 173: | ||
!Done By | !Done By | ||
|- | |- | ||
| − | | | + | |Oil Machine Locations |
| − | | | + | |As Needed |
| − | | | + | |Tech |
|} | |} | ||
Latest revision as of 11:22, 15 August 2025
Make: Consew
Model: 206RB
Serial Number:
Ace: Dan Schutter (text him at 503-317-5614) ().
Location: The Hub
Safety First
Here are some safety instructions for the Heavy Duty Sewing Machine. Remember... SAFETY FIRST!!!
- Sharp Hazard – needles are very sharp and can pierce your skin. Turn off the sewing machine when inserting/removing needles to avoid bumping the foot pedal and moving the needle assembly. Never place your fingers directly underneath the needle.
- Crush Hazard – be aware of all moving parts and keep your fingers away from any pinch points.
- Entanglement – ensure that loose clothing, long hair, or any other dangling/loose items do not become entangled in the machine. Hair that extends below the collar should be tied up.
- Eye Injury – needles can break if they hit a solid object while sewing. The broken tip can fly off and become lodged in your eye. Wear safety glasses when using the heavy duty sewing machine.
- While it is improbable that you will use pins with this machine, do not sew over pins. This can break or bend the needle.
- Ensure the needle you are using is undamaged.
- Make sure the needle is installed correctly.
- Be very careful to keep loose clothing and hair away from the pulley. If it grabs a loose sleeve, it could break your hand; if it grabs your hair, it could remove a piece your scalp. No dangling necklaces or earrings either! (Don't make me explain this.)
- For the safety of the machine always remove the bobbin from the machine before using the winding mechanism. Also, do not turn the handwheel manually without being certain to hold the thread tails for bobbin and spool to make certain they do not become entangled in the bobbin case.
Description
These are the things to know in order to succeed on the Consew:
Become familiar with the contents of the manual located in the top drawer of the storage unit under the serger/sewing machine table. It's full of misspellings and grammatical errors for now, nevertheless, it's helpful. Where it ceases to be helpful is in the description of the clutch motor which our Consew no longer possesses; our Consew has a servo motor. To understand why you should be happy about this, please view the first 5'44" of this video:
Please refer to the manual to learn the anatomy of the machine.
- Question regarding the thread controller spring, because they’ll need to make that adjustment themselves and should know what it is, where it is, and how to do that.
- Make sure the bobbin case is empty before trying to fill another bobbin. If there is a bobbin left in the bobbin case when winding a new bobbin a thread jam will occur in the bobbin case. Congratulations! You just broke it!
RE: Changing the needle
It’s easy to do, but will you want the students to seek the help of the ace or a tech?
I verified a screwdriver key, such as the ones purchased for the Janomes, will work for loosening the screw holding the needle in place. One has been added to the notions drawer in the worktable for the Consew.
RE: Demo and instructions for it, (These things need to included.)
- Following the safety protocol.
- Threading the machine
- Filling the bobbin, because people are going to need thread to match their project.
- We need a demo project or projects to choose from. Leather or upholstery?
- They should have to prove they can remove and replace the needle. This is where they need to know what the scarf is and which direction it should face.
- Double checking the stitch speed and stitch length, and that they know how to change those settings.
- Adjusting thread controller spring is simple and should be known and demonstrated since its function is dependent on the materials being used.
- In the instruction for the demo students should be encouraged to do test samples before stitching on their actual project.
- I think for the most inexperienced it would be helpful to remind them ‘righty-tight/lefty-loosey re: the tension knob.
- Stitch length dial works differently than the instruction book says; there is no stopper.
- Part of reformatting the uploaded/downloaded instruction manual should be marking which adjustments listed in the contents should only be performed by the tech. (Or maybe those parts of the manual shouldn’t be on the WIKI at all, in order to avoid confusion.)
General remarks:
Do we need a toolkit especially for the Consew? Something like the sewing kits that we have for the Janomes. One that has upholstery sewing needles, etc. . . . We don’t really have any instructions for how to sew with an industrial, not even in the manual. Things like checking for your thread tails to make sure they're behind the work and won't become entangled in the stitching. Or where your hands should be while stitching. Or what landmarks on the machine to use to find and guide your stitch path. Where you should be sitting The end result of following the instructions on the WIKI will be the ability to operate the machine safely, not the ability to succeed at making anything on it.
The Videos:
Sewing Wiki This is the wiki for some folks who have a very similar machine. Most of their links look good, but should be viewed before being adopted--just to be sure they're relevant. The text is very good--terms and directions are clear and correct; I'd imitate that as much as possible.
'S' & 'Z' Twists 'S' and 'Z' twists are very clearly explained. On the Consew you must use 'left twisted thread for upper/needle thread, but you can use either right or left twisted thread for lower/bobbin thread.' According to the folks at Superior the terms left and right twist are not correct terminology. They have a video embedded in the article that explains everything. The Consew needs Z-twist for the needle; Z-twist is the same as left twist. It might be nice to have a loupe among our tools, so students can check this before they thread the machine.
Let me know if you'd like me to find any other instructional materials.
Here is an example of this piece of equipment being used.
Documentation
Terminology
- Bobbin: The metal drum that holds the lower thread.
- Foot:
User Manual
Training
Operation
Make sure the dots on the handwheel and frame are aligned before removing or inserting a bobbin.
You will need to know how to replace a broken or damaged needle. The needle must be seated with the scarf to the right. You can be certain the needle is fully seated when you cannot push it up any further in the needle bar. See this article regarding a needle's structure: https://en.wikipedia.org/wiki/Sewing_machine_needle
On the Consew you must use z- or left twist thread for upper/needle thread, but you can use either s-/right or z-/left twisted thread for lower/bobbin thread. If you use the wrong thread in the needle it will unravel, and the machine will jam. To learn more about this, see this explanation.
Demonstration
RE: Safety protocol
- Eye protection
- Removing and replacing the needle. Needs to be part of the training/demo.
Certification
Complete The Hub - Heavy Duty Sewing Machine Module at the link below to gain access to the Heavy Duty Sewing Machine. The Maker Hub Canvas course pertains to all facilities and equipment contained in the Maker Hub; simply complete the quizzes for the facilities/equipment you wish to use in the Maker Hub. Please email makerhub@georgefox.edu if you have any questions.
Troubleshooting
Every time you change the needle make sure it is still aligned over the needle hole by turning the flywheel one complete rotation toward you. If the needle does not pass cleanly through the needle hole, tell Justin. Do not sew!
If the machine is skipping stitches it needs a timing adjustment; don’t sew—tell Justin.
Irregular stitch length or overheating; don’t sew—tell Justin.
Maintenance
General maintenance
- Clean lint, thread, and debris from feed dogs, bobbin area, and under needle plate after each use.
- Oil moving parts according to the manual - use sewing machine oil only and avoid over-oiling.
- Check belt tension and condition - replace if frayed, cracked, or slipping.
- Inspect needle for bending, dullness, or burrs - replace regularly to maintain stitch quality.
- Keep tension discs clean and free of lint or residue.
- Verify presser foot pressure and feed timing periodically - adjust as needed for consistent fabric feeding.
- Tighten screws, nuts, and bolts to prevent vibration-related loosening.
Specific Maintenance Tasks
| Maintenance Procedure | Frequency | Done By |
|---|---|---|
| Oil Machine Locations | As Needed | Tech |
