Difference between revisions of "Bending Brake"
| (52 intermediate revisions by 9 users not shown) | |||
| Line 2: | Line 2: | ||
|Is equipment=True | |Is equipment=True | ||
|Is sheet metal equipment=True | |Is sheet metal equipment=True | ||
| − | |||
| − | |||
|Is located in facility= Machine Shop | |Is located in facility= Machine Shop | ||
|Is used in domain=Metal | |Is used in domain=Metal | ||
|Has name={{PAGENAME}} | |Has name={{PAGENAME}} | ||
| + | |Has make=Chicago Steel | ||
| + | |Has model=W31 | ||
| + | |Has serial number= 91016 | ||
| + | |Has life expectancy= | ||
| + | |Has year of manufacture or purchase= | ||
| + | |Has replacement cost= | ||
|Has function=Steel Bending Brake | |Has function=Steel Bending Brake | ||
|Has url=http://www.tennsmith.com/foot-squaring-shears.html | |Has url=http://www.tennsmith.com/foot-squaring-shears.html | ||
|Has icon=File:Bending_brakeIcon.png | |Has icon=File:Bending_brakeIcon.png | ||
| − | |Has icondesc= | + | |Has icondesc= |
| − | |Has image=File:48_Inch_Bending_Brake.jpg | + | |Has certification=https://georgefox.instructure.com/courses/1310 |
| + | |Has image=File: 48_Inch_Bending_Brake.jpg | ||
|Has imagedesc=48 inch bending brake, 14 gauge | |Has imagedesc=48 inch bending brake, 14 gauge | ||
|Has description=48 inch bending brake, 14 gauge | |Has description=48 inch bending brake, 14 gauge | ||
| − | |Has ace= | + | |Has ace=Needed;Makerhub@georgefox.edu |
}} | }} | ||
| − | [[{{#show: {{FULLPAGENAME}}|?Has icon|link=none}}| | + | [[{{#show: {{FULLPAGENAME}}|?Has icon|link=none}}|140px|left|top|{{#show: {{FULLPAGENAME}}|?Has icondesc}}]] |
[[{{#show: {{FULLPAGENAME}}|?Has image|link=none}}|300px|thumb|upright=1.5|{{#show: {{FULLPAGENAME}}|?Has imagedesc}}]] | [[{{#show: {{FULLPAGENAME}}|?Has image|link=none}}|300px|thumb|upright=1.5|{{#show: {{FULLPAGENAME}}|?Has imagedesc}}]] | ||
| − | |||
| − | + | Make: {{#show: {{PAGENAME}} |?Has make}} | |
| + | |||
| + | Model: {{#show: {{PAGENAME}} |?Has model}} | ||
| + | |||
| + | Serial Number: {{#show: {{PAGENAME}} |?Has serial number}} | ||
| + | |||
| + | Ace: {{#show: {{PAGENAME}} |?Has ace.Has name}} ({{#show: {{PAGENAME}} |?Has ace.Has email address}}). | ||
| + | |||
| + | Location: {{#show: {{PAGENAME}} |?Is located in facility}} | ||
| + | |||
| + | |||
__TOC__ | __TOC__ | ||
| − | == | + | ==Safety First== |
| + | [[File:Safety First HD2.png|left|150px]] | ||
| + | Here are some safety instructions for the {{PAGENAME}}. Remember... SAFETY FIRST!!! | ||
| + | * Always make sure your hands are out of the way of the fingers and all moving parts | ||
| + | * Be aware of your surroundings to ensure that you do not bump others with the counterweight. | ||
| + | * If bending a small piece of metal, place it in the center of the brake. | ||
| + | * Do not attempt to bend material thicker than 16 gauge. | ||
| + | * Only use sheet metal with the brake. Don't try to bend round material! | ||
| + | * You may not use the sheet metal machines without safety glasses!! (Should be obvious if you are following the rules of the shop) | ||
| + | |||
| + | ==Description== | ||
| + | |||
| + | A bending brake is a metalworking machine that allows the bending of sheet metal. The brake is a Chicago W31 steel box and pan brake. The max material thickness capacity of this machine is 16 gauge mild steel. In a box-and-pan brake (also known as a finger brake), the clamping bar includes several removable blocks, which may be removed and rearranged to permit bending of restricted areas of a piece of sheet metal or of already partially formed pieces. After bending, a box or pan form is then completed by screw, solder, weld, rivet, or other metal fixing process. | ||
| + | |||
| + | Here is an example of this piece of equipment being used. | ||
* [http://www.americanmachinetools.com/how_to_use_a_hand_brake.htm How to Use a Hand Brake] | * [http://www.americanmachinetools.com/how_to_use_a_hand_brake.htm How to Use a Hand Brake] | ||
* [https://www.youtube.com/watch?v=prZtjSlyLFo Box and Pan Brake Video] | * [https://www.youtube.com/watch?v=prZtjSlyLFo Box and Pan Brake Video] | ||
| + | ==Documentation== | ||
| + | |||
| + | [[Media:Chicago-hand-operated-bending-brakes-brochure.pdf|Bending Brake User Manual]] | ||
| + | |||
| + | ====Terminology==== | ||
| + | *Bending Handle - Lever attached to the bending leaf; pivots to bend the sheet metal to the desired angle. | ||
| + | *Clamping Handle - Lever that raises, lowers, and locks the clamping bar to hold the sheet metal in place. | ||
| + | |||
| + | ====Parts of the Machine==== | ||
| + | [[File:Bending Brake Parts 1.jpg|600px|thumb|Clamping Handle and Fingers|none]] | ||
| + | [[File:Bending Brake Parts 2.jpg|600px|thumb|Bending Handle and Counterweight|none]] | ||
| + | |||
| + | ==Training== | ||
| + | ====Operation==== | ||
| + | |||
| + | The bending brake is designed for forming straight bends in sheet metal by clamping the workpiece between a stationary bed and a pivoting bending leaf. To operate, position the sheet metal against the bed, align the bend line with the edge of the clamping bar, and secure it using the clamping handle. Apply steady, even force to the bending handle to lift the bending leaf until the desired bend angle is reached. For consistent results, ensure the material is properly seated, the clamping pressure is adequate to prevent slippage, and the bending motion is smooth. | ||
| − | == | + | ====Demonstration==== |
| − | === | + | |
| − | #Ensure that your sheet metal is thinner or equivalent to | + | To demonstrate competency on the Bending brake you will be required to bend a piece of sheet metal to a 90 degree angle. |
| + | |||
| + | ====General Procedure==== | ||
| + | |||
| + | *Bending Steps | ||
| + | #Ensure that your sheet metal is thinner or equivalent to 16-gauge sheet metal, and ensure that it is less than 48" in width. | ||
#If making a bend for a box or a pan, adjust the fingers so that the equivalent width of the fingers is just shorter than your sheet metal. | #If making a bend for a box or a pan, adjust the fingers so that the equivalent width of the fingers is just shorter than your sheet metal. | ||
#Adjust the clamping force and the clamping handle to allow room to insert your work piece. | #Adjust the clamping force and the clamping handle to allow room to insert your work piece. | ||
#Insert your work piece to the line you want to bend, centered in the brake, and clamp your piece securely. | #Insert your work piece to the line you want to bend, centered in the brake, and clamp your piece securely. | ||
#Pull up on the bending handle of the leaf slowly until your piece is bent to the desired angle, and slowly lower the leaf. | #Pull up on the bending handle of the leaf slowly until your piece is bent to the desired angle, and slowly lower the leaf. | ||
| − | #If the piece does not bend straight, unclamp the handle on the | + | #If the piece does not bend straight, unclamp the handle on the over-bent side and adjust the top leaf. |
#Adjust the clamp handle, and remove your piece. | #Adjust the clamp handle, and remove your piece. | ||
#Put back any fingers if adjusted, and deburr if any rough edges are left. | #Put back any fingers if adjusted, and deburr if any rough edges are left. | ||
| − | == | + | ==Reset the Space== |
| − | + | [[File:Reset The Space HD2.png|left|150px]] | |
| − | === | + | Here is how you can reset the space for the {{PAGENAME}}. Remember to leave the space better than you found it!!! |
| − | + | * If you removed or adjusted any fingers, put them back where they belong. | |
| − | + | * Reset all materials, scrap pieces go in the scrap bin. | |
| − | + | * Ensure that the Brake and surrounding area are clean. | |
| − | + | * Return any borrowed gloves or other equipment to their proper storage locations. | |
| − | === | + | |
| − | == | + | |
| − | + | ==Certification== | |
| − | + | Complete the <strong>Machine Shop - {{PAGENAME}} Module</strong> at the link below to gain access to the {{PAGENAME}}. The Maker Hub Canvas course pertains to all facilities and equipment contained in the Maker Hub; simply complete the quizzes for the facilities/equipment you wish to use in the Maker Hub. Please email <span style="color:blue">makerhub@georgefox.edu</span> if you have any questions. | |
| + | |||
| + | [https://georgefox.instructure.com/enroll/R6RF69 Maker Hub Canvas Course] | ||
| + | |||
| + | ==Troubleshooting== | ||
| + | *Uneven bend along length - Check that the workpiece is seated evenly and the clamping bar is parallel to the bed. Adjust clamping pressure if needed. | ||
| + | *Material slipping during bend - Increase clamping pressure and ensure the clamping surfaces are clean and free of oil or debris. | ||
| + | *Bend angle inconsistent - Verify that the bending leaf pivots smoothly without binding; lubricate pivot points as required. | ||
| + | *Difficulty moving bending handle - Inspect for mechanical obstructions, dry pivot joints, or exceeding the brake’s rated capacity. | ||
| + | *Material cracking at bend - Use material within thickness limits and consider increasing bend radius for brittle metals. | ||
| + | |||
| + | ==Maintenance== | ||
| + | ====General maintenance==== | ||
| + | |||
| + | The machine needs to be cleaned and pivot points should be lubricated. | ||
| + | |||
| + | ====Specific Maintenance Tasks==== | ||
| + | {| class="wikitable" | ||
| + | !Maintenance Procedure | ||
| + | !Frequency | ||
| + | !Done By | ||
| + | |- | ||
| + | |Oil Surfaces | ||
| + | |As Needed | ||
| + | |Technician | ||
| + | |} | ||
Latest revision as of 10:47, 13 August 2025
Make: Chicago Steel
Model: W31
Serial Number: 91016
Ace: Needed (Makerhub@georgefox.edu).
Location: Machine Shop
Safety First
Here are some safety instructions for the Bending Brake. Remember... SAFETY FIRST!!!
- Always make sure your hands are out of the way of the fingers and all moving parts
- Be aware of your surroundings to ensure that you do not bump others with the counterweight.
- If bending a small piece of metal, place it in the center of the brake.
- Do not attempt to bend material thicker than 16 gauge.
- Only use sheet metal with the brake. Don't try to bend round material!
- You may not use the sheet metal machines without safety glasses!! (Should be obvious if you are following the rules of the shop)
Description
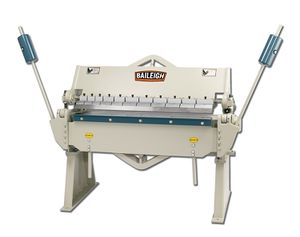
A bending brake is a metalworking machine that allows the bending of sheet metal. The brake is a Chicago W31 steel box and pan brake. The max material thickness capacity of this machine is 16 gauge mild steel. In a box-and-pan brake (also known as a finger brake), the clamping bar includes several removable blocks, which may be removed and rearranged to permit bending of restricted areas of a piece of sheet metal or of already partially formed pieces. After bending, a box or pan form is then completed by screw, solder, weld, rivet, or other metal fixing process.
Here is an example of this piece of equipment being used.
Documentation
Terminology
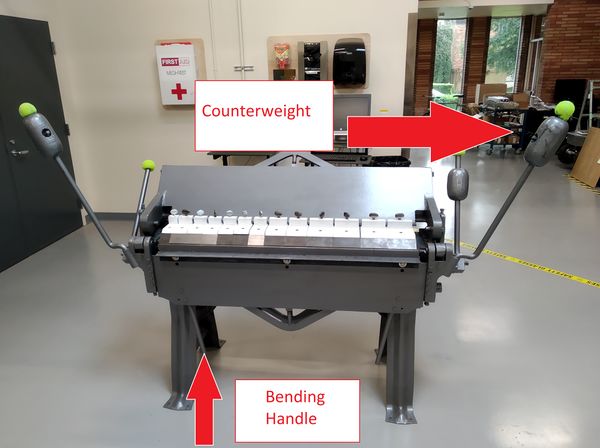
- Bending Handle - Lever attached to the bending leaf; pivots to bend the sheet metal to the desired angle.
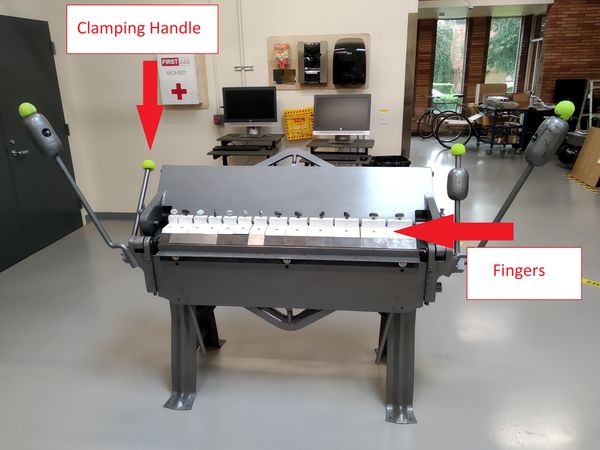
- Clamping Handle - Lever that raises, lowers, and locks the clamping bar to hold the sheet metal in place.
Parts of the Machine
Training
Operation
The bending brake is designed for forming straight bends in sheet metal by clamping the workpiece between a stationary bed and a pivoting bending leaf. To operate, position the sheet metal against the bed, align the bend line with the edge of the clamping bar, and secure it using the clamping handle. Apply steady, even force to the bending handle to lift the bending leaf until the desired bend angle is reached. For consistent results, ensure the material is properly seated, the clamping pressure is adequate to prevent slippage, and the bending motion is smooth.
Demonstration
To demonstrate competency on the Bending brake you will be required to bend a piece of sheet metal to a 90 degree angle.
General Procedure
- Bending Steps
- Ensure that your sheet metal is thinner or equivalent to 16-gauge sheet metal, and ensure that it is less than 48" in width.
- If making a bend for a box or a pan, adjust the fingers so that the equivalent width of the fingers is just shorter than your sheet metal.
- Adjust the clamping force and the clamping handle to allow room to insert your work piece.
- Insert your work piece to the line you want to bend, centered in the brake, and clamp your piece securely.
- Pull up on the bending handle of the leaf slowly until your piece is bent to the desired angle, and slowly lower the leaf.
- If the piece does not bend straight, unclamp the handle on the over-bent side and adjust the top leaf.
- Adjust the clamp handle, and remove your piece.
- Put back any fingers if adjusted, and deburr if any rough edges are left.
Reset the Space
Here is how you can reset the space for the Bending Brake. Remember to leave the space better than you found it!!!
- If you removed or adjusted any fingers, put them back where they belong.
- Reset all materials, scrap pieces go in the scrap bin.
- Ensure that the Brake and surrounding area are clean.
- Return any borrowed gloves or other equipment to their proper storage locations.
Certification
Complete the Machine Shop - Bending Brake Module at the link below to gain access to the Bending Brake. The Maker Hub Canvas course pertains to all facilities and equipment contained in the Maker Hub; simply complete the quizzes for the facilities/equipment you wish to use in the Maker Hub. Please email makerhub@georgefox.edu if you have any questions.
Troubleshooting
- Uneven bend along length - Check that the workpiece is seated evenly and the clamping bar is parallel to the bed. Adjust clamping pressure if needed.
- Material slipping during bend - Increase clamping pressure and ensure the clamping surfaces are clean and free of oil or debris.
- Bend angle inconsistent - Verify that the bending leaf pivots smoothly without binding; lubricate pivot points as required.
- Difficulty moving bending handle - Inspect for mechanical obstructions, dry pivot joints, or exceeding the brake’s rated capacity.
- Material cracking at bend - Use material within thickness limits and consider increasing bend radius for brittle metals.
Maintenance
General maintenance
The machine needs to be cleaned and pivot points should be lubricated.
Specific Maintenance Tasks
| Maintenance Procedure | Frequency | Done By |
|---|---|---|
| Oil Surfaces | As Needed | Technician |


