Difference between revisions of "Serger"
| (One intermediate revision by the same user not shown) | |||
| Line 86: | Line 86: | ||
==Certification== | ==Certification== | ||
| + | Complete <strong>The Hub - {{PAGENAME}} Module</strong> at the link below to gain access to the {{PAGENAME}}. The Maker Hub Canvas course pertains to all facilities and equipment contained in the Maker Hub; simply complete the quizzes for the facilities/equipment you wish to use in the Maker Hub. Please email <span style="color:blue">makerhub@georgefox.edu</span> if you have any questions. | ||
| − | [https://georgefox.instructure.com/ | + | [https://georgefox.instructure.com/enroll/GH36RT Maker Hub Canvas Course] |
==Troubleshooting== | ==Troubleshooting== | ||
Latest revision as of 15:07, 22 August 2024
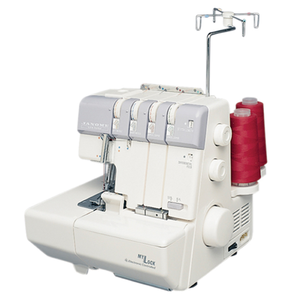
Make: Janome
Model: MyLock 634D
Serial Number: 6E1013527
Ace: Gail Dowler (gdowler@georgefox.edu).
Location: The Hub
Safety First
Here are some safety instructions for the Serger. Remember... SAFETY FIRST!!!
- Sharp Hazard – needles are very sharp and can pierce your skin. Turn off the serger when inserting/removing needles to avoid bumping the foot pedal and moving the needle assembly. Never place your fingers directly underneath the needle.
- Crush Hazard – be aware of all moving parts and keep your fingers away from any pinch points.
- Entanglement – ensure that loose clothing, long hair, or any other dangling/loose items do not become entangled in the machine. Hair that extends below the collar should be tied up.
- Eye Injury – needles can break if they hit a solid object while sewing. The broken tip can fly off and become lodged in your eye. Wear safety glasses when using the serger.
- Do not sew over pins. This can break or bend the needle.
- Always use the proper needle plate. The wrong plate can cause the needle to break.
- Do not push or pull fabric while stitching. It may deflect the needle causing it to break.
- Ensure the needle you are using is undamaged.
- Make sure the needle is installed correctly.
- Verify that you are using the correct presser foot. When changing out the presser foot, manually check that the needle’s travel will clear the foot before using the foot pedal.
- Do not run thick fabrics or many layers of fabric through the serger. Use the industrial sewing machine for these applications.
- When you finish using the serger, disconnect the power cable from both the machine and the wall outlet/power strip. Coil the power cable neatly on the table.
Description
Sergers preform a type of stitch known as overlock stitching. An overlock stitch is a type of stitching that overcasts the edge of one or more pieces of fabric. Sergers also have the ability to trim the excess seam allowance as it is fed through the machine. This type of stitching is useful for edging, hemming, and seaming. This process will create a clean edge of your fabric that will not fray.
The Janome MyLock 634D features 2 needles and a choice of 2, 3, or 4 thread overlocking stitching. The color-coded thread guiding makes threading simple and easy to follow. The MyLock 634D allows the user to easily switch from overlock stitching to rolled hemming without needing to change to needle plate. Some of the key features of the MyLock 634D are a tension release lever, easily accessible lower looper guides, changeable thread guide, easily retractable upper knife, adjustable foot pressure, and more.
Documentation
Terminology
- Needle -
- Spool -
Training
Operation
All information on this specific machine can be found in the User Manual
A simple intro to serging:
Demonstration
Demonstrate you can safely setup the serger. You will then proceed to edge a piece of scrap material.
General Procedure
Insert general procedure here.
Certification
Complete The Hub - Serger Module at the link below to gain access to the Serger. The Maker Hub Canvas course pertains to all facilities and equipment contained in the Maker Hub; simply complete the quizzes for the facilities/equipment you wish to use in the Maker Hub. Please email makerhub@georgefox.edu if you have any questions.
Troubleshooting
You may look in the user manual for troubleshooting instructions. But, if you are not confident in what you are doing, ask a supervisor for assistance.
Maintenance
General maintenance
Open the covers and use a lint brush to clean out the lint. Do not try to blow the lint away; you will drive it deeper into the machine.
Specific Maintenance Tasks
| Maintenance Procedure | Frequency | Done By |
|---|---|---|
| Lubricate mechanisms | As Needed | Technician |
| Clean machine | When Done | User |
| Change the needle | As Needed | User |
