Difference between revisions of "Ring Roller"
| (8 intermediate revisions by 3 users not shown) | |||
| Line 5: | Line 5: | ||
|Is used in domain=Metal | |Is used in domain=Metal | ||
|Has name={{PAGENAME}} | |Has name={{PAGENAME}} | ||
| − | |Has make=Baileigh | + | |Has make=Baileigh Industrial |
|Has model=R-M5 | |Has model=R-M5 | ||
| + | |Has serial number=US14464115 | ||
|Has function=Ring Roller | |Has function=Ring Roller | ||
|Has icon=File: Ring_rollerIcon.png | |Has icon=File: Ring_rollerIcon.png | ||
| Line 13: | Line 14: | ||
|Has imagedesc=Baileigh Ring Roller | |Has imagedesc=Baileigh Ring Roller | ||
|Has description=Baileigh Ring Roller | |Has description=Baileigh Ring Roller | ||
| − | |Has ace= | + | |Has ace=Needed; makerhub@georgefox.edu |
| + | |Has certification=https://georgefox.instructure.com/courses/1319 | ||
}} | }} | ||
| − | [[{{#show: {{FULLPAGENAME}}|?Has icon|link=none}}| | + | [[{{#show: {{FULLPAGENAME}}|?Has icon|link=none}}|140px|left|top|{{#show: {{FULLPAGENAME}}|?Has icondesc}}]] |
[[{{#show: {{FULLPAGENAME}}|?Has image|link=none}}|275px|thumb|upright=1.0|{{#show: {{FULLPAGENAME}}|?Has imagedesc}}]] | [[{{#show: {{FULLPAGENAME}}|?Has image|link=none}}|275px|thumb|upright=1.0|{{#show: {{FULLPAGENAME}}|?Has imagedesc}}]] | ||
| Line 21: | Line 23: | ||
Model: {{#show: {{PAGENAME}} |?Has model}} | Model: {{#show: {{PAGENAME}} |?Has model}} | ||
| + | |||
| + | Serial Number: {{#show: {{PAGENAME}} |?Has serial number}} | ||
Ace: {{#show: {{PAGENAME}} |?Has ace.Has name}} ({{#show: {{PAGENAME}} |?Has ace.Has email address}}). | Ace: {{#show: {{PAGENAME}} |?Has ace.Has name}} ({{#show: {{PAGENAME}} |?Has ace.Has email address}}). | ||
Location: {{#show: {{PAGENAME}} |?Is located in facility}} | Location: {{#show: {{PAGENAME}} |?Is located in facility}} | ||
| + | |||
==Description== | ==Description== | ||
| Line 40: | Line 45: | ||
*Dies - Round pieces of steel used to guide the material as its shaped. | *Dies - Round pieces of steel used to guide the material as its shaped. | ||
| − | + | [[Media:R-M5_07-2019.pdf|Ring Roller User Manual]] | |
==Training== | ==Training== | ||
| − | ==== | + | ====Operation==== |
Insert Text | Insert Text | ||
| Line 49: | Line 54: | ||
====Demonstration==== | ====Demonstration==== | ||
| − | + | Demonstrate you can safely setup the Ring Roller. You will then proceed to cut a 5" long piece of 1/4" steel rod. Roll this material into the smallest radius possible. When rolling the material remember to keep your fingers away from the rollers to keep from smashing your fingers. | |
| − | |||
====General Procedure==== | ====General Procedure==== | ||
| Line 66: | Line 70: | ||
==Certification== | ==Certification== | ||
| − | + | [ https://georgefox.instructure.com/courses/1319 Canvas Quiz] | |
==Troubleshooting== | ==Troubleshooting== | ||
Revision as of 16:04, 11 February 2022
Make: Baileigh Industrial
Model: R-M5
Serial Number: US14464115
Ace: Needed (Makerhub@georgefox.edu).
Location: Machine Shop
Description
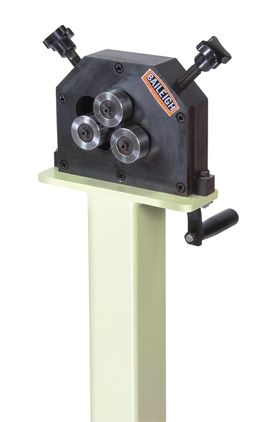
A ring roller is a machine used to roll metal into a ring by forcing the material through rollers, also called dies. The rollers can be adjusted to change the formed radius. The maximum mild steel machine capacity is 1/4" x 1" flat bar or 1/2" round rod. The minimum diameter you can form is 2.75"
Here is an example of this piece of equipment being used.
Documentation
Terminology
- Dies - Round pieces of steel used to guide the material as its shaped.
Training
Operation
Insert Text
Demonstration
Demonstrate you can safely setup the Ring Roller. You will then proceed to cut a 5" long piece of 1/4" steel rod. Roll this material into the smallest radius possible. When rolling the material remember to keep your fingers away from the rollers to keep from smashing your fingers.
General Procedure
- Adjust the knob on the right to adjust the radius, loosen the handle on the left if it restricting you from adjusting the right one.
- Make sure both knobs are secure and tightened before rolling, always start by rolling the largest radius, and work your way up from there.
- Insert the bar between the rollers.
- Turn the crank to roll the metal bar or rod.
- Start with a large radius and continue to make the radius smaller every time you roll. If you attempt to roll a small radius all at once, the rod may make a corkscrew shape instead of a circle.
- You have completed the roll when the two ends overlap each other by a couple of inches to account for the ends of the bar or rod that stay straight.
Safety
Insert text
Certification
[ https://georgefox.instructure.com/courses/1319 Canvas Quiz]
Troubleshooting
Maintenance
General maintenance
Insert text
Specific Maintenance Tasks
| Maintenance Procedure | Frequency | Done By |
|---|---|---|
| Sample | Sample | Sample |
