Difference between revisions of "Vinyl Printer+Cutter"
| Line 50: | Line 50: | ||
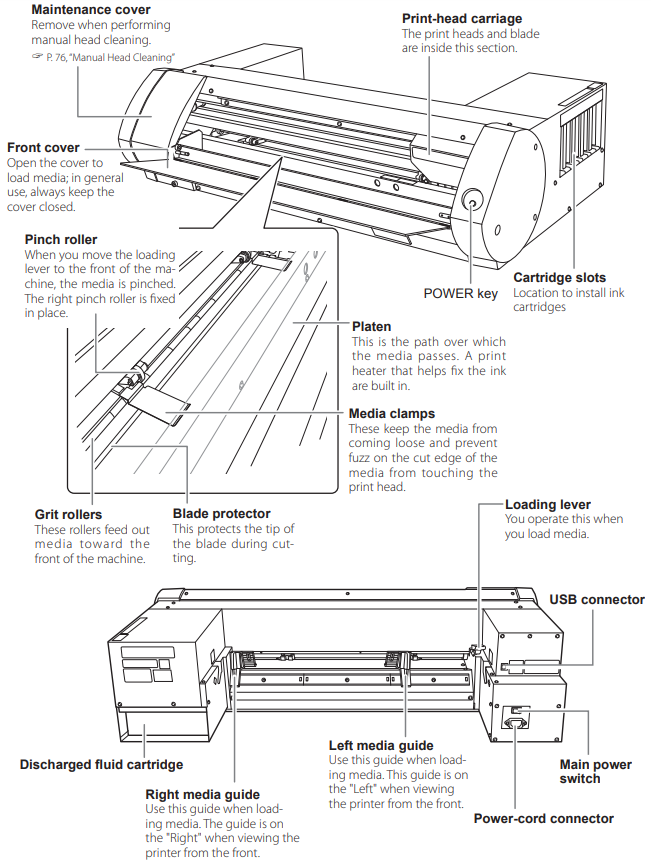
* [[File:Vinyl Printer Terms.png|none|thumb|866x866px]] | * [[File:Vinyl Printer Terms.png|none|thumb|866x866px]] | ||
| − | + | [[Media:BN-20 USE EN R2.pdf|Vinyl Printer+Cutter User Manual]] | |
| − | This user manual does a good job of visually showing the details of operating the printer. | + | This user manual does a good job of visually showing the details of operating the printer. |
==Training== | ==Training== | ||
Revision as of 15:13, 11 February 2022
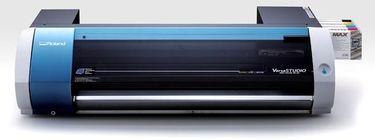
Make: Roland
Model: BN-20
Serial Number: ADP2248
Ace: Summer Martindale (Makerhub@georgefox.edu).
Location: The Hub
Description
Vinyl Printing is the process of applying ink to vinyl sheets to produce graphics using a conventional inkjet printing method with solvent based inks. This is useful for making images into stickers, creating t-shirt graphics, and any task where the appearance of vinyl needs to be changed. Printers similar to this are standard in small scale custom clothing companies due to how easy it is to take a graphic from Adobe Illustrator to a piece of vinyl. The BN-20 packs everything into one, powerful, profit-producing package. With award-winning eco-solvent inks including metallic and white options, a range of material compatibility and integrated contour cutting, it is easily the most versatile print device in its class. The BN-20 is perfect for creating t-shirt graphics, poster prints, stickers and decals – all from the comfort of your desktop.
Documentation
Terminology
- Graphic - The image, logo, lettering or similar design that is being printed.
- Adobe Illustrator - The software used to set up graphics to be printed.
- Weeding - Removing the excess vinyl material with the tools found in the drawer below the computer.
- Versawoks - The software that interacts with the printer to perform a print.
- Vector images - An image constructed with mathematical formulas which makes it easy to resize and perform other edits.
- Raster images - An image constructed with pixels which means they cannot be resized without a change in resolution.
- See below for specific machine terminology.
Vinyl Printer+Cutter User Manual This user manual does a good job of visually showing the details of operating the printer.
Training
Operation
Almost any file type can be used as a graphic when using the vinyl printer but they all must be brought into Illustrator or Inkscape to add a cut line. Note that a vector file such as a .pdf will work the best. The cut line tells the printer to cut out the image that is being printed so it can be weeded properly before it is applied. There are many ways to create a cut line and it is up to the user to determine which process will be the easiest for their graphic. Once a cut line has been created, the file is saved as an .eps and then opened in Versaworks to finalize any print settings before performing the print. After the print is completed it should be left to dry for 20 minutes before being applied to another object.
Demonstration
Print out and weed a graphic of your choice. If you are indecisive use a George Fox logo from the website.
General Procedure
Loading Material:
- The vinyl printer is capable of printing on any type or size of vinyl but matte vinyls will provide the best results. Sticker vinyls can be found on the vinyl cutter or in the cabinet under the computer while heat transfer vinyls can be found in the vinyl printer or in the cabinet to the right of the printer. Scrap pieces can be found in the bin next to the computer and are loaded into the printer just like a roll is.
- Press the secondary power button to turn on the printer.
- The loading process always begins by pushing the loading lever backwards. This opens the media clamps so the vinyl can be slid through the printer.
- The media guides are critical to keeping the vinyl in place while printing and must be adjusted to fit the width of the vinyl. Do so by sliding the left media guide to the edge of the vinyl piece. When doing this make sure the pinch roller is above a grit roller or the printer will NOT work. You may have to play with the piece orientation or width to make this possible.
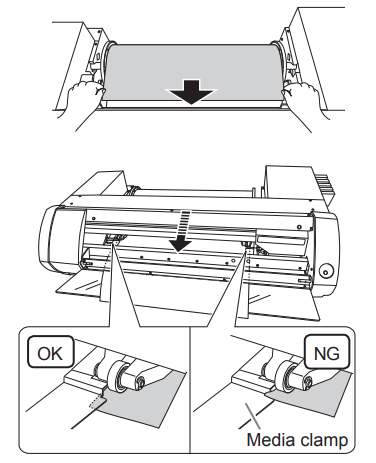
- Feed the vinyl through the printer from the back of machine so that it passes under the media clamps. The purpose of the media clamps is to keep the edges of the vinyl from interfering with the print head so this is an important piece to remember. Feel free to reference the image below.
- Finish the loading process by pulling the loading lever forward and making sure the door is closed. If everything is done correctly the printer will move around the material a bit and then sit quietly. If there is beeping then something is not set up correctly.
Preparing Graphics:
First, it is important to understand the differences between a vector and a raster when setting up graphics to be printed. Raster images use many colored pixels or individual building blocks to form a complete image. JPEGs, GIFs and PNGs are common raster image types. Almost all of the photos found on the web and in print catalogs are raster images. Because raster images are constructed using a fixed number of colored pixels, they can’t be dramatically resized without compromising their resolution. When stretched to fit a space they weren’t designed to fill, their pixels become visibly grainy and the image distorts. This is why altered photos may appear pixilated or low resolution. Further, because a raster image is composed of many tiny pieces it is difficult to distinguish one object from another within the image. Vector images, alternatively, allow for more flexibility. Constructed using mathematical formulas rather than individual colored blocks, vector file types such as SVG, EPS, AI and PDF* [why the "*" on PDF.?] are excellent for creating graphics that frequently require resizing. Also, each object within a vector file is assigned to a distinct layer within Adobe Illustrator or Inkscape which means an object can be moved, resized, and recolored without affecting the rest of the image. Having a graphic in vector format can be helpful because it is easy to remove the vinyl background from the graphic by adding a cut line around the object.
For Adobe Illustrator:
- Open the graphic in Illustrator 2017 and perform any desired editing. Most of the time nothing will need to be changed with the exception of converting a raster to a vector in order to add a cut line around a specific part of the graphic. To do this:
- To import a normal picture into Adobe Illustrator, do [File] > [Place] and then click and drag to the desired size.The graphic can then be converted to vectors by clicking [Object] >[Flatten Transparency].
- Next, click on the image to bring up several options at the top of the screen and select the [Trace] function. When doing this make sure to select the [Expand] option. This will break the image up into components which can be edited individually.
- If you want to remove a part of a graphic, you would select the section you want to remove in the layers tab and then hit the trash can icon.
- Note that this process works well for simple images with few colors. If the image is super complicated it will lose a lot of detail and still be difficult to work with because of the many layers that are created.
- In essence, a cut line is a 0.25 pt line (called a stroke in Illustrator) that is correctly colored and labeled so Versaworks can read it properly. The stroke can be added around specific layers (great for logos), or around the entire graphic (better for images). The advantage of adding a stroke around each layer is that it is possible to completely weed out vinyl between two parts of an image instead of leaving a piece of uncolored vinyl. For details on adding the cut line follow the steps below.
- Select the entire graphic and add a 0.25 stroke to the graphic. The [Stroke] option can be found in the toolbar at the top of the screen.
- Click on the color options to the left of the [Stroke] option and then click on [New Swatch] on the bottom edge of the box. A window will open up.
- Name the new swatch [CutContour]. Make sure to use the exact capitalization or it will not work properly.
- Change the color type from [Process Color] to [Spot Color]
- Make sure that the color system is set to CMYK
- Drag the magenta bar (M) all the way up to 100 and make sure the other sliders are at 0.
- Hit okay. At this point there should be a bright pink line surrounding the graphic and it is ready to be printed.
- Now that the graphic is ready, save it as an Adobe EPS file (.EPS) so it will be able to be printed in Versaworks.
For Inkscape:
- Open or import your graphic and perform any desired edits. To create the cut line you will need to have a vector object so that a stroke can be added. If your graphic is already a vector format great, but if it is not there are two options.
- First you can draw a shape around the graphic and use that as the cut line. This option works well for high quality images because there is no compromise in image detail. The downside is that it is difficult to cut out precise shapes from the graphic because it is difficult to get shapes to match up correctly.
- The second option is to convert the graphic to a vector format using a bitmap. Do this by clicking [Path] > [Trace Bitmap] and then pressing [Okay]. There are several different options in the bitmap menu that you can experiment with to find the best results. Generally, the color option works the best. Finish the process by right clicking and selecting the [ungroup] option so that each piece of the graphic can be edited.
- Create the cut line. Do this by selecting the shape that you would like to cut out, right clicking, and then selecting [Fill and Stroke]. Then add a stroke of any width (0.25 pt works well) and any color. Ideally this would be a spot color and named CutContour just like Illustrator but Inkscape does not have the same options. The downside of using a normal stroke is that the cut settings in Versaworks must be adjusted to treat the stroke as a cut line. This can be an issue if you have several adjacent shapes creating a graphic but you only want to cut around the outside of the objects. To prevent this, select the group of objects you want to cut around, make sure there are no strokes around them, and copy/paste a new copy of them next to the old ones. Select the copy and then go to [Path] > [Union]. This will combine the group of objects into one shape with a continuous outline that will be cut out, but notice that the new singular object will be one color. Add a stroke to the new object and make sure to turn off the fill, then use the page coordinates to place the new object in the same place as the original group. You should be able to see the stroke surrounding your original object; this will be your cut line.
- Save the file as a .EPS to be imported into Versaworks
- In Versaworks, click on the setting symbol next to job queue A or B.
- Click the scissor icon on the left side of the settings window and check the [Cut all paths] option. This will treat the stroke as a cut line as it is qualified as a path.
Printing and Cutting:
- Make sure the material is loaded properly.
- Open up Roland Versaworks. This can be found on the desktop and is where the printing is done from.
- Open the .eps file of the desired graphic. There are two different job queues that it can be put into but it doesn't matter which one is used if you are only printing one job. Note: The graphic will appear to be a low quality image in the preview window but this is just how the software operates.
- Double click on the graphic to open a high definition preview of the image to check that everything is working properly. Sometimes the colors may not carry over properly so make sure they look good. If something looks off then there are some color settings that can be changed when saving the EPS file. Mainly, make sure that the cut line is indicated by a moving, dashed, red line surrounding image.
- You might want to change the orientation or other parameters before starting the print; to do this go to [Job] > [Job Settings].
- Finally, right click on the desired file name in the job queue and hit print.
- After the cut is finished turn off the machine with the secondary power button but make sure to leave the main power switch on to prevent damage and wait 20 minutes before interacting with the graphic.
Preparing for Transfers:
Depending on the type of vinyl and the application it is being used for you will have different procedures for transferring the vinyl. When working with the heat transfer vinyl, used for making shirts and such, there are two main ways to do this. First, you can print the mirror of the graphic so that no transfer paper is needed. Second, you can print it normally and then use clear transfer paper to hold everything in place during application. This second option is also used for the standard sticker vinyl and can be done by performing the following steps:
- Use the weeding kit to remove all unwanted sections of the graphic.
- Tweezers are used to pinch and pull up unwanted sections.
- The rounded dental tools are used to hold down wanted sections to prevent them being peeled off with unwanted sections.
- If necessary, cut the graphic off from any excess material.
- Use scissors to cut out a piece of clear transfer paper slightly larger than your cut-out graphic.
- Position it sticky side down over your graphic and use a squeegee to apply it the the graphic.
- This is done starting in the center of the graphic, and smoothed with the squeegee from the center out.
- Once it is applied, flip the layers over and peel the backing of the vinyl material from the transfer paper.
- Peel at the greatest angle possible, aim for parallel to the transfer paper so that none of the vinyl is pulled off.
- The graphic is then ready to be transferred onto the desired material.
Safety
- Never turn off the main power supply. The printer must routinely empty the print head to prevent it from clogging and it cannot do so without power.
- The printer will automatically pause if the front door is opened and the back is open. Keep hands and clothing away from the back of the printer to prevent pinching and tangling.
- Sometimes vinyl scraps can be oddly shaped and can get wrinkled up when traveling through the media guides. Make sure the piece slides through easily before printing so this does not cause issues.
- It is recommended that the machine get used about once a week to prevent issues such as nozzle clogging.
Certification
Troubleshooting
- The most common issue is the printer beeping when trying to load a piece of material. To fix this, make sure the pinch roller is positioned above a grit roller by finding a new piece of vinyl or rotating/cutting down the current piece.
- If there are globs, spots, or streaks of ink occurring during the printing process then it is time to manually clean the print head (see maintenance).
- There may be issues with the vinyl being difficult to weed due to pieces sticking together. The heat transfer vinyl is more difficult to weed in general so some of this may be expected but one thing that will help is to increase the cutting force before printing. By default it is set to 50 gf but feel free to increase it if weeding is excessively difficult.
Maintenance
General maintenance
Like any printer, this machine will periodically need to have its ink replaced. Additionally there are other tasks that should be completed to keep the printer fully functional.These include; keeping equipment free of dirt and grime, both manually and automatically maintaining the print head, and replacing cutting blades and print head wipers.
Specific Maintenance Tasks
| Maintenance Procedure | Frequency | Done By | Last Done | |
|---|---|---|---|---|
| 1 | Clean Print Area | As needed | Student | N/A |
| 2 | Change Ink | When the low ink warning appears on the computer | Ace | |
| 3 | Replace the Waste Cartridge | Once the full cartridge warning appears on the computer | Ace | |
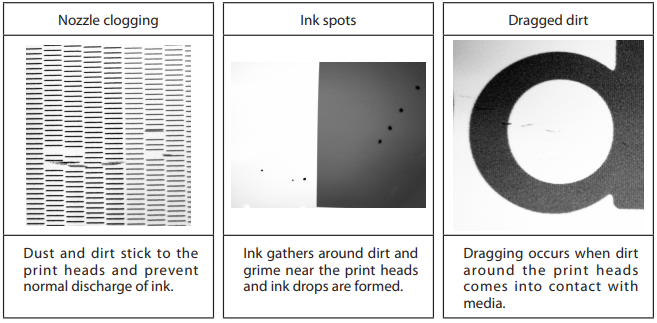
| 4 | Medium Print Head Cleaning | Once there is nozzle clogging, ink spots, or dragged dirt | Ace | |
| 5 | Manual Print Head Cleaning | If the medium cleaning does not solve the issues | Ace | |
| 6 | Replace Felt Wiper | When the replace wiper warning appears | Ace | |
| 7 | Replace Blade | When cut quality has decreased | Ace |
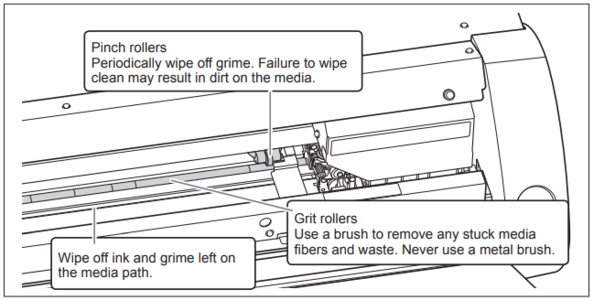
- Wipe any dust off the machine with a paper towel and the areas shown below.
- See user manual for procedure specifics.
- See user manual for procedure specifics.
- Should be completed if prints show signs similar to the image below; see user manual for procedure specifics.
- See user manual for procedure specifics.
- See user manual for procedure specifics.
- See user manual for procedure specifics.
