Difference between revisions of "The Hub"
| (42 intermediate revisions by 3 users not shown) | |||
| Line 1: | Line 1: | ||
| − | With more than 5,500 sq. ft., The Hub contains a variety of hand tools and equipment. The capabilities include vinyl cutting/printing, sewing, electronics workbench as well as low fidelity prototyping | + | [[File:The Hub Facility Logo.png|300px|frameless|left]][[File:MakerHub1.jpg|400px|thumb|right|The Hub]] |
| + | With more than 5,500 sq. ft., The Hub contains a variety of hand tools and equipment. The capabilities include vinyl cutting/printing, sewing, electronics workbench as well as a [[Supplies|low-fidelity prototyping station]]. | ||
The current Ace of the {{PAGENAME}} is '''{{#show: {{PAGENAME}} |?Has ace.Has name}}''' ({{#show: {{PAGENAME}} |?Has ace.Has email address}}). <br /> | The current Ace of the {{PAGENAME}} is '''{{#show: {{PAGENAME}} |?Has ace.Has name}}''' ({{#show: {{PAGENAME}} |?Has ace.Has email address}}). <br /> | ||
| − | + | <br> | |
| + | <br> | ||
__TOC__ | __TOC__ | ||
| − | |||
| − | |||
| − | |||
| − | |||
| − | |||
| − | |||
| − | |||
=Schedule= | =Schedule= | ||
| − | The Hub is open 24/7 during the semester. You will need to | + | The Hub is open 24/7 during the semester. You will need to complete the waiver and pass the Maker Hub Intro quiz to gain access. |
=Equipment Overview = | =Equipment Overview = | ||
| Line 41: | Line 36: | ||
==[[3 commandments]]== | ==[[3 commandments]]== | ||
| + | |||
| + | ===1. Safety First=== | ||
| + | The Hub is open 24/7 to students. There is a first aid box located on the west side wall of the Tool Room. The box contains band-aids and other basic first aid needs. This is not a campus supply and should not be used as a supply source for your personal first aid kit. If you do happen to get blood on the floor or equipment you need to contact the technician or security. There are contact phone numbers listed on the first aid box. | ||
| + | |||
| + | There are several pieces of equipment in the Hub that can be extremely hot and they will burn you. Pay attention and don't assume that a machine was off when you make contact with it. | ||
| + | |||
| + | ===2. Reset the Space=== | ||
| + | |||
| + | First, there are approximately 8 open workbenches that are open for general use. Each of these has a permanent home that is marked on the floor. Each of these tables should be surrounded by 4 chairs. Each of these tables is also equipped with power outlets on each leg. These are connected with cables and cable tied - please do not cut these cable ties (why has someone been doing this??? why???). There is one power plug for each table that can be plugged into the power outlet that comes down from the ceiling. These power outlets have been positioned so that that they hang directly down by the table. These tables are on wheels and can be moved. However, when you have finished with the table, please reset the space. Ensure that the table is placed back inside of the special marks on the floor, plug in the table, and make sure that the four chairs are back around the table. When you RESET THE SPACE, it makes it nice for those following behind you. And we want to be nice … don’t we? Yes is the answer to that question. If you need to leave your project out on a table, you must mark it as in use, with your Name, Team/Project, initial date, and reason for leaving it out. There needs to be a decent reason for this, and it shouldn’t stay out for more than three days. If there are special circumstances, please speak with your project advisor and/or the technician. | ||
| + | There are smaller blue tables that also have spots marked on the floor for their permanent homes. These tables reside on the wall nearest the quad. These tables can be used as transport tables for your projects. There are some limited storage locations in the Hub, and you can use these tables to transport your projects from these locations to wherever you might need in the Hub. When you are finished using these tables, please clear them off and put them back. If, for some special reason, you need the table to be in use for a short time (less than three days), mark the table as in use. This is useful if you want to run overnight tests or you are in the middle of an assembly. However, this is for short term use. | ||
| + | |||
| + | When using the electronics station, it is, as always, imperative that you RESET THE SPACE. Clean up all solder paste, stripped wires, etc., and put everything back where you found it, putting the cables back where they go. | ||
| + | |||
| + | There is an end cabinet located at the end of the Low-Fidelity Prototyping Station that holds papers and materials as well as scrap cardboard. If there is room, feel free to add scrap cardboard (from shipped boxes, etc.) to keep this supply stocked. | ||
| + | |||
| + | For the other materials, if they are low or empty, please notify the toolroom so that supplies can be restocked. As always, when finished, RESET THE SPACE. Clean up the table and make sure that the bins are orderly. | ||
| + | |||
| + | On the wall are a set of tools. These are available for use within the Maker Hub. As should be obvious, when you are done using the tools, return them - RESET THE SPACE. For example, if you use a tool put it back when you are done. Not much of an example. Sort of hard to make this any more clear. Let’s say it is a wrench - and you use it. When you are done - put it back. Get it? The tools are marked with blue paint to indicate they belong in the Maker Hub. | ||
| + | |||
| + | If you are a senior and you need tools for your project and don’t want to return them, check them out from the toolroom. If we don’t have them, speak with your advisor and we can see about getting them. In the meantime, put them back. If you are an employee and need equipment and/or tools in your place of employment, do not abscond with the tools on the wall. You may certainly use them, but you must put them back. If you want tools permanently in your shop, ask the technician and the problem can be remedied. | ||
| + | |||
| + | ===3. Be Professional=== | ||
| + | |||
| + | There are eight rolling computers that also have permanent homes at marked spaces around the HUB. They are all the same as the Computer Lab machines with the exception of number 8. This machine has the Adobe Creative Suite software. Each of these 8 machines have UPS power supplies that allow you to unplug the machine and move it around the Maker Hub without powering it down. You allegedly have about 15 minutes of power available from these UPS supplies (if anyone actually times it, let us know). Feel free to use these computers wherever you want to use them … they often make their way into meeting rooms. However, when you have finished, as always RESET THE SPACE! The computers, when not in use, should always be sitting, plugged in, at their permanent locations. This is especially important if you take them into a lab or the senior design studio, or one of the other Maker Hub shops. When you have finished sitting at the machine, return it. Do not leave it in a different space. If your senior design team or lab or shop needs an extra computer, speak with your project advisor or the technician and we can address the situation. BE PROFESSIONAL! | ||
| + | |||
| + | Low-Fidelity Prototyping Station | ||
| + | The Low-Fidelity Prototyping Station (Crafts) is provided so that students can make quick project mock-ups. Please BE PROFESSIONAL when using this station. While it might be tempting to make pipe-cleaner men as you did in elementary school, this material is provided for free to be utilized for projects, not entertainment. We will simply not be able to provide these materials if they are continually wasted. | ||
| + | |||
| + | ==General Maker Hub Knowledge== | ||
| + | The Hub is the central room of the Maker Hub. It has multiple open tables for work, 8 computers on wheels, some smaller blue rolling tables and some semi-permanent stations. Let’s take a little time to go over these elements . | ||
| + | |||
| + | There is A/V equipment in the corner of the space. Best to just leave it alone. It is used for assemblies by trained professionals. You shouldn’t try this. And it is pretty boring. | ||
| + | |||
| + | There are storage shelves in the senior design corridor across from the Environmental lab. If you want to store your project there, this is fine. Just label your shelf. Feel free to use the blue carts to move it into the Maker Hub for work. We will be working more on the storage options. | ||
| + | |||
| + | Within the Hub, there are some semi-permanent workstations: Sewing Station The sewing station is located next to the Prototype Lab and consists of 2 sewing machines and 1 serger. Use of the sewing equipment requires specialized training. Vinyl Cutting Station The vinyl cutting station sits in front of the windows of the Prototype Lab. The vinyl cutter consists of a vinyl cutter and a vinyl printer. These are useful for making signs, stickers and other fun things. Use of this station requires specialized training. In addition to the vinyl cutter, there is a large roll of butcher paper available. This does not require special training. You pull it and tear it off. If you cannot operate this piece of equipment, please leave the space and change your major. Electronics Stations There are two electronics stations currently installed in the Hub. These workbenches each contain a soldering station with soldering mat, oscilloscope, multimeter, power supply, and signal generator. Located at the end of the station is a cabinet used for holding various electronic cables and wires needed for working with equipment. | ||
| + | |||
| + | Here are a few good steps to being successful in the Maker Hub. | ||
| + | * Do not prop open doors. They are closed and locked for a reason. | ||
| + | * Please make sure equipment is turned off before leaving. | ||
| + | * Make sure you you have been properly trained before attempting to use any of the machines or equipment. | ||
| + | * Always ask if you have questions on how to do something. | ||
| + | Here are a couple things to keep in mind: | ||
| + | * Some of the machines get very hot so don't assume a machine is cold when you touch it. | ||
| + | * There are hand tools located on the wall. Do not remove these from the Maker Hub without permission. | ||
| + | * Make sure to get permission from the technician prior to leaving any projects in the Maker Hub. | ||
| + | |||
| + | ==Canvas Certification== | ||
| + | Complete the <strong>Maker Hub Introduction Module</strong> at the link below to gain access to {{PAGENAME}} (you may have already completed this module to gain access to the Maker Hub in general... the Maker Hub Introduction Module satisfies requirements for both The Hub (facility) and the Maker Hub overall). The Maker Hub Canvas course pertains to all facilities and equipment contained in the Maker Hub; simply complete the quizzes for the facilities/equipment you wish to use in the Maker Hub. Please email <span style="color:blue">makerhub@georgefox.edu</span> if you have any questions. | ||
| + | |||
| + | [https://georgefox.instructure.com/enroll/GH36RT Maker Hub Canvas Course] | ||
| + | |||
| + | {{#set: | ||
| + | | is facility = True | ||
| + | |Has ace= | ||
| + | }} | ||
| + | |||
| + | <!--> | ||
The Hub is the central room of the Maker Hub. It has multiple open tables for work, 8 computers on wheels, some smaller blue rolling tables and some semi-permanent stations. Let’s take a little time to go over these elements . | The Hub is the central room of the Maker Hub. It has multiple open tables for work, 8 computers on wheels, some smaller blue rolling tables and some semi-permanent stations. Let’s take a little time to go over these elements . | ||
| Line 51: | Line 104: | ||
On the wall are a set of tools. These are available for use within the Maker Hub. As should be obvious, when you are done using the tools, return them - RESET THE SPACE. For example, if you use a tool put it back when you are done. Not much of an example. Sort of hard to make this any more clear. Let’s say it is a wrench - and you use it. When you are done - put it back. Get it? The tools are marked with blue paint to indicate they belong in the Maker Hub. | On the wall are a set of tools. These are available for use within the Maker Hub. As should be obvious, when you are done using the tools, return them - RESET THE SPACE. For example, if you use a tool put it back when you are done. Not much of an example. Sort of hard to make this any more clear. Let’s say it is a wrench - and you use it. When you are done - put it back. Get it? The tools are marked with blue paint to indicate they belong in the Maker Hub. | ||
If you are a senior and you need tools for your project and don’t want to return them, check them out from the toolroom. If we don’t have them, speak with your advisor and we can see about getting them. In the meantime, put them back. If you are an employee and need equipment and/or tools in your place of employment, do not abscond with the tools on the wall. You may certainly use them, but you must put them back. If you want tools permanently in your shop, ask the technician and the problem can be remedied. | If you are a senior and you need tools for your project and don’t want to return them, check them out from the toolroom. If we don’t have them, speak with your advisor and we can see about getting them. In the meantime, put them back. If you are an employee and need equipment and/or tools in your place of employment, do not abscond with the tools on the wall. You may certainly use them, but you must put them back. If you want tools permanently in your shop, ask the technician and the problem can be remedied. | ||
| + | |||
There is A/V equipment in the corner of the space. Best to just leave it alone. It is used for assemblies by trained professionals. You shouldn’t try this. And it is pretty boring. | There is A/V equipment in the corner of the space. Best to just leave it alone. It is used for assemblies by trained professionals. You shouldn’t try this. And it is pretty boring. | ||
| Line 75: | Line 129: | ||
There is an end cabinet located at the end of the Low-Fidelity Prototyping Station that holds papers and materials as well as scrap cardboard. If there is room, feel free to add scrap cardboard (from shipped boxes, etc.) to keep this supply stocked. | There is an end cabinet located at the end of the Low-Fidelity Prototyping Station that holds papers and materials as well as scrap cardboard. If there is room, feel free to add scrap cardboard (from shipped boxes, etc.) to keep this supply stocked. | ||
| − | For the other materials, if they are low or empty, please notify the toolroom so that supplies can be restocked. As always, when finished, RESET THE SPACE. Clean up the table and make sure that the bins are orderly. | + | For the other materials, if they are low or empty, please notify the toolroom so that supplies can be restocked. As always, when finished, RESET THE SPACE. Clean up the table and make sure that the bins are orderly. |
| − | |||
| − | |||
| − | |||
| − | |||
| − | |||
| − | |||
| − | |||
| − | |||
| − | |||
| − | |||
| − | |||
| − | |||
| − | |||
| − | |||
| − | |||
| − | |||
| − | |||
| − | |||
| − | |||
| − | |||
| − | |||
| − | |||
| − | |||
| − | |||
| − | |||
| − | |||
Latest revision as of 14:48, 22 August 2024
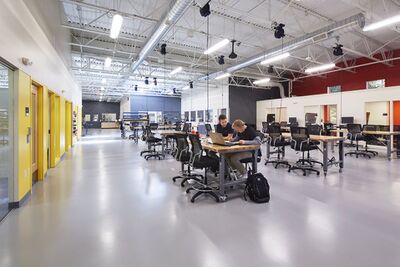
With more than 5,500 sq. ft., The Hub contains a variety of hand tools and equipment. The capabilities include vinyl cutting/printing, sewing, electronics workbench as well as a low-fidelity prototyping station.
The current Ace of the The Hub is ' ().
Schedule
The Hub is open 24/7 during the semester. You will need to complete the waiver and pass the Maker Hub Intro quiz to gain access.
Equipment Overview
| Name | Company | Model | Current Ace ⠉ |
|---|---|---|---|
| Electronics Workstation | BK Precision Teletronix | 2831 4 1/2 Digital Multimeter 4017A Function Generator TDS 2024 Oscilloscope 1651A DC Power Supply | Needed |
| Foam Cutter | Proxxon | Thermocut 12E & 115E | Needed |
| Heat Press | Stahls' Hotronix | Maxx20 | Needed |
| Heavy Duty Sewing Machine | Consew | 206RB | Dan Schutter (text him at 503-317-5614) |
| Mug Press | Heat Press Nation | HPN-SIG-MUG | Needed |
| Serger | Janome | MyLock 634D | Needed |
| Sewing Machine | Janome | 3160QDC | |
| Soldering Irons | Weller | WES51 | Evan Hatch |
| Sublimation Printer | Sawgrass | SG400NA | Summer Martindale |
| Vinyl Cutter | Roland | GR-640 | Summer Martindale |
| Vinyl Printer+Cutter | Roland | BN-20 | Summer Martindale |
Equipment by Icon
3 commandments
1. Safety First
The Hub is open 24/7 to students. There is a first aid box located on the west side wall of the Tool Room. The box contains band-aids and other basic first aid needs. This is not a campus supply and should not be used as a supply source for your personal first aid kit. If you do happen to get blood on the floor or equipment you need to contact the technician or security. There are contact phone numbers listed on the first aid box.
There are several pieces of equipment in the Hub that can be extremely hot and they will burn you. Pay attention and don't assume that a machine was off when you make contact with it.
2. Reset the Space
First, there are approximately 8 open workbenches that are open for general use. Each of these has a permanent home that is marked on the floor. Each of these tables should be surrounded by 4 chairs. Each of these tables is also equipped with power outlets on each leg. These are connected with cables and cable tied - please do not cut these cable ties (why has someone been doing this??? why???). There is one power plug for each table that can be plugged into the power outlet that comes down from the ceiling. These power outlets have been positioned so that that they hang directly down by the table. These tables are on wheels and can be moved. However, when you have finished with the table, please reset the space. Ensure that the table is placed back inside of the special marks on the floor, plug in the table, and make sure that the four chairs are back around the table. When you RESET THE SPACE, it makes it nice for those following behind you. And we want to be nice … don’t we? Yes is the answer to that question. If you need to leave your project out on a table, you must mark it as in use, with your Name, Team/Project, initial date, and reason for leaving it out. There needs to be a decent reason for this, and it shouldn’t stay out for more than three days. If there are special circumstances, please speak with your project advisor and/or the technician. There are smaller blue tables that also have spots marked on the floor for their permanent homes. These tables reside on the wall nearest the quad. These tables can be used as transport tables for your projects. There are some limited storage locations in the Hub, and you can use these tables to transport your projects from these locations to wherever you might need in the Hub. When you are finished using these tables, please clear them off and put them back. If, for some special reason, you need the table to be in use for a short time (less than three days), mark the table as in use. This is useful if you want to run overnight tests or you are in the middle of an assembly. However, this is for short term use.
When using the electronics station, it is, as always, imperative that you RESET THE SPACE. Clean up all solder paste, stripped wires, etc., and put everything back where you found it, putting the cables back where they go.
There is an end cabinet located at the end of the Low-Fidelity Prototyping Station that holds papers and materials as well as scrap cardboard. If there is room, feel free to add scrap cardboard (from shipped boxes, etc.) to keep this supply stocked.
For the other materials, if they are low or empty, please notify the toolroom so that supplies can be restocked. As always, when finished, RESET THE SPACE. Clean up the table and make sure that the bins are orderly.
On the wall are a set of tools. These are available for use within the Maker Hub. As should be obvious, when you are done using the tools, return them - RESET THE SPACE. For example, if you use a tool put it back when you are done. Not much of an example. Sort of hard to make this any more clear. Let’s say it is a wrench - and you use it. When you are done - put it back. Get it? The tools are marked with blue paint to indicate they belong in the Maker Hub.
If you are a senior and you need tools for your project and don’t want to return them, check them out from the toolroom. If we don’t have them, speak with your advisor and we can see about getting them. In the meantime, put them back. If you are an employee and need equipment and/or tools in your place of employment, do not abscond with the tools on the wall. You may certainly use them, but you must put them back. If you want tools permanently in your shop, ask the technician and the problem can be remedied.
3. Be Professional
There are eight rolling computers that also have permanent homes at marked spaces around the HUB. They are all the same as the Computer Lab machines with the exception of number 8. This machine has the Adobe Creative Suite software. Each of these 8 machines have UPS power supplies that allow you to unplug the machine and move it around the Maker Hub without powering it down. You allegedly have about 15 minutes of power available from these UPS supplies (if anyone actually times it, let us know). Feel free to use these computers wherever you want to use them … they often make their way into meeting rooms. However, when you have finished, as always RESET THE SPACE! The computers, when not in use, should always be sitting, plugged in, at their permanent locations. This is especially important if you take them into a lab or the senior design studio, or one of the other Maker Hub shops. When you have finished sitting at the machine, return it. Do not leave it in a different space. If your senior design team or lab or shop needs an extra computer, speak with your project advisor or the technician and we can address the situation. BE PROFESSIONAL!
Low-Fidelity Prototyping Station The Low-Fidelity Prototyping Station (Crafts) is provided so that students can make quick project mock-ups. Please BE PROFESSIONAL when using this station. While it might be tempting to make pipe-cleaner men as you did in elementary school, this material is provided for free to be utilized for projects, not entertainment. We will simply not be able to provide these materials if they are continually wasted.
General Maker Hub Knowledge
The Hub is the central room of the Maker Hub. It has multiple open tables for work, 8 computers on wheels, some smaller blue rolling tables and some semi-permanent stations. Let’s take a little time to go over these elements .
There is A/V equipment in the corner of the space. Best to just leave it alone. It is used for assemblies by trained professionals. You shouldn’t try this. And it is pretty boring.
There are storage shelves in the senior design corridor across from the Environmental lab. If you want to store your project there, this is fine. Just label your shelf. Feel free to use the blue carts to move it into the Maker Hub for work. We will be working more on the storage options.
Within the Hub, there are some semi-permanent workstations: Sewing Station The sewing station is located next to the Prototype Lab and consists of 2 sewing machines and 1 serger. Use of the sewing equipment requires specialized training. Vinyl Cutting Station The vinyl cutting station sits in front of the windows of the Prototype Lab. The vinyl cutter consists of a vinyl cutter and a vinyl printer. These are useful for making signs, stickers and other fun things. Use of this station requires specialized training. In addition to the vinyl cutter, there is a large roll of butcher paper available. This does not require special training. You pull it and tear it off. If you cannot operate this piece of equipment, please leave the space and change your major. Electronics Stations There are two electronics stations currently installed in the Hub. These workbenches each contain a soldering station with soldering mat, oscilloscope, multimeter, power supply, and signal generator. Located at the end of the station is a cabinet used for holding various electronic cables and wires needed for working with equipment.
Here are a few good steps to being successful in the Maker Hub.
- Do not prop open doors. They are closed and locked for a reason.
- Please make sure equipment is turned off before leaving.
- Make sure you you have been properly trained before attempting to use any of the machines or equipment.
- Always ask if you have questions on how to do something.
Here are a couple things to keep in mind:
- Some of the machines get very hot so don't assume a machine is cold when you touch it.
- There are hand tools located on the wall. Do not remove these from the Maker Hub without permission.
- Make sure to get permission from the technician prior to leaving any projects in the Maker Hub.
Canvas Certification
Complete the Maker Hub Introduction Module at the link below to gain access to The Hub (you may have already completed this module to gain access to the Maker Hub in general... the Maker Hub Introduction Module satisfies requirements for both The Hub (facility) and the Maker Hub overall). The Maker Hub Canvas course pertains to all facilities and equipment contained in the Maker Hub; simply complete the quizzes for the facilities/equipment you wish to use in the Maker Hub. Please email makerhub@georgefox.edu if you have any questions.
