Difference between revisions of "Heat Press"
| Line 65: | Line 65: | ||
When completing the heat press demonstration, it is helpful to first complete the [[Vinyl Printer+Cutter]] or [[Sublimation Printer]] training. Training for the vinyl printer/cutter or sublimation printer may be accomplished concurrently with the heat press if coordinated beforehand. It is also helpful to bring a prepared graphic to the training; otherwise, a George Fox logo can be used. | When completing the heat press demonstration, it is helpful to first complete the [[Vinyl Printer+Cutter]] or [[Sublimation Printer]] training. Training for the vinyl printer/cutter or sublimation printer may be accomplished concurrently with the heat press if coordinated beforehand. It is also helpful to bring a prepared graphic to the training; otherwise, a George Fox logo can be used. | ||
| − | The standard heat press demonstration is to make a custom t-shirt. There are two options available for putting a graphic/text on a t-shirt: sublimation printing and vinyl transfer. | + | The standard heat press demonstration is to make a custom t-shirt. There are two options available for putting a graphic/text on a t-shirt: sublimation printing and vinyl transfer. The Maker Hub has some t-shirts available for heat press demonstrations. If you decide to bring your own t-shirt, make sure you have researched the correct materials and colors that will produce a successful sublimation print or vinyl transfer. |
| − | + | ||
| + | #Set the heat press to the appropriate temperature and time for your sublimation print or vinyl transfer. The heat press can take up to 30 minutes to reach temperature, so turn on the heat press at the beginning of the training. | ||
| + | #Print or cut the graphic on your preferred medium. | ||
| + | #Place a Teflon sheet on the lower platen of the heat press. | ||
| + | #Place the t-shirt on (or around/enveloping) the lower platen. | ||
| + | #Position the graphic on the t-shirt and fix it in place with the green heat tape if needed. | ||
| + | #Place a fresh piece of Kraft paper from the Low Fidelity Prototyping Station on top of your graphic. | ||
| + | #Place another Teflon sheet on top of everything. This should complete the "sandwich." In most cases, the order from bottom to top should be lower platen, Teflon sheet, t-shirt, graphic, Kraft paper, Teflon sheet, upper platen. | ||
| + | #Apply the graphic by closing the heat press and wait for the timer to count down. | ||
| + | #Behold your new custom t-shirt, wear it with pride, and tell all your friends how cool the Maker Hub is. | ||
==== General Procedure ==== | ==== General Procedure ==== | ||
Revision as of 09:29, 30 May 2023
Make: Stahls' Hotronix
Model: Maxx20
Serial Number: 201810973
Ace: Needed (Makerhub@georgefox.edu).
Location: The Hub
Description
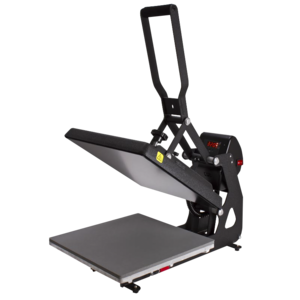
The heat press is a machine used to transfer graphics onto items like T-shirts, bags, jerseys and more. Materials that can be transferred include heat transfer vinyl (HTV), screen printed transfers, rhinestones, and more. Within the Hub, the heat press works in conjunction with the vinyl printer/cutter as well as the dye sublimation printer. Depending on the materials used there are different processes required. If using heat transfer vinyl it will adhere the material to cloth and is commonly used to make custom t-shirts or to add logos to clothing. One of the down sides of using vinyl is the raised material left on the fabric. The dye sublimation process is much easier to work with. This processor vaporizes the ink and it penetrates into the fabric without leaving a raised surface. Another advantage over vinyl is the ability to produce many colors in one transfer.
Documentation
Terminology
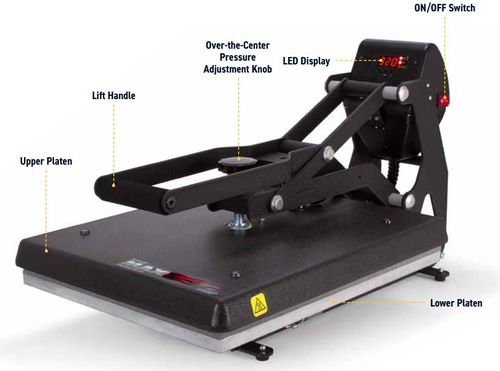
- Platen - The flat plates on the top and bottom of the machine which apply pressure to the material along with heat.
- Pressure Adjustment Knob - The knob located over the center of the upper platen which is used to adjust the pressure applied to the material.
- Lift Handle - The large handle used to raise or lower the upper platen
- Graphic - The design that is being transferred such as a logo printed on heat transfer vinyl.
- Material - The item onto which the graphic is transferred. In many cases this is a t-shirt.
- Transfer Paper - The clear material on top of the graphic. This should be left on until after the transfer has occurred.
- Protective Sheets - The heat resistant sheets in the press that prevent graphics from sticking to the platen. These are not attached to the platens.
Manuals
Training
Operation
Overall, the operation of the heat press is very simple with most of the work occurring when setting the temperature and press time. The temperature of the heat press can be precisely set anywhere between 200°F and 430°F while being regulated within one degree of the set temperature. When applying graphics created by the vinyl printer, it is recommended that temperature be set between 300°F and 325°F (305°F works well), but other temperatures can be experimented with if the graphics are not transferring as desired. The time should be set to 15 seconds as this will ensure a proper transfer without overheating the vinyl or the material to which it is being applied. If the vinyl begins to peel off when removing the transfer paper then the time can be lengthened beyond 15 seconds, and inversely the time can be decreased if there is concern about melting the material. After the time at temperature has been set, the material should be placed between the platens and pressed for 2-3 seconds to remove any wrinkles. Now the graphic can be placed at the desired location on the material and pressed until the timer expires. The final step in the process is to remove the material from the press and carefully pull off the transfer paper to reveal the completed transfer. Make sure to reset the space by leaving the platens open and wiping down the machine as needed.
If you are using a transfer from the dye sublimation printer you will need to set the temperature of the heat press to 400°F and set the timer to approximately 40 seconds. You will want to use two pieces of butcher paper to prevent the ink from bleeding through the shirt or fabric. One piece of paper should be placed under the top layer of material that is receiving the transfer and the other piece will be placed between the heating element and the transfer paper.
Demonstration
When completing the heat press demonstration, it is helpful to first complete the Vinyl Printer+Cutter or Sublimation Printer training. Training for the vinyl printer/cutter or sublimation printer may be accomplished concurrently with the heat press if coordinated beforehand. It is also helpful to bring a prepared graphic to the training; otherwise, a George Fox logo can be used.
The standard heat press demonstration is to make a custom t-shirt. There are two options available for putting a graphic/text on a t-shirt: sublimation printing and vinyl transfer. The Maker Hub has some t-shirts available for heat press demonstrations. If you decide to bring your own t-shirt, make sure you have researched the correct materials and colors that will produce a successful sublimation print or vinyl transfer.
- Set the heat press to the appropriate temperature and time for your sublimation print or vinyl transfer. The heat press can take up to 30 minutes to reach temperature, so turn on the heat press at the beginning of the training.
- Print or cut the graphic on your preferred medium.
- Place a Teflon sheet on the lower platen of the heat press.
- Place the t-shirt on (or around/enveloping) the lower platen.
- Position the graphic on the t-shirt and fix it in place with the green heat tape if needed.
- Place a fresh piece of Kraft paper from the Low Fidelity Prototyping Station on top of your graphic.
- Place another Teflon sheet on top of everything. This should complete the "sandwich." In most cases, the order from bottom to top should be lower platen, Teflon sheet, t-shirt, graphic, Kraft paper, Teflon sheet, upper platen.
- Apply the graphic by closing the heat press and wait for the timer to count down.
- Behold your new custom t-shirt, wear it with pride, and tell all your friends how cool the Maker Hub is.
General Procedure
Adjusting the Temperature and Time:
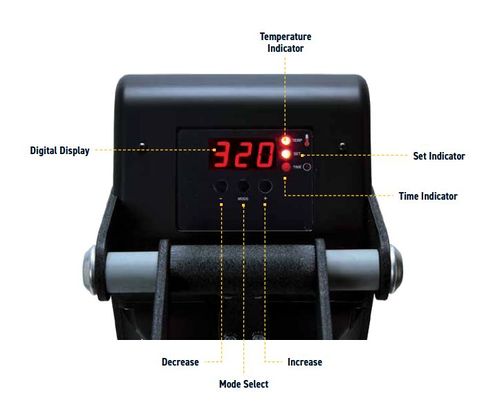
- Press the (Mode) select button in the center of the Control Panel so that the (SET) and (TEMP) lights located next to the display will illuminate. This process can be seen in Figure 2.
- Press the (+) or (-) button to raise or lower the temperature setting. The LED Display will show changes as you make them.
- Once you have adjusted the temperature, press the (Mode) Select button again to advance to Time Mode. The (SET) and (TIME) lights will illuminate. If you do not want to adjust the temperature first you will need to press (Mode).
- Adjust the time in the same manner you adjusted the temperature.
- Select the desired time and push the Mode Select button again to exit. All lights will be off and the press will return to PRINT mode.
- Wait for the heat press to reach the desired temperature. This can take several minutes.
- Once the press has heated up, close it for 30 seconds to preheat the lower platen.
Applying the Graphic:
- Place the material on the lower platen and press down on it for 2-3 seconds to remove any wrinkles. This is also a good opportunity to check the pressure by taking note of how difficult it is to pull down the lift handle. If the handle requires a firm pressure to click into place then no adjustment is needed, but if it easily closes or requires a large effort to close then the pressure should be adjusted using the patented over the center pressure adjustment knob.
- Orient the graphic on the material. Once it is pressed it cannot be moved so make sure it is in the correct position.
- Place one of the protective sheets on top of the graphic. This MUST be done or the transfer paper will be melted to the platen.
- Close the heat press and wait until the timer expires.
- Remove the material from the heat press.
- Carefully pull off the heat transfer paper, making sure to keep a steep angle so that the graphic does not peel off. This can be done while the material is hot or cold.
- Reset the space by turning off the heat press, leaving it open, and wiping off any dust or other debris as needed.
Certification
Troubleshooting
One issue that can occur is that the graphic can begin to peel off of the material as the transfer paper is removed. If this happens replace the transfer paper, run through the pressing process again, and then pull off the transfer paper while following the steps laid out in the procedure.
When transferring sublimation ink, it is recommended to slowly raise the heat press once the set time expires in order to prevent the rush of air that may move the paper around. Since the paper will still be hot, it can continue to transfer small amounts of ink even though most has been transferred already. If the paper moves as the press is opened, you can get a faint double-image or ghosting effect on your t-shirt.
General Maintenance
Due to its simplicity and limited number of moving parts this machine requires a minimal amount of maintenance. The maintenance required consists of wiping down the machine as needed after each use to ensure there is no dust or vinyl transferring left on the machine. To do this, grab a paper towel from either the prototype lab or the sink next to the tool room and wipe over the machine. Pay special attention to the upper platen as it is the surface that transfers heat to the vinyl.
Specific Maintenance Tasks
| Maintenance Procedure | Frequency | Done By |
|---|---|---|
| Machine wipe down | As needed | Student |


