Difference between revisions of "Wooden Train Whistle"
| Line 35: | Line 35: | ||
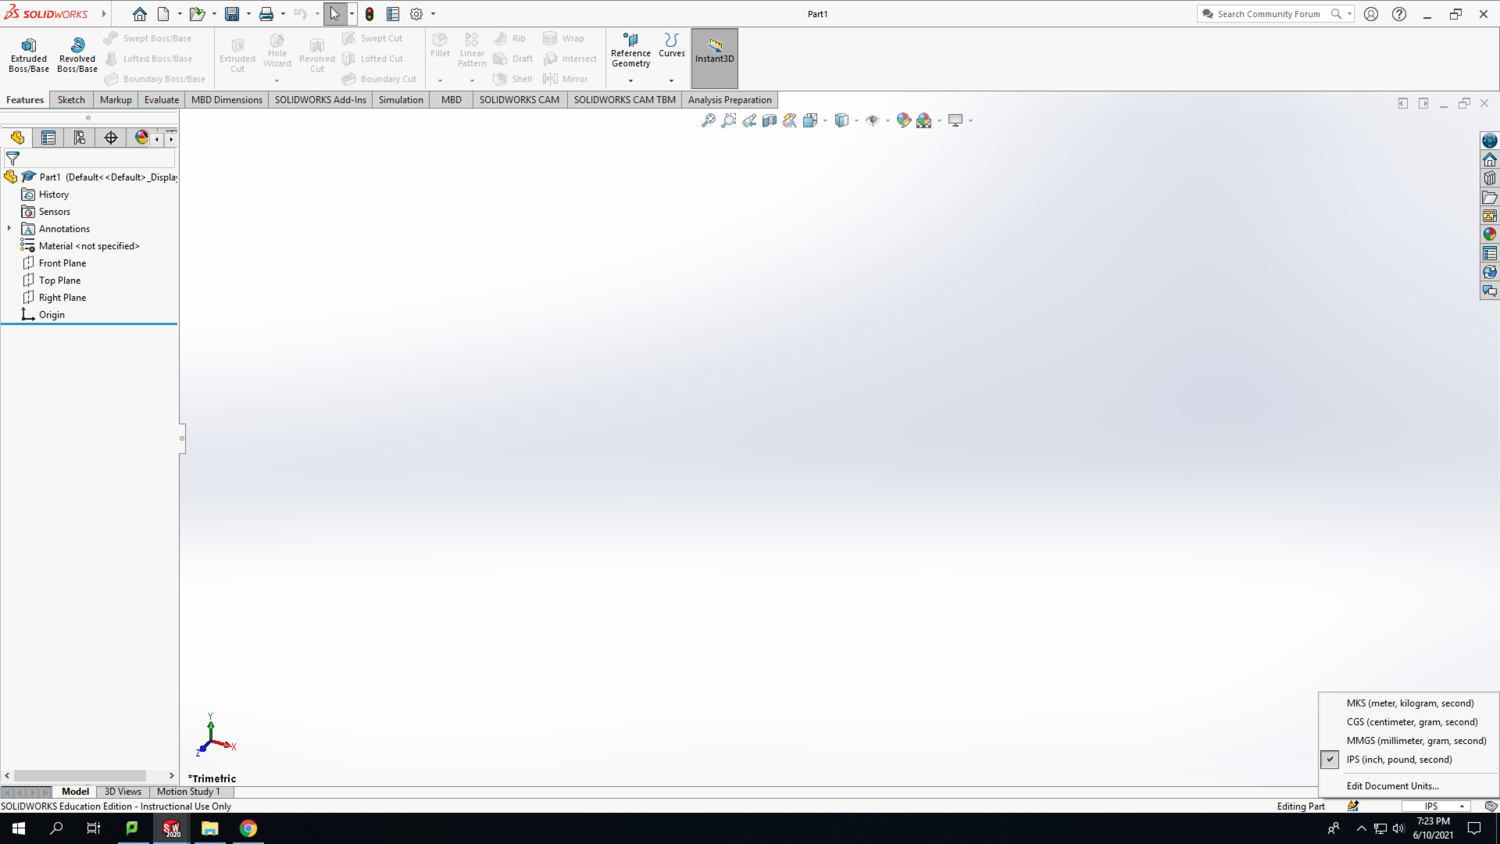
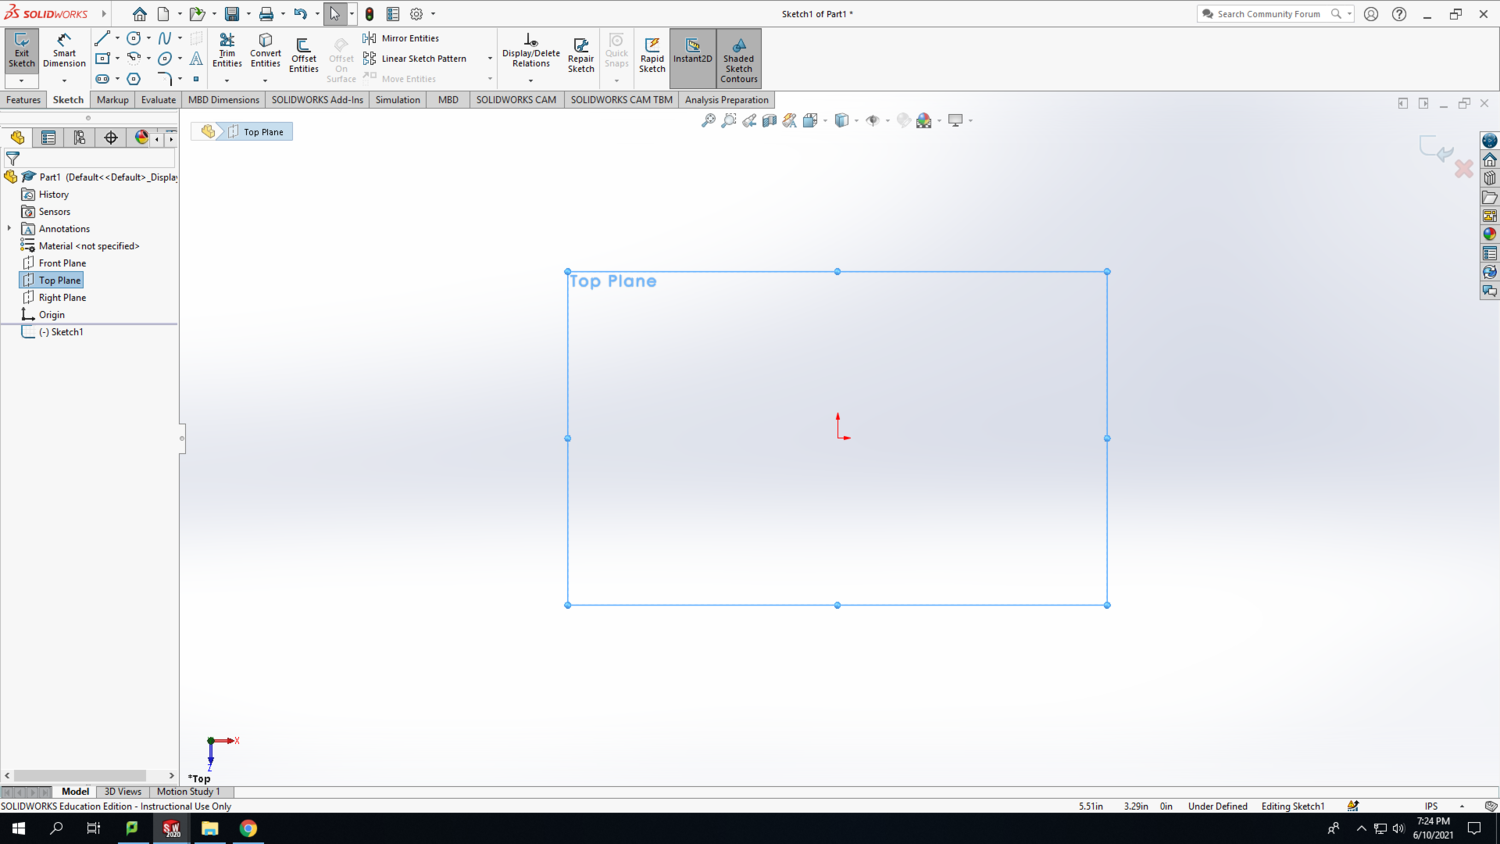
<strong>Step 1:</strong> Open SolidWorks 2020, and select a new part. Don't forget to save your file frequently as you go. In the bottom-right corner of your SolidWorks window, change the units to IPS (inch, pound, second). | <strong>Step 1:</strong> Open SolidWorks 2020, and select a new part. Don't forget to save your file frequently as you go. In the bottom-right corner of your SolidWorks window, change the units to IPS (inch, pound, second). | ||
| − | TW1 | + | [[File:TW1.png|1500px|none]] |
<br> | <br> | ||
<br> | <br> | ||
<strong>Step 2:</strong> Select the Front Plane in the design tree (the left column on your screen) to begin your sketch. Click on the Sketch tab above and click Sketch. | <strong>Step 2:</strong> Select the Front Plane in the design tree (the left column on your screen) to begin your sketch. Click on the Sketch tab above and click Sketch. | ||
| − | TW2 | + | [[File:TW2.png|1500px|none]] |
<br> | <br> | ||
<br> | <br> | ||
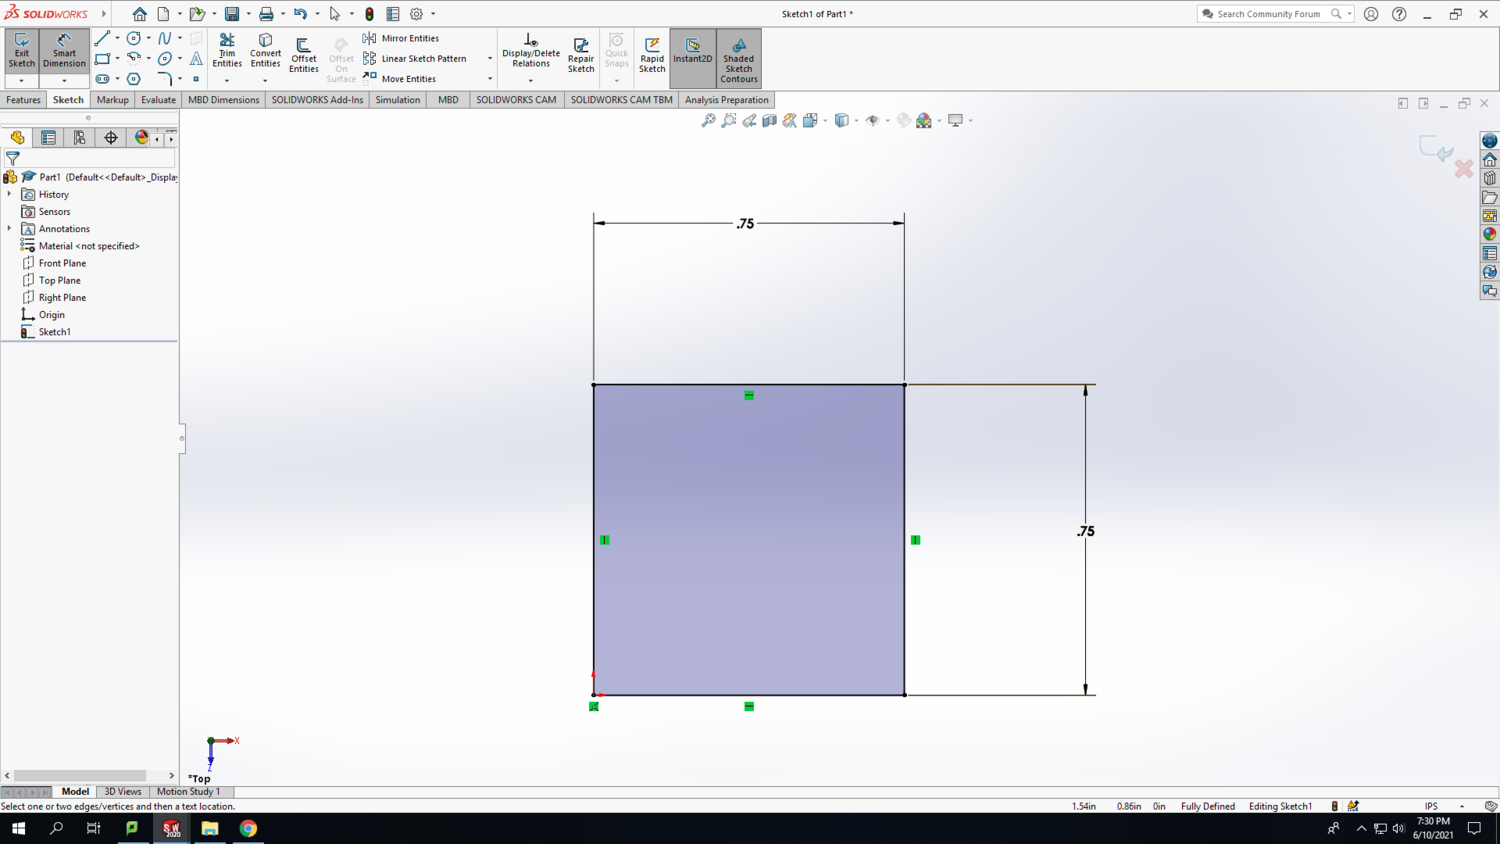
<strong>Step 3:</strong> Draw a rectangle with its bottom-left corner coincident with the origin. Use the Smart Dimension tool to make this rectangle a square with 3/4-inch sides. | <strong>Step 3:</strong> Draw a rectangle with its bottom-left corner coincident with the origin. Use the Smart Dimension tool to make this rectangle a square with 3/4-inch sides. | ||
| − | TW3 | + | [[File:TW3.png|1500px|none]] |
<br> | <br> | ||
<br> | <br> | ||
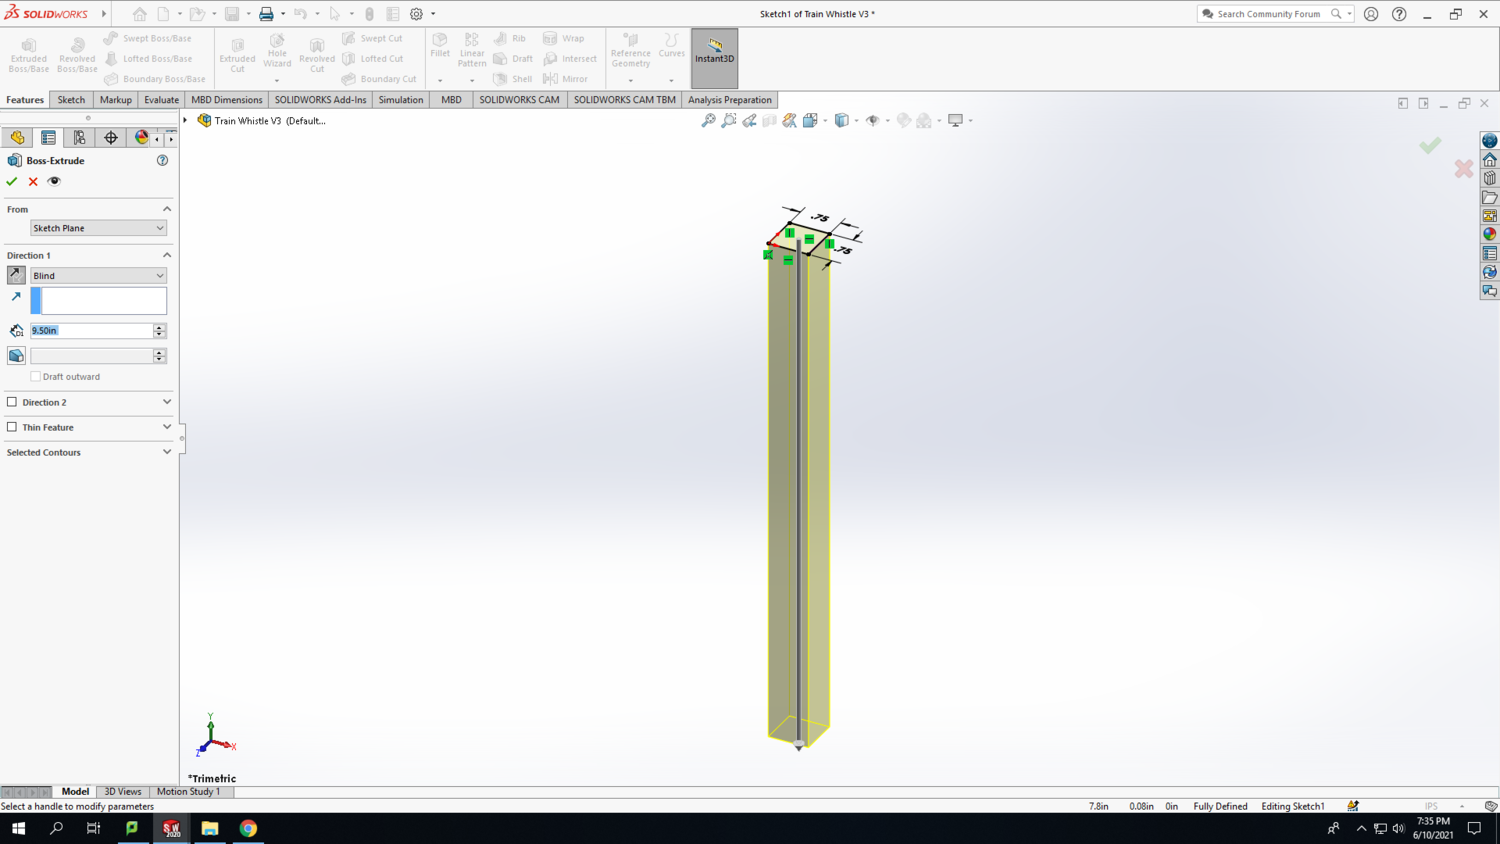
<strong>Step 4:</strong> Go to the Features tab and click on Extruded Boss/Base. Click on the Reverse Direction icon underneath the Direction 1 section in the left column to ensure that the square is extruded in the negative "y" direction. Set the depth to 9.5 inches, and click the green checkmark when you are finished. | <strong>Step 4:</strong> Go to the Features tab and click on Extruded Boss/Base. Click on the Reverse Direction icon underneath the Direction 1 section in the left column to ensure that the square is extruded in the negative "y" direction. Set the depth to 9.5 inches, and click the green checkmark when you are finished. | ||
| − | TW4 | + | [[File:TW4.png|1500px|none]] |
<br> | <br> | ||
<br> | <br> | ||
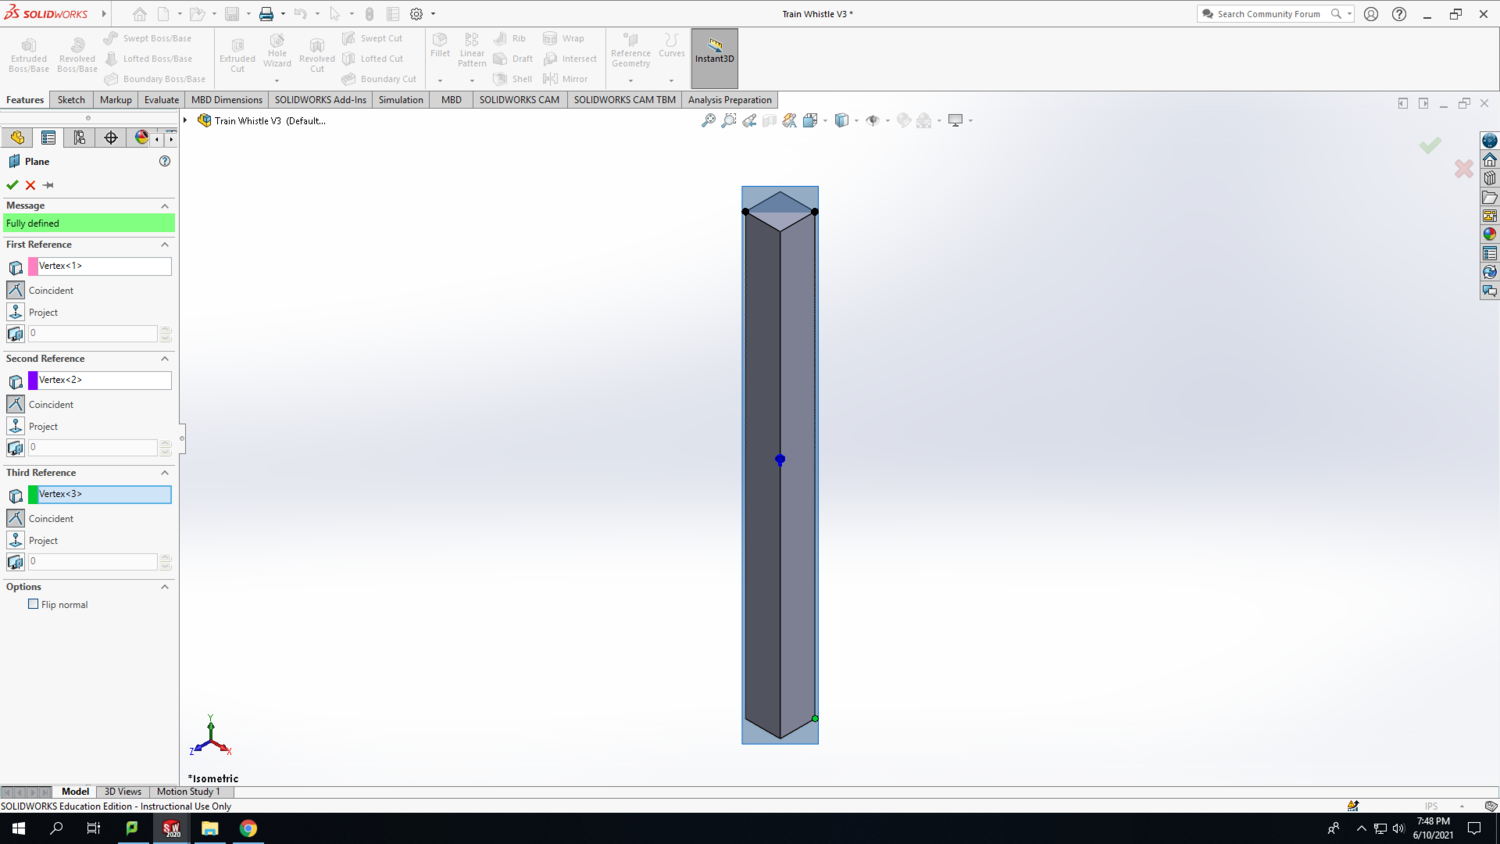
<strong>Step 5:</strong> You should now have a solid square column. On the Features tab, click on Reference Geometry and select a Plane. The left column will ask for three reference points; choose the origin, the diagonal point across the 3/4-inch square, and the point at the bottom of the extrusion as shown in the screenshot. If you imagine the square column as a really tall sandwich with the 3/4-inch squares at the top and bottom acting as the pieces of bread, the reference plane we are creating acts as the knife that cuts the sandwich diagonally into two triangular sandwich halves. Click the green checkmark when you are finished. | <strong>Step 5:</strong> You should now have a solid square column. On the Features tab, click on Reference Geometry and select a Plane. The left column will ask for three reference points; choose the origin, the diagonal point across the 3/4-inch square, and the point at the bottom of the extrusion as shown in the screenshot. If you imagine the square column as a really tall sandwich with the 3/4-inch squares at the top and bottom acting as the pieces of bread, the reference plane we are creating acts as the knife that cuts the sandwich diagonally into two triangular sandwich halves. Click the green checkmark when you are finished. | ||
| − | TW5 | + | [[File:TW5.png|1500px|none]] |
<br> | <br> | ||
<br> | <br> | ||
<strong>Step 6:</strong> We are now going to draw a sketch on the plane we just created. With the plane selected, go to the Sketch tab and click on Sketch. Draw a rectangle starting from the origin to the opposite diagonal edge. You can make this rectangle a construction rectangle by checking the For Construction box in the left column. Use the Smart Dimension tool to set the vertical side of the rectangle to 3/4 inch. Now would be a good time to double-check that your drawing is fully defined in the bottom right corner of the screen. | <strong>Step 6:</strong> We are now going to draw a sketch on the plane we just created. With the plane selected, go to the Sketch tab and click on Sketch. Draw a rectangle starting from the origin to the opposite diagonal edge. You can make this rectangle a construction rectangle by checking the For Construction box in the left column. Use the Smart Dimension tool to set the vertical side of the rectangle to 3/4 inch. Now would be a good time to double-check that your drawing is fully defined in the bottom right corner of the screen. | ||
| − | TW6 | + | [[File:TW6.png|1500px|none]] |
<br> | <br> | ||
<br> | <br> | ||
<strong>Step 7:</strong> From the bottom right corner of the rectangle, draw a vertical line along the edge of square column. Use the Smart Dimension tool to set the length to 3/4 inch. | <strong>Step 7:</strong> From the bottom right corner of the rectangle, draw a vertical line along the edge of square column. Use the Smart Dimension tool to set the length to 3/4 inch. | ||
| − | TW7 | + | [[File:TW7.png|1500px|none]] |
<br> | <br> | ||
<br> | <br> | ||
Revision as of 14:40, 14 June 2021
In this TV, we will take you through the steps of designing an egg shaker in SolidWorks, preparing the print in PrusaSlicer, and then 3D printing it using the Prusa 3D Printer.
Procedure
Buckle up...
SolidWorks
Train Whistle Body
Step 1: Open SolidWorks 2020, and select a new part. Don't forget to save your file frequently as you go. In the bottom-right corner of your SolidWorks window, change the units to IPS (inch, pound, second).
Step 2: Select the Front Plane in the design tree (the left column on your screen) to begin your sketch. Click on the Sketch tab above and click Sketch.
Step 3: Draw a rectangle with its bottom-left corner coincident with the origin. Use the Smart Dimension tool to make this rectangle a square with 3/4-inch sides.
Step 4: Go to the Features tab and click on Extruded Boss/Base. Click on the Reverse Direction icon underneath the Direction 1 section in the left column to ensure that the square is extruded in the negative "y" direction. Set the depth to 9.5 inches, and click the green checkmark when you are finished.
Step 5: You should now have a solid square column. On the Features tab, click on Reference Geometry and select a Plane. The left column will ask for three reference points; choose the origin, the diagonal point across the 3/4-inch square, and the point at the bottom of the extrusion as shown in the screenshot. If you imagine the square column as a really tall sandwich with the 3/4-inch squares at the top and bottom acting as the pieces of bread, the reference plane we are creating acts as the knife that cuts the sandwich diagonally into two triangular sandwich halves. Click the green checkmark when you are finished.
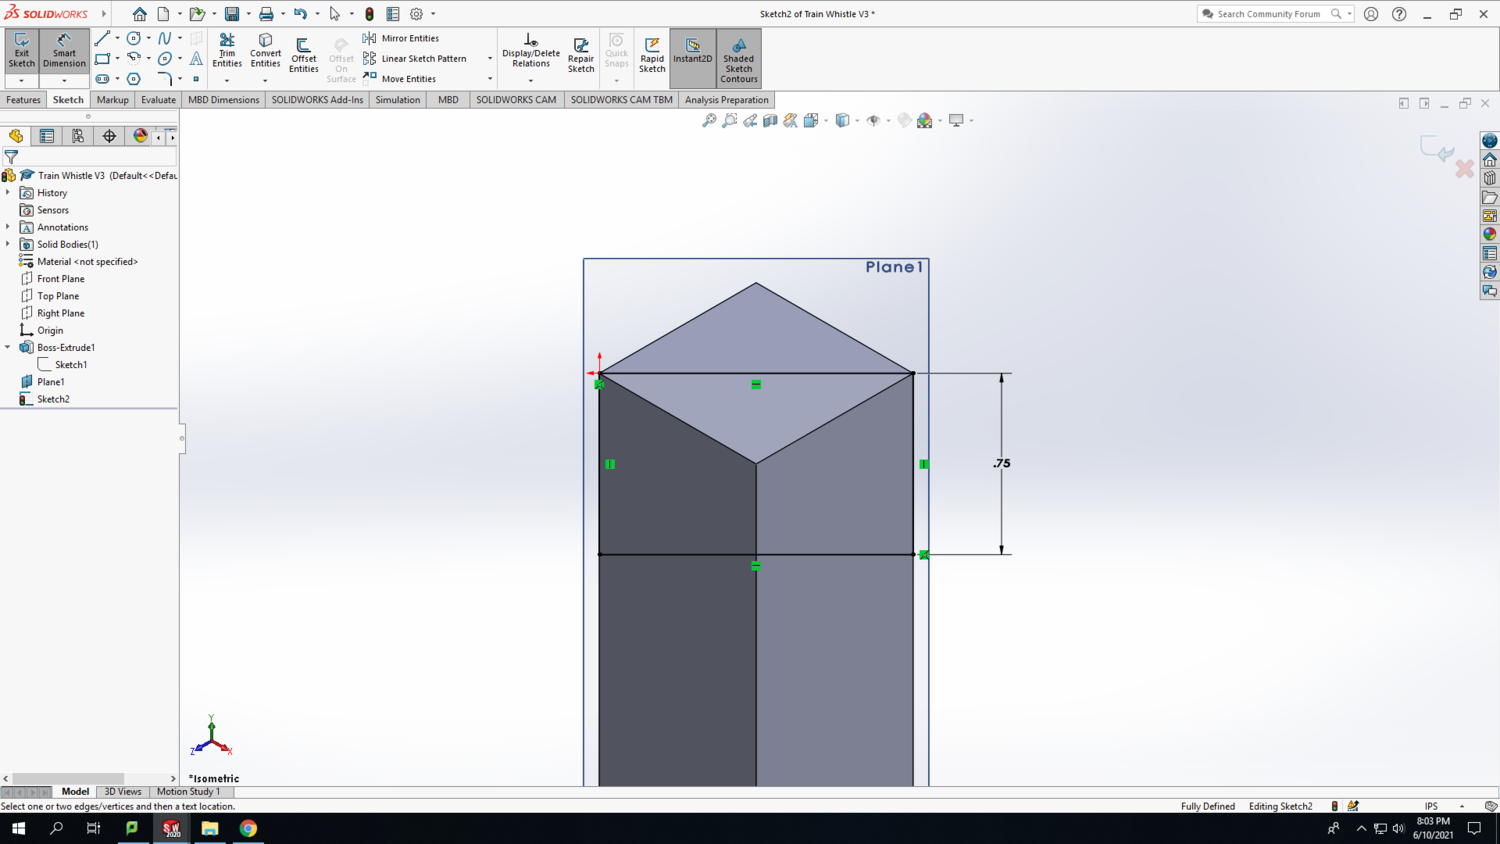
Step 6: We are now going to draw a sketch on the plane we just created. With the plane selected, go to the Sketch tab and click on Sketch. Draw a rectangle starting from the origin to the opposite diagonal edge. You can make this rectangle a construction rectangle by checking the For Construction box in the left column. Use the Smart Dimension tool to set the vertical side of the rectangle to 3/4 inch. Now would be a good time to double-check that your drawing is fully defined in the bottom right corner of the screen.
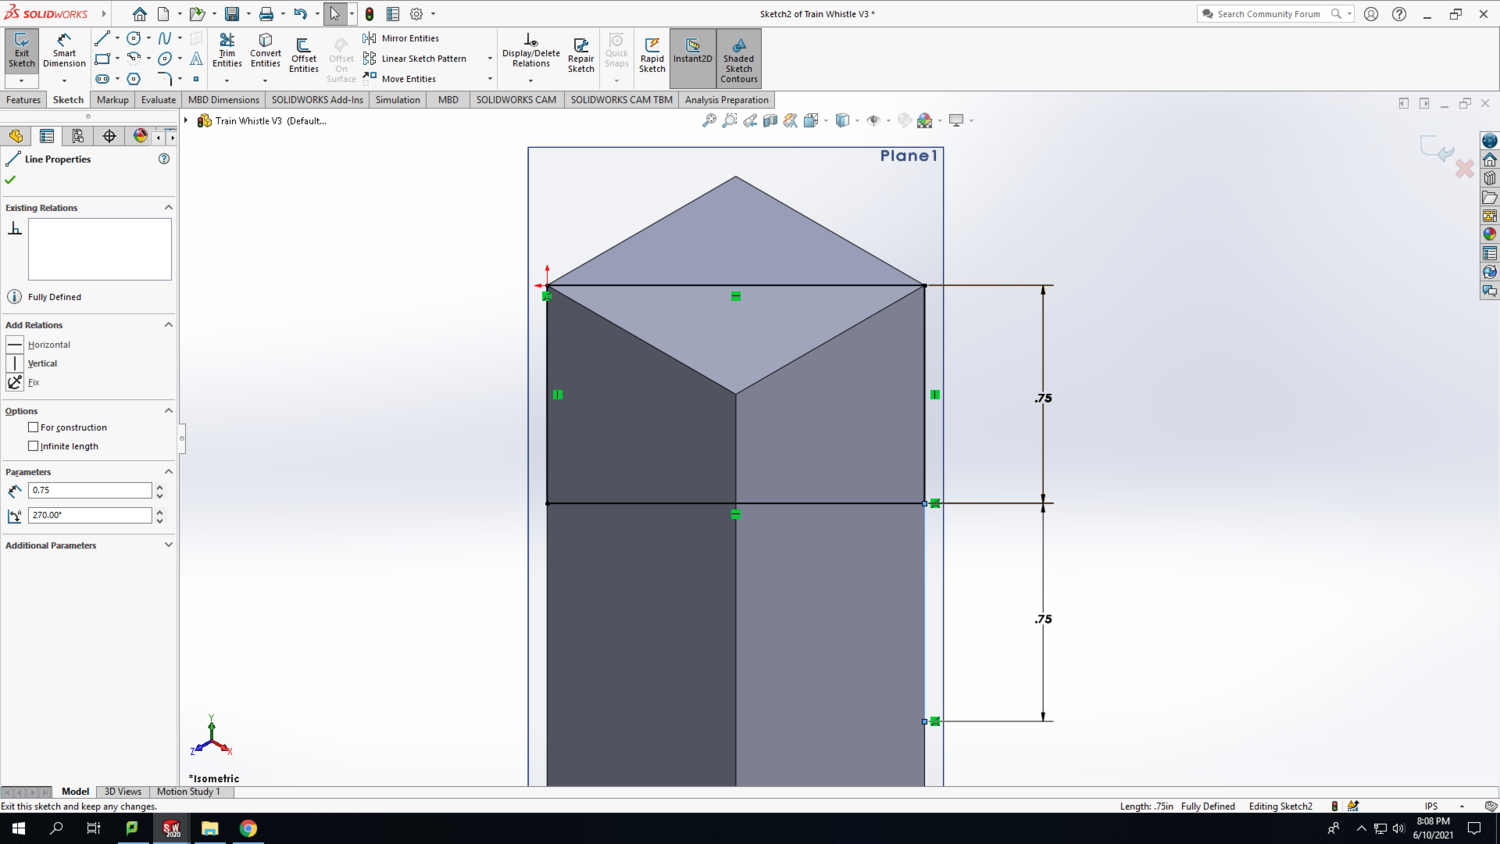
Step 7: From the bottom right corner of the rectangle, draw a vertical line along the edge of square column. Use the Smart Dimension tool to set the length to 3/4 inch.
Step 8: Draw a diagonal line from the vertical line to the midpoint of the rectangle's bottom line as shown in the screenshot.
TW8
Step 9: Finally, to ensure SolidWorks knows we are creating a closed area, draw a line from the midpoint of the rectangle's bottom line to the edge of the rectangle.
TW9
Step 10: This next step will be a lot easier if you select the plane and click on the Section View icon at the top of your drawing space. This will allow you to see a cross-section of the square column and select the enclosed area in the sketch easier. Click the green checkmark. SolidWorks often indicates enclosed areas in a sketch with darker shading as shown in the screenshot below (hence the darker triangle that we just drew). While you are here, use the Smart Dimension tool to measure the angle as shown in the second screenshot below. You should get about 35.26 degrees. Remember this angle because we will need it when making cuts on the wood bandsaw.
TW10
Step 11: Select the triangular area, go to the Features tab, and click on Extruded Cut. In the left column, check the box for Direction 2 so that the extruded cut is extending both directions out of the reference plane. Click the green checkmark when you are finished.
TW11
Step 12: Click the Section View icon again to see the full drawing again. Hold the Shift key and select both the top face and the extruded cut face as shown in the screenshot below.
TW12
Step 13: Go to the Features tab and click the drop-down arrow under Linear Pattern. Click on Circular Pattern. With any luck, both the Boss Extrude and the Cut Extrude will have automatically populated the Features and Faces section in the left column. Choose the Pattern Axis as the edge of the square column that is opposite the Cut Extrude that we performed in a previous step. There's more than one way to get the correct number of instances and spacing. In this example, I chose 4 instances equally spaced over 360 degrees. When everything looks good, click the green checkmark.
TW13
Step 14: Select the Top Plane in the Design Tree and start a new sketch by going to the Sketch tab and clicking Sketch. It also helps to be "Normal To" your sketching plane; you can find that icon by clicking on the Top Plane in the Design Tree. On the Sketch tab, click the drop-down arrow next to the rectangle and choose Center Rectangle. Draw a rectangle centered on the origin by clicking on the origin and dragging. Check the "For Construction" box in the left column before clicking the green checkmark. Use the Smart Dimension tool to make the rectangle a square with sides at 10/16 inch.
TW14
Step 15: Draw four circles--one centered on each corner of the construction square. Use the Smart Dimension tool to set the diameter of each circle at 1/2 inch.
TW15
Step 16: On the Features tab, click the Extruded Cut to create the four drilled holes. There's room for creativity here in choosing the depth of your drilled holes because the depth of the hole directly affects the frequency at which it resonates. For now, set the depth of all four holes to 4 7/16 inches (4.4375 inches).
TW16
Step 17: If math equations give you the urge to throw up, you'll definitely want to skip this step. This step will explain how you can attempt to "tune" your train whistle to a certain pitch or chord. The train whistle will still sound good even if you pick random hole depths; you can even choose to make all the holes the same depth for a single tone too. Two pieces of advice... First, I wouldn't recommend drilling a hole that is within a half inch of the total length of the workpiece (in our case, that means don't drill a hole deeper than 9 inches) because you don't want to accidentally drill through the bottom. Secondly, I wouldn't recommend drilling a hole shorter than 3 inches. Holes this short require a very fast stream of air to resonate, and they may not work well alongside the other deeper holes. The general rule of thumb is that deeper holes require less air to resonate than shorter holes.
Most Western music uses the concert pitch standard of A4 = 440 Hz. It's called "A4" because it occurs in the 4th octave on a standard 88-key piano. It's the first "A" note above middle C. If we double the frequency of A4, we get A5 = 880 Hz which is exactly one octave above A4. Most music derives from the 12-note chromatic scale that divides the notes from the root note to the octave into 12 "even" values. This means that each note is related to its adjacent note (up or down) by a factor of the 12th root of 2. You can see a table of notes with their respective frequencies at this link (Frequency of Musical Notes). Ok, enough music theory... back to the train whistle. We are making an assumption that the acoustic resonance of the drilled holes in our train whistle functions like a tube with one end closed off (stopped pipe). The equation for the resonance of a stopped pipe is shown in the image below. The point is: the equation shows that you can change the frequency/pitch of the note based on how deep you drill the holes in your train whistle. The diameter (d) of our holes will be fixed to 1/2 inch because that's the longest drill bit we have. Though there are many factors that affect the speed of sound, we can approximate it with 13504 in/s. We will also set n=1 because we are only concerned with the fundamental frequency, not higher order harmonics. Keep in mind that our assumptions mean that this equation will not yield exact results. However, it is close enough for our purposes, and based on the prototype I built, I was able to add a constant value that makes the equation a little more accurate for this particular project (C = 3/8 inch). You are welcome to ignore the hole depths given and experiment with these equations to produce various notes/chords to your own peril. The recommended hole depths given below are intended to produce a G-major or a G-minor train whistle. Results may vary.
TW17
Step 18: The easiest way to make to make the drilled holes different depths is to use the Convert Entities function under the Sketch tab. Orient the train whistle such that you can see down the drilled holes from the top. Click on the circular section at the bottom of the hole and click on Cut Extrude to indicate to SolidWorks that you would like to make another change to this sketch. Click on Convert Entities in the Sketch tab. This process basically takes a feature and creates a new sketch out of it, so keep an eye on your design tree as you go. Then you can click on the Cut Extrude function again on the Features tab to cut deeper into the train whistle an additional 4 6/16 inches (4.375 inches) for a total of 8 13/16 inches. This hole depth will attempt to produce a G4 note.
TW18
Step 19: Pick a different hole and perform the same Convert Entities and Cut Extrude steps to set the depth of the next hole. Add an additional 2 9/16 inches (2.5625 inches) to the hole depth for a total of 7 inches. This hole depth will attempt to produce a B4 note (the major third in a G-major triad). If--instead--you would like to create a G-minor triad, set the additional cut extrude depth to 3 inches for a total of 7 7/16 inches. This hole depth will attempt to produce a Bb4 note.
TW19
Step 20: Pick a third hole and perform the same Convert Entities and Cut Extrude steps to set the depth of the next hole. Add an additional 1 1/2 inches (1.5 inches) to the hole depth for a total of 5 15/16 inches. This hole depth will attempt to produce a D5 note (the fifth of the G-major triad). We will leave the fourth hole's depth at its original 4 7/16 inches because this will attempt to produce a G5 note (one octave up from G4). It's difficult to tell if each Cut Extrude produced the intended result, but you can change the view using the Display Style icon shown in the screenshot. By looking at the sideview of our train whistle, we can see that we have four different hole depths. If you would like to check your work, you can select the Evaluate tab and click on the Measure tool. By clicking on the top and the bottom of the drilled holes, SolidWorks will return the length or "minimum distance" between the two points/features. Now pat yourself on the back; you've completed part 1 of 3. But don't worry, the other two parts will be relatively simple.
TW20
Fipple Block
Step 21: .
TW21
Step 22: .
TW22
Step 23: .
TW23
Mouthpiece
Step 21: .
TW21
Step 22: .
TW22
Step 23: .
TW23
Assembly
This is one of the things that SolidWorks is really good at... assemblies.
