Through Hole Press

Make: Bungard
Model: PL-FAVORIT
Ace: Karson Rhoads (krhoads20@georgefox.edu).
Location: PCB Lab
Description
The Through Hole Press is a hand-operated through hole plating machine using rivets. A rivet is a component used to easily connect traces that are transitioning between the top and bottom layers of a PCB. Specifically, it is a small hollow copper tube that can be inserted on one side of the board, then - using a specialized rivet tool like the Through Hole Press - the rivets are pressed and deformed to connect both sides. There are other methods that carry out the same function, but using rivets is the fastest and most consistent method.
Documentation
Terminology
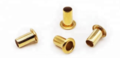
Rivet
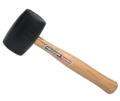
Rubber Mallet


Favorit Through Hole Press User Manual
Training
Overview
Rivets are used to connect traces on the top and bottom layers of a PCB. Rivets can be pressed using either the Through Hole Press or a rubber mallet. Each method has its perks, so students will learn both methods.
Demonstration
To show a complete knowledge of the press, the student will press 2 rivets by using a rubber mallet and 2 rivets using the press. A test PCB with many holes of different sizes will be provided and reused among students.
General Procedure
- Hole Sizing
- Before pressing a rivet, you need to make sure you design the holes so that they fit well. For a rivet to fit nicely in a hole, the hole diameter needs to be 0.1 mm (3.9 mils) larger than the rivet outer diameter. Use the table below to see what types of rivets Voltera offers. Also, refer to the chart below to assure you have the right size rivet for the hole you are pressing it into.
- Additionally, these rivets are hollow, so these can also be used to secure headers on your PCB. When placing vias in your design program, ensure the right drill size is used so the V-One leaves enough space when printing the ink.
- Using Through Hole Press
- Follow the instructions in the following video for setting up the correct tool set for your rivet.
- You will need to place all the rivets into the board. Some like to use their fingers, some like to use tweezers, it is up to you. Pinching the rivets on the side is the easiest way to go, as shown in the picture below.
- The through hole press pretty much just flattens down the other side on the rivet. Once all rivets have been placed, you will need to turn it upside down while keeping the rivets snug inside the hole in order to flatten the other side. Find a flat unused PCB, place it over the rivets, and turn it upside down to keep them from falling out. Using some tape to keep the plate stable on the board is something to try if things are not quite going your way.
- Before pressing the rivets, you need to make sure you have the right tool inserted into the upper and lower parts of the press. These tools can be found in the drawer in front of the press. The tool you choose should have the same inside diameter of the rivet you want to press.
- Now it is time to press the rivets. Place the board over the pin of the lower tool and fit a rivet over the pin as far as possible. To flatten the other side of the rivet, press the lever until it reaches the stop pin, then release.
- Your rivet should change somewhat like this. Pressing the rivet too hard can cause it to crack and damage the traces on the board, yet pressing the rivet too softly will to a poor job because it will not make a firm connection with the traces. It should be hit just hard enough to deform the rivet to make a firm connection with the traces. With practice, you'll learn the right amount of pressure to apply. Come stop by!
- Using the Rubber Mallet
- Rivets can also be pressed using a rubber mallet! The setup for the through hole press apply here as well. This method is faster than the Through Hole Press, but it is not as consistent.
- You will need to place all the rivets into the board. Some like to use their fingers, some like to use tweezers, it is up to you. Pinching the rivets on the side is the easiest way to go, as shown in the picture below.
- The through hole press pretty much just flattens down the other side on the rivet. Once all rivets have been placed, you will need to turn it upside down while keeping the rivets snug inside the hole in order to flatten the other side. Find a flat unused PCB, place it over the rivets, and turn it upside down to keep them from falling out. Using some tape to keep the plate stable on the board is something to try if things are not quite going your way.
- Using the rubber mallet and the rivet tool, you can press the rivet as shown in the picture below. Place the tip of the tool inside the rivet in an upright position, then hit the top of the tool with the mallet. The rivet tool can be found in the drawers in front of the PCB Printers.
- Your rivet should change somewhat like this. Pressing the rivet too hard can cause it to crack and damage the traces on the board, yet pressing the rivet too softly will to a poor job because it will not make a firm connection with the traces. It should be hit just hard enough to deform the rivet to make a firm connection with the traces. With practice, you'll learn the right amount of pressure to apply. Come stop by!


Safety
There is not much that can hurt you while using the machine or the rubber mallet. Do not put any part of yourself under the through hole press, because it will try to punch a hole in you. The same idea goes with the mallet and the its tool. Do not swing it or do any dumb stuff. This should not have to be said, but people are dumb sometimes. Please do not be that person.
As for the through hole press and its tools, there any many things that could damage it. Especially tools for small rivet diameter (0.4 and 0.6 mm) are sensitive and require careful handling. The tip of the upper tool and springloaded pin of the bottom tool may not be damaged. Avoid any excessive pressure on both parts! For transport reasons the tip of the lower tool may be hidden inside of the tool body. If so, carefully turn in the headless screw, until the tip shows up again, but still can be pushed into the body again.
Certification
Troubleshooting
If a rivet is not connecting the top and bottom layer traces, it is probably not pressed well, meaning it is not making good contact with the trace on both layers. A well placed rivet gives a good connection that is resistant to bending and twisting. In order to obtain a good long-term stability, we recommend that you apply our SUR-TIN immersion tin. This will help to prevent corrosion at the transition layer of the rivet and the copper clad (and will increase solderability). If you place component leads in the rivet holes and solder them from one side only, you should avoid thermal stress to the rivet. Certainly if solder passes the rivet it can cause the rivet to grow under the heat so that the rivet becomes loose. In such case, you should solder fix both rivet collars to the pads before inserting component leads.
Maintenance
General maintenance
There is little to no maintenance to be done on this machine. Just be sure to reset the space, put away any rivets, tools, and PCBs that you have used.
Specific Maintenance Tasks
| Maintenance Procedure | Frequency | Done By |
|---|---|---|
| General Cleaning | Before and After each use, put away any rivets, tools, and PCBs that you have used | Student |