Difference between revisions of "T-Shirt"
| (38 intermediate revisions by the same user not shown) | |||
| Line 10: | Line 10: | ||
|Uses equipment=Vinyl Printer+Cutter | |Uses equipment=Vinyl Printer+Cutter | ||
|Uses software=Inkscape | |Uses software=Inkscape | ||
| − | |Uses software= | + | |Uses software=VersaWorks |
|Uses software=CutStudio | |Uses software=CutStudio | ||
}} | }} | ||
| Line 27: | Line 27: | ||
== Create the T-shirt TV logo == | == Create the T-shirt TV logo == | ||
| − | + | We will use this logo for the front of the shirt. It will be a single color, so we will use the [[Vinyl Cutter]] to cut it out. | |
| − | + | * Download [[Media:TV_Shell.svg|TV_Shell.svg]]. | |
| − | + | * Download [[Media:T_shirt_outline.jpg|T_shirt_outline.jpg]]. | |
| − | + | * Open up the TV_Shell.svg in Inkscape. | |
| − | + | * Import the T_Shirt_outline.jpg into Inkscape. | |
| − | [[Image:T_Shirt_Trace_Bitmap.png | + | * Now turn this raster image into a vector image. With the image selected, run Path->Trace Bitmap. In the dialog box, I selected "Remove Background" so that the vector would be transparent. I also selected "Live Preview" so that I could see what was happening with different options. As it turns out, for this very simple bitmap, the default works just fine. |
| + | [[Image:T_Shirt_Trace_Bitmap.png]] | ||
| + | * After you click OK, it looks like nothing has happened, except that the select focus changes to the T-shirt itself. This is because there is actually another new object on top of the image - the newly created T-shirt trace. Try moving it. | ||
| + | [[Image:T_Shirt_Trace_Bitmap_Result.png|300px]] | ||
| + | * If you click on the "Edit Paths by Node" symbol [[Image:Inkscape_Edit_Paths_By_Node.png]] you will see that the image is now a vector made up of a series of paths | ||
| + | [[Image:T_Shirt_Vector_Image.png]]. | ||
| + | * Return to the standard select tool. [[Image:Inkscape_Standard_Select_Tool.png]] Select the box that is around the TV screen (it was placed there just for this purpose), and shift-select the new T-shirt Image. Use the Object->Align and Distribute command to bring up the Align and Distribute window, and then align them on center both vertically and horizontally. | ||
| + | [[Image:Inkscape_Align_And_Distribute.png]] | ||
| + | * When completed, you should have this image. | ||
| + | [[Image:Tv_tshirt_icon.png|300px]] | ||
| + | |||
| + | ===Video Demonstration=== | ||
| + | {{#evu:https://www.youtube.com/watch?v=uVtxNZIBhdE}} | ||
== Edit the Maker Hub logo == | == Edit the Maker Hub logo == | ||
| − | + | ||
| + | We will start with the Maker Hub logo with a transparent background. We want to add in the white background to help us see the image better. | ||
| + | |||
| + | * Download the [[Media:TV_Tshirt_Maker_Hub_Logo_Transparent.svg|Maker_Hub_Logo_Transparent.svg]] | ||
| + | * Start by selecting just the blue portion. You can do this by clicking the object, and then hold CTRL and click again. The first click selects the group, the second one selects the object within the group. You can try and move it to make sure you have just the top. Undo to move it back. Then copy and paste it. Move this extra copy aside so that we can work on it. | ||
| + | [[Image:TV_Tshirt_Maker_Hub_Logo_Duplicate.png]] | ||
| + | * Select Path->Dynamic Offset. This gives us an image with a little white handle on it. If you don't see this, make sure that your "Edit Paths by Node" select tool [[Image:Inkscape_Edit_Paths_By_Node.png]] is active. | ||
| + | [[Image:TV_Tshirt_Maker_Hub_Logo_Dynamic_Offset_Handle.png]] | ||
| + | * Drag the handle outward until the moment where there are no gaps in the light bulb. It should be fully encased by the gear. | ||
| + | [[Image:TV_Tshirt_Maker_Hub_Logo_Dynamic_Offset_Result.png]] | ||
| + | * Let's change the fill to white, and lower it to the bottom. To change the fill to white, click the white square on the bottom - or open the Fill and Stroke menu by going to Object->Fill and Stroke. In the Fill window on the right, make it a white fill. To lower it to the bottom, use the command of that name in the Object menu. | ||
| + | [[Image:TV_Tshirt_Maker_Hub_Logo_Dynamic_Offset_Result_White.png]] | ||
| + | * We now need to take this object and convert it to a path so that we can get rid of the light bulb inside and just have a pure white fill. Select Path->Object to Path | ||
| + | * Select the "Edit Paths by Node" select tool [[Image:Inkscape_Edit_Paths_By_Node.png]]. You should see each node highlighted on the image. | ||
| + | [[Image:TV_Tshirt_Maker_Hub_Logo_Dynamic_Offset_Result_White_Nodes.png]] | ||
| + | * Select and delete each of the nodes that make up the light bulb interior. This will eliminate the transparent region inside. | ||
| + | [[Image:TV_Tshirt_Maker_Hub_Logo_Dynamic_Offset_Result_White_Background.png]] | ||
| + | * We need to center this behind the original. Select everything (draw a box around everything using the normal select tool) - the using the Align and Distribute command, center the original on the white background. | ||
| + | [[Image:TV_Tshirt_Maker_Hub_Logo_Centered.png]] | ||
| + | * To send this to the [[Vinyl Printer+Cutter]] [[VersaWorks]] software, we need to add a stroke around the outside to serve as a cut line. Select the white background (make sure it is the white one - it is on the bottom and harder to get to - use the Ctrl-click if necessary). Give it a white stroke of size .01" You can change the color just to see what this is doing - but we will want to print it in white. | ||
| + | |||
| + | ===Video Demonstration=== | ||
| + | {{#evu:https://www.youtube.com/watch?v=ahjaw3UrnP4}} | ||
| + | |||
| + | == Prepare the TV T-Shirt Logo for the [[Vinyl Cutter]] == | ||
| + | |||
| + | * Load your saved TV T-Shirt Logo into Inkscape. Use the select tool to drag around the entire image, selected everything. | ||
| + | [[Image:Tv_Tshirt_Inkscape_Group.png]] | ||
| + | Then use Object->Group to group them into a single object. We want to resize the entire thing. | ||
| + | * Set the Inkscape measurement field to inches (in the top bar). | ||
| + | [[Image:Tv_Tshirt_Inkscape_Inches.png]] | ||
| + | * Make sure that the lock icon is set to lock. This will let you maintain the aspect ratio when you change just one of the dimensions. In the image directly below, it is still unlocked. Click it so that it locks like the following image. | ||
| + | [[Image:Tv_Tshirt_Inkscape_Lock.png]] | ||
| + | * Set the width to 3". | ||
| + | [[Image:Tv_Tshirt_Inkscape_3_locked.png]] | ||
| + | * Resize the page to the selection by clicking Edit->Resize Page to Selection. | ||
| + | * Now it is time to send it to [[CutStudio]] for printing. | ||
| + | === Print the TV T-Shirt Logo on the [[Vinyl Cutter]] | ||
| + | * Move to the [[Vinyl Cutter]] station, log in on the computer, and bring up your image in Inkscape. | ||
| + | * Select Extensions->Roland Cut Studio->Open in Cut Studio | ||
| + | [[Image:Tv_Tshirt_Inkscape_OpenCutStudio.png]] | ||
| + | * This will bring up the Cut Studio program with your image ready to print. | ||
| + | [[Image:Tv_Tshirt_CutStudio.png]] | ||
| + | * Select File->Cutting Setup to make sure that the proper printer is selected and everything is using the machine settings. | ||
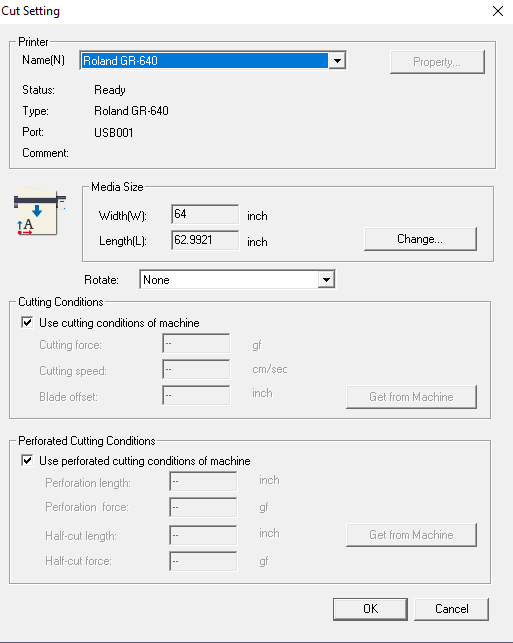
| + | [[Image:Tv_Tshirt_CutStudio_Cut_Setting.png]] | ||
| + | * Select Object->Weeding and make sure that we have a .25" weed border. | ||
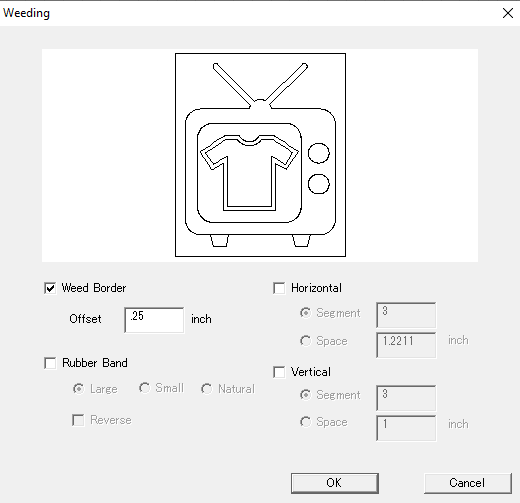
| + | [[Image:Tv_Tshirt_CutStudio_Object_Weeding.png]] | ||
| + | * Use the Size and Shape window on the right of the screen to rotate or rescale the graphic as needed. The origin of the cut, as set earlier, should be in the bottom left corner of the work-space. | ||
| + | Once you’re ready, select File->Cutting. Make sure that your image appears where you think it should (bottom left corner) and that the size seems correct. | ||
| + | * Refer to [[Vinyl Cutter#Training|Vinyl Cutter Training]] for information on how to operate the printer and weed your vinyl cutting. | ||
| + | |||
| + | == Print the Maker Hub Logo to the [[Vinyl Printer+Cutter]] == | ||
| + | * Go the the [[Vinyl Printer+Cutter]] Station and log into the computer there. | ||
| + | * Open Inkscape with the Maker Hub Logo file you completed (with the stroke). Save this file as a pdf (File->Save As ... then select PDF in the file type). Save based on the object's size, not the page size. | ||
| + | [[Image:Tv_Tshirt_Inkscape_PDF_Dialog.png]] | ||
| + | * Open [[VersaWorks]] | ||
| + | * Import the pdf file you just saved to Queue A. You need to check the settings for Queue A to make sure that the cut line has been set to the "Cut all paths" option. This will cut the stroke path that we added to the image. A graphic of your image will be loaded into the canvas on the right-hand side of the screen. | ||
| + | * If you double-click on this graphic, you should see a preview of your job with a moving, dashed, red line surrounding your image. This is the cut line. If this is correct, you can proceed to printing and cutting the image. | ||
| + | * You can change the size of your image if need be. You can also change the units to inches using Edit->Preferences | ||
| + | * When you are ready to print, right click on the file name in the queue, and hit print. | ||
| + | * Follow the instructions on the [[Vinyl Printer+Cutter#Training|Vinyl Printer+Cutter Training]] site to get your print and weed it. | ||
| + | |||
| + | == Transfer your images to the T-shirt using the [[Heat Press]] == | ||
| + | * Make sure that your images are cut down to a little beyond the edges (1/4" - 1/2" border) and weeded. Since these images are not reversed, we will want to use the transfer paper (which is, I think, preferred, as it lets you put the image onto the shirt and stick it where you want it). Cut some transfer paper to fit the images, and carefully press it onto the image. | ||
| + | * Use the squeegees to get the air out. You will want to avoid air bubbles as much as possible - specifically on the printed image. If air is above portions of the ink, we have seen it behave (color) slightly differently when pressed. For the single-color vinyl, this is not an issue. | ||
| + | * Take one of the images, remove the backing, and place it onto the T-shirt in the appropriate spot. | ||
| + | * Follow the directions on the [[Heat Press#Training|Heat Press Training]] page to affix the image. | ||
| + | * Repeat for the second image. | ||
Latest revision as of 11:22, 15 July 2019
In this TV, we will attach a logo on the front and back of a T-Shirt. We will use the Vinyl Cutter for the single color icon of this TV and use this for the front left of the T-shirt. The Maker Hub logo will be printed on the Vinyl Printer+Cutter and attached to the back. The Vinyl will all be affixed using the Heat Press.
Familiarize yourself with Inkscape
Follow the directions given in the Training section on the Inkscape page.
Create the T-shirt TV logo
We will use this logo for the front of the shirt. It will be a single color, so we will use the Vinyl Cutter to cut it out.
- Download TV_Shell.svg.
- Download T_shirt_outline.jpg.
- Open up the TV_Shell.svg in Inkscape.
- Import the T_Shirt_outline.jpg into Inkscape.
- Now turn this raster image into a vector image. With the image selected, run Path->Trace Bitmap. In the dialog box, I selected "Remove Background" so that the vector would be transparent. I also selected "Live Preview" so that I could see what was happening with different options. As it turns out, for this very simple bitmap, the default works just fine.

- After you click OK, it looks like nothing has happened, except that the select focus changes to the T-shirt itself. This is because there is actually another new object on top of the image - the newly created T-shirt trace. Try moving it.

- If you click on the "Edit Paths by Node" symbol
 you will see that the image is now a vector made up of a series of paths
 .
.
- Return to the standard select tool.
 Select the box that is around the TV screen (it was placed there just for this purpose), and shift-select the new T-shirt Image. Use the Object->Align and Distribute command to bring up the Align and Distribute window, and then align them on center both vertically and horizontally.

- When completed, you should have this image.
![]()
Video Demonstration
Edit the Maker Hub logo
We will start with the Maker Hub logo with a transparent background. We want to add in the white background to help us see the image better.
- Download the Maker_Hub_Logo_Transparent.svg
- Start by selecting just the blue portion. You can do this by clicking the object, and then hold CTRL and click again. The first click selects the group, the second one selects the object within the group. You can try and move it to make sure you have just the top. Undo to move it back. Then copy and paste it. Move this extra copy aside so that we can work on it.
![]()
- Select Path->Dynamic Offset. This gives us an image with a little white handle on it. If you don't see this, make sure that your "Edit Paths by Node" select tool is active.
![]()
- Drag the handle outward until the moment where there are no gaps in the light bulb. It should be fully encased by the gear.
![]()
- Let's change the fill to white, and lower it to the bottom. To change the fill to white, click the white square on the bottom - or open the Fill and Stroke menu by going to Object->Fill and Stroke. In the Fill window on the right, make it a white fill. To lower it to the bottom, use the command of that name in the Object menu.
![]()
- We now need to take this object and convert it to a path so that we can get rid of the light bulb inside and just have a pure white fill. Select Path->Object to Path
- Select the "Edit Paths by Node" select tool . You should see each node highlighted on the image.
![]()
- Select and delete each of the nodes that make up the light bulb interior. This will eliminate the transparent region inside.
![]()
- We need to center this behind the original. Select everything (draw a box around everything using the normal select tool) - the using the Align and Distribute command, center the original on the white background.
![]()
- To send this to the Vinyl Printer+Cutter VersaWorks software, we need to add a stroke around the outside to serve as a cut line. Select the white background (make sure it is the white one - it is on the bottom and harder to get to - use the Ctrl-click if necessary). Give it a white stroke of size .01" You can change the color just to see what this is doing - but we will want to print it in white.
Video Demonstration
Prepare the TV T-Shirt Logo for the Vinyl Cutter
- Load your saved TV T-Shirt Logo into Inkscape. Use the select tool to drag around the entire image, selected everything.
 Then use Object->Group to group them into a single object. We want to resize the entire thing.
- Set the Inkscape measurement field to inches (in the top bar).

- Make sure that the lock icon is set to lock. This will let you maintain the aspect ratio when you change just one of the dimensions. In the image directly below, it is still unlocked. Click it so that it locks like the following image.

- Set the width to 3".

- Resize the page to the selection by clicking Edit->Resize Page to Selection.
- Now it is time to send it to CutStudio for printing.
=== Print the TV T-Shirt Logo on the Vinyl Cutter
- Move to the Vinyl Cutter station, log in on the computer, and bring up your image in Inkscape.
- Select Extensions->Roland Cut Studio->Open in Cut Studio

- This will bring up the Cut Studio program with your image ready to print.

- Select File->Cutting Setup to make sure that the proper printer is selected and everything is using the machine settings.

- Select Object->Weeding and make sure that we have a .25" weed border.

- Use the Size and Shape window on the right of the screen to rotate or rescale the graphic as needed. The origin of the cut, as set earlier, should be in the bottom left corner of the work-space.
Once you’re ready, select File->Cutting. Make sure that your image appears where you think it should (bottom left corner) and that the size seems correct.
- Refer to Vinyl Cutter Training for information on how to operate the printer and weed your vinyl cutting.
Print the Maker Hub Logo to the Vinyl Printer+Cutter
- Go the the Vinyl Printer+Cutter Station and log into the computer there.
- Open Inkscape with the Maker Hub Logo file you completed (with the stroke). Save this file as a pdf (File->Save As ... then select PDF in the file type). Save based on the object's size, not the page size.

- Open VersaWorks
- Import the pdf file you just saved to Queue A. You need to check the settings for Queue A to make sure that the cut line has been set to the "Cut all paths" option. This will cut the stroke path that we added to the image. A graphic of your image will be loaded into the canvas on the right-hand side of the screen.
- If you double-click on this graphic, you should see a preview of your job with a moving, dashed, red line surrounding your image. This is the cut line. If this is correct, you can proceed to printing and cutting the image.
- You can change the size of your image if need be. You can also change the units to inches using Edit->Preferences
- When you are ready to print, right click on the file name in the queue, and hit print.
- Follow the instructions on the Vinyl Printer+Cutter Training site to get your print and weed it.
Transfer your images to the T-shirt using the Heat Press
- Make sure that your images are cut down to a little beyond the edges (1/4" - 1/2" border) and weeded. Since these images are not reversed, we will want to use the transfer paper (which is, I think, preferred, as it lets you put the image onto the shirt and stick it where you want it). Cut some transfer paper to fit the images, and carefully press it onto the image.
- Use the squeegees to get the air out. You will want to avoid air bubbles as much as possible - specifically on the printed image. If air is above portions of the ink, we have seen it behave (color) slightly differently when pressed. For the single-color vinyl, this is not an issue.
- Take one of the images, remove the backing, and place it onto the T-shirt in the appropriate spot.
- Follow the directions on the Heat Press Training page to affix the image.
- Repeat for the second image.