Difference between revisions of "Spot Welder"
Jump to navigation
Jump to search
| (11 intermediate revisions by 5 users not shown) | |||
| Line 10: | Line 10: | ||
|Has imagedesc=Protoflow Reflow Oven | |Has imagedesc=Protoflow Reflow Oven | ||
|Has description= | |Has description= | ||
| − | |Has certification= | + | |Has certification=https://georgefox.instructure.com/courses/1281 |
|Has make=Miller | |Has make=Miller | ||
|Has model=LMSW-52 | |Has model=LMSW-52 | ||
| + | |Has serial number=MJ328801N | ||
|Has group=Circuit Board Design | |Has group=Circuit Board Design | ||
| − | |Has ace= | + | |Has ace=Levi Gibson;lgibson19@georgefox.edu |
}} | }} | ||
| − | [[{{#show: {{FULLPAGENAME}}|?Has icon|link=none}}| | + | [[{{#show: {{FULLPAGENAME}}|?Has icon|link=none}}|140px|left|top|{{#show: {{FULLPAGENAME}}|?Has icondesc}}]] |
Make: {{#show: {{PAGENAME}} |?Has make}} | Make: {{#show: {{PAGENAME}} |?Has make}} | ||
Model: {{#show: {{PAGENAME}} |?Has model}} | Model: {{#show: {{PAGENAME}} |?Has model}} | ||
| + | |||
| + | Serial Number: {{#show: {{PAGENAME}} |?Has serial number}} | ||
Ace: {{#show: {{PAGENAME}} |?Has ace.Has name}} ({{#show: {{PAGENAME}} |?Has ace.Has email address}}). | Ace: {{#show: {{PAGENAME}} |?Has ace.Has name}} ({{#show: {{PAGENAME}} |?Has ace.Has email address}}). | ||
Location: {{#show: {{PAGENAME}} |?Is located in facility}} | Location: {{#show: {{PAGENAME}} |?Is located in facility}} | ||
| + | |||
__TOC__ | __TOC__ | ||
| + | |||
| + | ==Safety First== | ||
| + | [[File:Safety First HD2.png|left|150px]] | ||
| + | * Wear gloves and welding helmet. | ||
| + | * Don't have bare skin exposed. | ||
| + | * Don't weld in wet gear or standing water. | ||
| + | * Welded material will be hot. | ||
| + | |||
| + | |||
| + | |||
==Description== | ==Description== | ||
| Line 37: | Line 51: | ||
==Documentation== | ==Documentation== | ||
| − | + | ||
| + | [[Media:Spot_Welder_Manual.pdf|Spot Welder User Manual]] | ||
====Terminology==== | ====Terminology==== | ||
| Line 57: | Line 72: | ||
# Turn on the spot welder | # Turn on the spot welder | ||
# Place the material being welded between the clamps. | # Place the material being welded between the clamps. | ||
| − | # Clamp down on the two pieces of material for | + | # Clamp down on the two pieces of material for approximately 2 seconds. The time required to weld may vary slightly depending on the material and thickness. |
# Grab workpiece with a set of pliers, and open the clamp. | # Grab workpiece with a set of pliers, and open the clamp. | ||
<references /> | <references /> | ||
| − | |||
| − | |||
| − | |||
| − | |||
| − | |||
| − | |||
==Certification== | ==Certification== | ||
| − | [https:// | + | [https://georgefox.instructure.com/courses/1281 Canvas Quiz] |
==Troubleshooting== | ==Troubleshooting== | ||
Revision as of 10:22, 23 June 2022
Make: Miller
Model: LMSW-52
Serial Number: MJ328801N
Ace: Levi Gibson (lgibson19@georgefox.edu).
Location: Welding Shop
Safety First
- Wear gloves and welding helmet.
- Don't have bare skin exposed.
- Don't weld in wet gear or standing water.
- Welded material will be hot.
Description
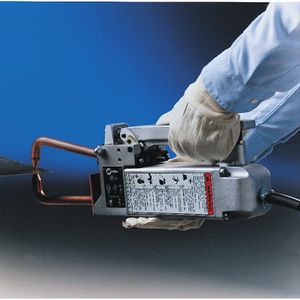
Resistance spot welding is a process in which contacting metal surface points are joined by the heat obtained from resistance to electric current. The Miller LMSW-52 Air-Cooled Spot Welder is a lightweight unit that is portable, easy to operate and excellent for welding mild, galvanized or stainless sheet materials.
- LMSW-52 spot welder manual [1]
Here is an example of spot welding and some good basic information.
Documentation
Terminology
- Tongs-
Training
Operation
Here are some general setup rules of thumb:
- The maximum weld capacity is 2 sheets of 16 gauge material.
Demonstration
For the demonstration you will need to perform a spot weld using two pieces of scrap material.
General Procedure
- Ensure the material being welded should be clear of any oil or dust
- Turn on the spot welder
- Place the material being welded between the clamps.
- Clamp down on the two pieces of material for approximately 2 seconds. The time required to weld may vary slightly depending on the material and thickness.
- Grab workpiece with a set of pliers, and open the clamp.
Certification
Troubleshooting
Maintenance
General maintenance
The welding tips should be inspected and cleaned as needed.
Specific Maintenance Tasks
| Maintenance Procedure | Frequency | Done By |
|---|---|---|
| xxx | xxx | Student/Tech |
| xxxx | xxxx | Student/Tech |
| xxxx | xxxx | Student/Tech |

