Difference between revisions of "Slip Roller"
Jump to navigation
Jump to search
| Line 34: | Line 34: | ||
=== Rolling Steps === | === Rolling Steps === | ||
| − | #Adjust the radius by turning the knobs on the back of the machine. | + | #Adjust the radius by turning the knobs on the back of the machine. This adjusts the distance between the rollers. |
| − | #Adjust the | + | #Adjust the amount of pinch using the knobs on the front left of the machine for materials of different thickness. If the gap between the rollers is too far apart the material will slip on the rollers. |
#Begin by pulling the right side of the top roller out of its slot. | #Begin by pulling the right side of the top roller out of its slot. | ||
#Insert your piece that you would like to roll between the rollers. | #Insert your piece that you would like to roll between the rollers. | ||
#Re-secure the top roller inside of the slot prior to rolling. | #Re-secure the top roller inside of the slot prior to rolling. | ||
| − | # | + | #Slowly rotate the handle until you have rolled to the desired radius. If the initial radius is not the desired radius, re-roll at a slightly tighter radius. |
| − | # | + | #Unlock the top roller to slide your rolled metal off the end of roller. |
== 3 commandments == | == 3 commandments == | ||
Revision as of 12:23, 5 May 2020
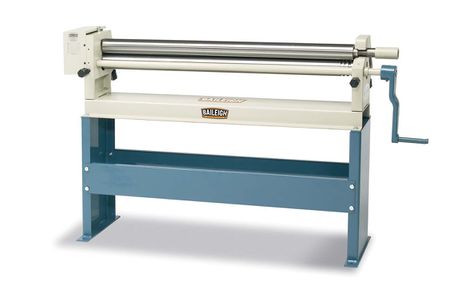
A slip roller is a machine used to roll sheet metal with a formed radius. In addition to rolling sheet metal, the roller in the shop includes wire grooves for bending solid rod. The minimum forming diameter of the roller in the shop is 4.5"
The current Ace of the Slip Roller is Needed (Makerhub@georgefox.edu).
Documentation
Resources
Training
Rolling Steps
- Adjust the radius by turning the knobs on the back of the machine. This adjusts the distance between the rollers.
- Adjust the amount of pinch using the knobs on the front left of the machine for materials of different thickness. If the gap between the rollers is too far apart the material will slip on the rollers.
- Begin by pulling the right side of the top roller out of its slot.
- Insert your piece that you would like to roll between the rollers.
- Re-secure the top roller inside of the slot prior to rolling.
- Slowly rotate the handle until you have rolled to the desired radius. If the initial radius is not the desired radius, re-roll at a slightly tighter radius.
- Unlock the top roller to slide your rolled metal off the end of roller.
3 commandments
Stuff about the 3 commandments.
Safety
- Never put your finger in between the rollers as you could crush them.
