Difference between revisions of "Rework Station"
| (28 intermediate revisions by 8 users not shown) | |||
| Line 1: | Line 1: | ||
| + | {{#set: | ||
| + | |Is equipment=True | ||
| + | |Is located in facility=PCB Lab | ||
| + | |Is used in domain=Electronics | ||
| + | |Has name={{PAGENAME}} | ||
| + | |Has make=Zephyrtronics | ||
| + | |Has model=ZT-2, ZT-3, ZT-1-CLS-DPU, Hakko FR-301, Quick861DW | ||
| + | |Has serial number= | ||
| + | |Has life expectancy= | ||
| + | |Has year of manufacture or purchase= | ||
| + | |Has replacement cost= | ||
| + | |Has icon=File:Solder Rework Station.png | ||
| + | |Has icondesc=Rework Station Icon | ||
| + | |Has iconwname=File:image_pending.png | ||
| + | |Has image=File:Rework Station.jpg | ||
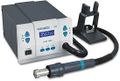
| + | |Has imagedesc=The Rework Station | ||
| + | |Has description= | ||
| + | |Has certification=https://georgefox.instructure.com/courses/1297 | ||
| + | |Has group= | ||
| + | |Has ace=Karson Rhoads;krhoads20@georgefox.edu | ||
| + | }} | ||
[[File:Rework Station.jpg|thumb]] | [[File:Rework Station.jpg|thumb]] | ||
| − | + | [[File:Solder Rework Station.png|left|110x110px|frameless]] | |
| − | [[File:Solder Rework Station.png|left| | ||
Make: {{#show: {{PAGENAME}} |?Has make}} | Make: {{#show: {{PAGENAME}} |?Has make}} | ||
| − | Model: | + | Model: {{#show: {{PAGENAME}} |?Has model}} |
Ace: {{#show: {{PAGENAME}} |?Has ace.Has name}} ({{#show: {{PAGENAME}} |?Has ace.Has email address}}). | Ace: {{#show: {{PAGENAME}} |?Has ace.Has name}} ({{#show: {{PAGENAME}} |?Has ace.Has email address}}). | ||
Location: {{#show: {{PAGENAME}} |?Is located in facility}} | Location: {{#show: {{PAGENAME}} |?Is located in facility}} | ||
| − | + | ||
| − | + | ||
| − | |||
__TOC__ | __TOC__ | ||
| Line 34: | Line 53: | ||
| − | User Manual | + | [http://www.zeph.com/smdpreheater.htm Zephyrtronics Airbath] |
| + | |||
| + | [http://www.zeph.com/pencil.html Zephyrtronics Airpencil] | ||
| + | |||
| + | [http://www.zeph.com/zt3web.htm Zephyrtronics Airpick] | ||
| + | |||
| + | [[Media:Fr301e20180402.pdf|Hakko FR-301 User Manual]] | ||
| + | |||
| + | [[Media:861DW-english--manual.pdf|Quick-861DW User Manual]] | ||
==Training== | ==Training== | ||
| − | ==== | + | ====Operation==== |
| − | The Airbath can heat up to 205 °C, which can be enough to melt the solder on a PCB. | + | The Airbath can heat up to 205 °C, which can be enough to melt the solder on a PCB. Some solder melts at even higher temperatures than this, which can be achieved using the Air Pencil and/or Heat Gun. Essentially, the Air Bath heats up the board and the Air Pencil finishes the job by heating up the part of the board that we want to fix (because we don't want to melt the solder on the parts that are already good to go). This is where the Air Pick and tweezers come in. After heating up the part we want to fix, the tweezers are used to remove a component while the Air Pick uses a vacuum to place a component on the board. If the component is too small, using tweezers to pick up the component is also a good alternative. |
====Demonstration==== | ====Demonstration==== | ||
| Line 46: | Line 73: | ||
====General Procedure==== | ====General Procedure==== | ||
| − | # Fixing/Replacing SMD Components | + | |
| − | ## Before turning on the Air Bath, clamp the PCB on the black stand, preferably placing it so that the component you want to fix is directly above the air. You should not be able to move the board once it is clamped. Keeping it sturdy helps from accidentally moving the PCB during the reworking process. | + | #Fixing/Replacing SMD Components |
| − | ## The Air Bath has a power switch on the left, three buttons on the right, and a screen on the right. The switch has 3 positions which allows you to choose Cool, Off, and Warm by pressing it in their respective directions. The button on the right allow you to adjust the temperature in a rather funny way. The middle button has a down arrow while the right button has an up arrow, indicating which button decreases/increases the temperature of the bath. However, you need to hold down the left button while doing so. For instance, to increase the temperature, you would hold the left and right buttons at the same time.[[File:AirBathBoi.jpg|none|thumb]] | + | ##Before turning on the Air Bath, clamp the PCB on the black stand, preferably placing it so that the component you want to fix is directly above the air. You should not be able to move the board once it is clamped. Keeping it sturdy helps from accidentally moving the PCB during the reworking process. |
| − | ## Now you will heat up the Air Bath. Hit the Power switch on the front, and set the temperature about 20-30 °C below the solder's melting point. The melting point for your solder can be found using the table below. Voltera's Solder Paste (Orange) melts at lower temperatures than the Sn63Pb37 Solder Paste (Blue). If the Voltera Solder Paste says T4 at the top, heat the Air Bath to 180 °C. If the Voltera Solder Paste says T5 at the top, heat the Air Bath to 150 °C. If you are using the Sn63Pb37 Solder Paste, heat the Air Bath to 150 °C. [[File:...meltingPointTable.png|none|thumb]] | + | ##The Air Bath has a power switch on the left, three buttons on the right, and a screen on the right. The switch has 3 positions which allows you to choose Cool, Off, and Warm by pressing it in their respective directions. The button on the right allow you to adjust the temperature in a rather funny way. The middle button has a down arrow while the right button has an up arrow, indicating which button decreases/increases the temperature of the bath. However, you need to hold down the left button while doing so. For instance, to increase the temperature, you would hold the left and right buttons at the same time.[[File:AirBathBoi.jpg|none|thumb]] |
| − | ## Once the board is heated, you can use the Air Pencil to heat up a specific component. The pencil blows hot air out the end. When you turn it on, adjust the settings to be 3/4 of the heat capacity and about 1/3 of the air flow. We do this because when the air flow is maximized at full temperature, it does not get hot enough to melt the solder. Too much air flow is bad. | + | ##Now you will heat up the Air Bath. Hit the Power switch on the front, and set the temperature about 20-30 °C below the solder's melting point. The melting point for your solder can be found using the table below. Voltera's Solder Paste (Orange) melts at lower temperatures than the Sn63Pb37 Solder Paste (Blue). If the Voltera Solder Paste says T4 at the top, heat the Air Bath to 180 °C. If the Voltera Solder Paste says T5 at the top, heat the Air Bath to 150 °C. If you are using the Sn63Pb37 Solder Paste, heat the Air Bath to 150 °C. [[File:...meltingPointTable.png|none|thumb]] |
| − | ## Hold the tip of the pencil over the SMD you want to solder/desolder, and move it slightly around the leads to allow for more distribution of heat. If it is not heating it up, try turning the heat of the pencil higher. This should allow for your SMD components solder to melt, and you will be able to pick up the component up with a pair of static-safe tweezers or the Air Pick. If you are soldering a part on, make sure to generously apply flux to the pads, and make sure all the solder sticks to the pads after heating. | + | ##Once the board is heated, you can use the Air Pencil to heat up a specific component. The pencil blows hot air out the end. When you turn it on, adjust the settings to be 3/4 of the heat capacity and about 1/3 of the air flow. We do this because when the air flow is maximized at full temperature, it does not get hot enough to melt the solder. Too much air flow is bad. |
| − | ## If the pencil is not doing a good enough job to heat up the component, then you may graduate to using the bigger heat gun, the Quick861DW. The same theoretical concepts apply. | + | ##Hold the tip of the pencil over the SMD you want to solder/desolder, and move it slightly around the leads to allow for more distribution of heat. If it is not heating it up, try turning the heat of the pencil higher. This should allow for your SMD components solder to melt, and you will be able to pick up the component up with a pair of static-safe tweezers or the Air Pick. If you are soldering a part on, make sure to generously apply flux to the pads, and make sure all the solder sticks to the pads after heating. |
| − | ## The Air Pick uses a vacuum to pick up and place components. Typically you would use both hands for this; one hand heats up the component with the pencil and the other grabs the component with the pick. | + | ##If the pencil is not doing a good enough job to heat up the component, then you may graduate to using the bigger heat gun, the Quick861DW. The same theoretical concepts apply, however, one potential downside of this is that it affects a larger area than the pencil. You may unintentionally melt the solder of components that you don't want to melt, so be extra careful my dudes. |
| − | ## On the handle of the pick there is a divot that is connected to the vacuum. When you plug the divot with your finger, it will enable it to pick up a component. When you release your finger from the divot, it will let go of the component. There are different tips that you will place on the end of the tip based on the component you want to pick up, each having a different size for varying components. | + | ##The Air Pick uses a vacuum to pick up and place components. Typically you would use both hands for this; one hand heats up the component with the pencil and the other grabs the component with the pick. |
| − | # Desoldering Through Hole Components | + | ##On the handle of the pick there is a divot that is connected to the vacuum. When you plug the divot with your finger, it will enable it to pick up a component. When you release your finger from the divot, it will let go of the component. There are different tips that you will place on the end of the tip based on the component you want to pick up, each having a different size for varying components. |
| − | ## For desoldering through hole components, you will want to use the Desoldering Gun. It has a hot tip that can fit over a solder joint and utilizes a vacuum when the trigger is pulled. As a result, it melts the solder and sucks it into a cartridge, completely removing the joint. | + | #Desoldering Through Hole Components |
| − | ## Before using the Desoldering Gun, make sure you have the little metal stand for the gun to sit on for safety purposes. Have Solder ready nearby to tin the tip before use, and clean the tip after tinning using the wire mesh. | + | ##For desoldering through hole components, you will want to use the Desoldering Gun. It has a hot tip that can fit over a solder joint and utilizes a vacuum when the trigger is pulled. As a result, it melts the solder and sucks it into a cartridge, completely removing the joint. |
| − | ## On the handle of the gun there is a temperature control wheel that ranges from 1-4 (coolest to hottest). Be sure to set it to the correct temperature using the graphic below. Typically, a through hole component would require you to set the scale to 2.[[File:...SolderingGun.png|none|thumb]] | + | ##Before using the Desoldering Gun, make sure you have the little metal stand for the gun to sit on for safety purposes. Have Solder ready nearby to tin the tip before use, and clean the tip after tinning using the wire mesh. |
| − | ## To use the Desoldering Gun, briefly put the top over a solder joint (not completely on the PCB or you might damage it), press the trigger to enable the vacuum, and the solder should be sucked away! | + | ##On the handle of the gun there is a temperature control wheel that ranges from 1-4 (coolest to hottest). Be sure to set it to the correct temperature using the graphic below. Typically, a through hole component would require you to set the scale to 2.[[File:...SolderingGun.png|none|thumb]] |
| − | ## Tin the tip before cooldown, and take note that the cooldown may take a bit of time. Don't burn yourself! | + | ##To use the Desoldering Gun, briefly put the top over a solder joint (not completely on the PCB or you might damage it), press the trigger to enable the vacuum, and the solder should be sucked away! |
| + | ##Tin the tip before cooldown, and take note that the cooldown may take a bit of time. Don't burn yourself! | ||
| + | |||
==Safety== | ==Safety== | ||
| − | + | The most important thing about all these machines: THEY GET REALLY HOT! | |
| + | |||
| + | Be so so careful because these machines can get up to temperatures of potentially 700°F. Always be wary of where you are blowing the hot air with the air guns, so you don’t melt other things. Be wary of how hot your PCB can get, and always put the cooling setting on after you’re finished with the Air Bath before picking your PCB up, because you can burn yourself. | ||
==Certification== | ==Certification== | ||
| + | Complete the <strong>PCB Lab - {{PAGENAME}} Module</strong> at the link below to gain access to the {{PAGENAME}}. The Maker Hub Canvas course pertains to all facilities and equipment contained in the Maker Hub; simply complete the quizzes for the facilities/equipment you wish to use in the Maker Hub. Please email <span style="color:blue">makerhub@georgefox.edu</span> if you have any questions. | ||
| − | + | [https://georgefox.instructure.com/enroll/G7CTPX Maker Hub Canvas Course] | |
==Troubleshooting== | ==Troubleshooting== | ||
| + | |||
| + | #Suppose the solder isn't melting. Consult the temperature table in the General Procedure, chances are that you just need to make it hotter, little by little. | ||
| + | #Suppose the Air Pick is not picking up the component. Use the appropriate tip and make sure you are plugging the little divot to enable it to pick up. If these aren't working, resort to using tweezers. | ||
| + | #Suppose the components are getting blown away from the pads you want it to sit on. Well, turn down the air my dude. | ||
==Maintenance== | ==Maintenance== | ||
====General maintenance==== | ====General maintenance==== | ||
| − | + | Wrap all cords and make them look tidy. Make sure all devices are turned off and returned to their original place. Do not leave tweezers or extra parts laying around, put them back in the accessories drawer. | |
====Specific Maintenance Tasks==== | ====Specific Maintenance Tasks==== | ||
| Line 81: | Line 117: | ||
!Done By | !Done By | ||
|- | |- | ||
| − | | | + | |General Cleaning |
| − | | | + | |Before and after every use |
| − | | | + | |Student |
| + | |- | ||
| + | |Tinning tip of Desoldering Gun | ||
| + | |Before and after every use | ||
| + | |Student | ||
| + | |- | ||
| + | |Emptying solder out of desoldering gun reservoir | ||
| + | |As needed | ||
| + | |Student/Ace | ||
| + | |- | ||
| + | |Replacing desoldering gun filter | ||
| + | |As needed | ||
| + | |Ace | ||
|} | |} | ||
| − | |||
| − | |||
| − | |||
| − | |||
| − | |||
| − | |||
| − | |||
| − | |||
| − | |||
| − | |||
| − | |||
| − | |||
| − | |||
| − | |||
| − | |||
| − | |||
| − | |||
| − | |||
| − | |||
| − | |||
| − | |||
| − | |||
| − | |||
| − | |||
| − | |||
| − | |||
| − | |||
| − | |||
| − | |||
| − | |||
| − | |||
| − | |||
| − | |||
| − | |||
| − | |||
| − | |||
| − | |||
| − | |||
| − | |||
| − | |||
| − | |||
| − | |||
| − | |||
| − | |||
| − | |||
| − | |||
| − | |||
| − | |||
| − | |||
| − | |||
| − | |||
| − | |||
| − | |||
| − | |||
| − | |||
| − | |||
| − | |||
| − | |||
| − | |||
| − | |||
| − | |||
| − | |||
Latest revision as of 10:06, 28 February 2024


Make: Zephyrtronics
Model: ZT-2, ZT-3, ZT-1-CLS-DPU, Hakko FR-301, Quick861DW
Ace: Karson Rhoads (krhoads20@georgefox.edu).
Location: PCB Lab
Description
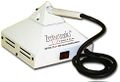
The Rework Station is essential for fixing what you messed up during the fabrication process. Consisting of an Air Bath, Air Pencil, and Air Pick, the Rework Station allows you heat up a specific area of the PCB and make modifications, whether that means adding/removing some solder on the pads, rotating a component, or completely replacing a component. Other tools are available for similar purposes, such as a desoldering gun, and an additional heat gun for larger components.
Documentation
Terminology
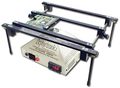
Air Bath (ZT-1-CLS-DPU)
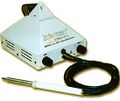
Air Pencil (ZT-2)
Air Pick (ZT-3)
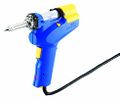
Desoldering Gun (Hakko FR-301)
Heat Gun (Quick861DW)


Training
Operation
The Airbath can heat up to 205 °C, which can be enough to melt the solder on a PCB. Some solder melts at even higher temperatures than this, which can be achieved using the Air Pencil and/or Heat Gun. Essentially, the Air Bath heats up the board and the Air Pencil finishes the job by heating up the part of the board that we want to fix (because we don't want to melt the solder on the parts that are already good to go). This is where the Air Pick and tweezers come in. After heating up the part we want to fix, the tweezers are used to remove a component while the Air Pick uses a vacuum to place a component on the board. If the component is too small, using tweezers to pick up the component is also a good alternative.
Demonstration
To show a complete knowledge of the Air Bath, Air Pencil, Air Pick, Desoldering Gun, and Heat Gun, the student will have a PCB prepared and perform tasks with the station as a whole. Using the Air Bath, Air Pencil, and Air Pick, students will remove a SMD and solder it back on. Using the Desoldering Gun, students will remove a soldered through hole component. Using the Heat Gun, students will mount a larger SMD, solder it on, and then remove it.
General Procedure
- Fixing/Replacing SMD Components
- Before turning on the Air Bath, clamp the PCB on the black stand, preferably placing it so that the component you want to fix is directly above the air. You should not be able to move the board once it is clamped. Keeping it sturdy helps from accidentally moving the PCB during the reworking process.
- The Air Bath has a power switch on the left, three buttons on the right, and a screen on the right. The switch has 3 positions which allows you to choose Cool, Off, and Warm by pressing it in their respective directions. The button on the right allow you to adjust the temperature in a rather funny way. The middle button has a down arrow while the right button has an up arrow, indicating which button decreases/increases the temperature of the bath. However, you need to hold down the left button while doing so. For instance, to increase the temperature, you would hold the left and right buttons at the same time.
- Now you will heat up the Air Bath. Hit the Power switch on the front, and set the temperature about 20-30 °C below the solder's melting point. The melting point for your solder can be found using the table below. Voltera's Solder Paste (Orange) melts at lower temperatures than the Sn63Pb37 Solder Paste (Blue). If the Voltera Solder Paste says T4 at the top, heat the Air Bath to 180 °C. If the Voltera Solder Paste says T5 at the top, heat the Air Bath to 150 °C. If you are using the Sn63Pb37 Solder Paste, heat the Air Bath to 150 °C.
- Once the board is heated, you can use the Air Pencil to heat up a specific component. The pencil blows hot air out the end. When you turn it on, adjust the settings to be 3/4 of the heat capacity and about 1/3 of the air flow. We do this because when the air flow is maximized at full temperature, it does not get hot enough to melt the solder. Too much air flow is bad.
- Hold the tip of the pencil over the SMD you want to solder/desolder, and move it slightly around the leads to allow for more distribution of heat. If it is not heating it up, try turning the heat of the pencil higher. This should allow for your SMD components solder to melt, and you will be able to pick up the component up with a pair of static-safe tweezers or the Air Pick. If you are soldering a part on, make sure to generously apply flux to the pads, and make sure all the solder sticks to the pads after heating.
- If the pencil is not doing a good enough job to heat up the component, then you may graduate to using the bigger heat gun, the Quick861DW. The same theoretical concepts apply, however, one potential downside of this is that it affects a larger area than the pencil. You may unintentionally melt the solder of components that you don't want to melt, so be extra careful my dudes.
- The Air Pick uses a vacuum to pick up and place components. Typically you would use both hands for this; one hand heats up the component with the pencil and the other grabs the component with the pick.
- On the handle of the pick there is a divot that is connected to the vacuum. When you plug the divot with your finger, it will enable it to pick up a component. When you release your finger from the divot, it will let go of the component. There are different tips that you will place on the end of the tip based on the component you want to pick up, each having a different size for varying components.
- Desoldering Through Hole Components
- For desoldering through hole components, you will want to use the Desoldering Gun. It has a hot tip that can fit over a solder joint and utilizes a vacuum when the trigger is pulled. As a result, it melts the solder and sucks it into a cartridge, completely removing the joint.
- Before using the Desoldering Gun, make sure you have the little metal stand for the gun to sit on for safety purposes. Have Solder ready nearby to tin the tip before use, and clean the tip after tinning using the wire mesh.
- On the handle of the gun there is a temperature control wheel that ranges from 1-4 (coolest to hottest). Be sure to set it to the correct temperature using the graphic below. Typically, a through hole component would require you to set the scale to 2.
- To use the Desoldering Gun, briefly put the top over a solder joint (not completely on the PCB or you might damage it), press the trigger to enable the vacuum, and the solder should be sucked away!
- Tin the tip before cooldown, and take note that the cooldown may take a bit of time. Don't burn yourself!


Safety
The most important thing about all these machines: THEY GET REALLY HOT!
Be so so careful because these machines can get up to temperatures of potentially 700°F. Always be wary of where you are blowing the hot air with the air guns, so you don’t melt other things. Be wary of how hot your PCB can get, and always put the cooling setting on after you’re finished with the Air Bath before picking your PCB up, because you can burn yourself.
Certification
Complete the PCB Lab - Rework Station Module at the link below to gain access to the Rework Station. The Maker Hub Canvas course pertains to all facilities and equipment contained in the Maker Hub; simply complete the quizzes for the facilities/equipment you wish to use in the Maker Hub. Please email makerhub@georgefox.edu if you have any questions.
Troubleshooting
- Suppose the solder isn't melting. Consult the temperature table in the General Procedure, chances are that you just need to make it hotter, little by little.
- Suppose the Air Pick is not picking up the component. Use the appropriate tip and make sure you are plugging the little divot to enable it to pick up. If these aren't working, resort to using tweezers.
- Suppose the components are getting blown away from the pads you want it to sit on. Well, turn down the air my dude.
Maintenance
General maintenance
Wrap all cords and make them look tidy. Make sure all devices are turned off and returned to their original place. Do not leave tweezers or extra parts laying around, put them back in the accessories drawer.
Specific Maintenance Tasks
| Maintenance Procedure | Frequency | Done By |
|---|---|---|
| General Cleaning | Before and after every use | Student |
| Tinning tip of Desoldering Gun | Before and after every use | Student |
| Emptying solder out of desoldering gun reservoir | As needed | Student/Ace |
| Replacing desoldering gun filter | As needed | Ace |