Difference between revisions of "Reflow Oven"
| Line 34: | Line 34: | ||
File:bake_go.jpg|Tray | File:bake_go.jpg|Tray | ||
</gallery> | </gallery> | ||
| − | |||
| − | |||
* [https://www.lpkfusa.com/products/pcb_prototyping/smt_assembling/protoflow_s/ Product Home Page] | * [https://www.lpkfusa.com/products/pcb_prototyping/smt_assembling/protoflow_s/ Product Home Page] | ||
| Line 43: | Line 41: | ||
====Overview==== | ====Overview==== | ||
| − | + | The Reflow Oven bakes PCBs to harden the traces and pads where components are laid. It's just like your oven at home with a few extra accessories, like preset profiles that adjust the temperature and time based on the ink/paste you put on your board. | |
====Demonstration==== | ====Demonstration==== | ||
| − | + | To show a complete knowledge of the oven, the student will have a PCB prepared by the PCB Printer and follow the instructions in the General Procedure. | |
====General Procedure==== | ====General Procedure==== | ||
# Power the Reflow Oven on. | # Power the Reflow Oven on. | ||
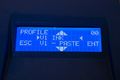
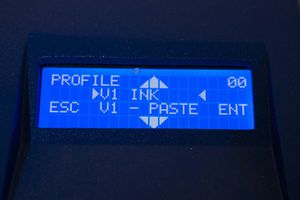
| − | # Select the respective ink/paste. Recall, Green is V1 Ink, Orange is V1 Paste, and Blue is Sn63Pb37. | + | # Select the respective ink/paste on the LCD Display. Recall, Green is V1 Ink, Orange is V1 Paste, and Blue is Sn63Pb37.[[File:bake_ink_selection.jpg|300x300px|none|link=https://maker-hub.georgefox.edu/wiki/File:Bake_ink_selection.jpg]] |
| + | |||
# The oven will warm up. When its ready, press "Enter" to open the tray. | # The oven will warm up. When its ready, press "Enter" to open the tray. | ||
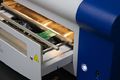
| − | # '''DANGER: The rails could be HOT! Take caution.''' Place the board securely on the rails. | + | # '''DANGER: The rails could be HOT! Take caution.''' Place the board securely on the rails.[[File:bake_place.jpg|300x300px|none|link=https://maker-hub.georgefox.edu/wiki/File:Bake_place.jpg]] |
# Press "Enter" to close the tray. | # Press "Enter" to close the tray. | ||
| − | # The preheat will take 2 minutes. The baking process takes about 30 minutes for traces and 3 minutes for the paste | + | # The preheat will take 2 minutes. The baking process takes about 30 minutes for traces and 3 minutes for the paste. |
# The drawer will automatically open to initiate the cool down phase. '''DO NOT remove the board until the oven says all the stages are complete. DANGER: The rails are HOT!''' | # The drawer will automatically open to initiate the cool down phase. '''DO NOT remove the board until the oven says all the stages are complete. DANGER: The rails are HOT!''' | ||
# When cool down is complete, remove the board from the oven, and turn off the oven. | # When cool down is complete, remove the board from the oven, and turn off the oven. | ||
| − | |||
==Safety== | ==Safety== | ||
Revision as of 11:59, 6 June 2019
Maker: LPKF
Model: ProtoFlow S N2
Ace: Karson Rhoads (krhoads20@georgefox.edu).
Location: PCB Lab
Description
The ProtoFlow S N2 is LPKF's premiere convection oven, ideal for lead-free reflow soldering, meeting the stringent demands of rapid PCB soldering applications. The ProtoFlow S N2 features even heat distribution, easy programming, and many pre-defined temperature profiles. The compact design and efficient power consumption make it one of the most useful components in any rapid PCB prototyping environment.
Documentation
Terminology
LCD Dispay
Tray


Training
Overview
The Reflow Oven bakes PCBs to harden the traces and pads where components are laid. It's just like your oven at home with a few extra accessories, like preset profiles that adjust the temperature and time based on the ink/paste you put on your board.
Demonstration
To show a complete knowledge of the oven, the student will have a PCB prepared by the PCB Printer and follow the instructions in the General Procedure.
General Procedure
- Power the Reflow Oven on.
- Select the respective ink/paste on the LCD Display. Recall, Green is V1 Ink, Orange is V1 Paste, and Blue is Sn63Pb37.

- The oven will warm up. When its ready, press "Enter" to open the tray.
- DANGER: The rails could be HOT! Take caution. Place the board securely on the rails.
- Press "Enter" to close the tray.
- The preheat will take 2 minutes. The baking process takes about 30 minutes for traces and 3 minutes for the paste.
- The drawer will automatically open to initiate the cool down phase. DO NOT remove the board until the oven says all the stages are complete. DANGER: The rails are HOT!
- When cool down is complete, remove the board from the oven, and turn off the oven.

Safety
- Always follow the instructions on the LCD Display. It is your guide that keeps you safe.
- When the tray opens up after baking a board, be patient and let the board cool down. If you handle it while it is too hot, it can burn you and shift your components (not good).
- Once you are finished using the Reflow Oven, clean the inside and turn it off. RESET THE SPACE.
- If you do not want to risk being burnt by the rails when you place your board in the oven, open the tray and place your board BEFORE selecting a profile.
Certification
Foxtale Quiz
Troubleshooting
Maintenance
General maintenance
Insert text
Specific Maintenance Tasks
| Maintenance Procedure | Frequency | Done By |
|---|---|---|
| Sample | Sample | Sample |

The ProtoFlow S N2 is LPKF's premiere convection oven, ideal for lead-free reflow soldering, meeting the stringent demands of rapid PCB soldering applications. The ProtoFlow S N2 features even heat distribution, easy programming, and many pre-defined temperature profiles. The compact design and efficient power consumption make it one of the most useful components in any rapid PCB prototyping environment. [1]
The current Ace of the Reflow Oven is Karson Rhoads (krhoads20@georgefox.edu).
Documentation
Training