Difference between revisions of "Prototype Lab"
Jconsenz18 (talk | contribs) |
Jconsenz18 (talk | contribs) |
||
| Line 53: | Line 53: | ||
| is facility = True | | is facility = True | ||
}}1. Safety First === | }}1. Safety First === | ||
| + | Safety First is the rule we hold highest of the 3. Given the delicate nature of our machines, and the different chemicals and materials we use in the Prototype lab, this rule applies to both the safety of you, and the machines. | ||
| + | |||
| + | Keeping yourself safe in the Prototype Lab is very easy, as there are very few ways to hurt yourself or the machines. However, proper procedure must be followed at all times, from here we will list potential safety hazards not given their own page in the Wiki: | ||
| + | |||
| + | ==== Sodium Hydroxide Bath ==== | ||
| + | The Sodium Hydroxide Bath is located in the back of the Prototype Lab, to the right of the sink. The Bath is used to dissolve support material from parts printed on the Dimension and F370, and will only be used by those trained in the Prototype Lab.The Bath uses a mixture of heated Sodium Hydroxide and water, and as such requires safety equipment to operate. | ||
=== 2. Reset the Space === | === 2. Reset the Space === | ||
=== 3. Be Professional === | === 3. Be Professional === | ||
Revision as of 12:07, 11 October 2018
The prototype lab contains a group of 3D printers and a laser cutter (more to come in the near future)!
The Aces of the Prototype Lab are: Ben Kraske (bkraske16@georgefox.edu) and Gabi Lorenzo (glorenzo16@georgefox.edu).
General 3D Printing Knowledge
3D printing is the process of joining material together to create a three-dimensional opject using computer control. It is a form of additive manufacturing. Objects are created using a 3D model. There are many different types of 3D printing, and the Prototype Lab utilizes two types which are FDM (fused deposit modeling) and SLA (stereolithography).
In the Prototype Lab, objects are most commonly printed from an STL file. This means if you create a part in Solidworks that you must save the file as a STL instead of a SLDPRT. Once the file is in STL form, it can then be processed by a slicer software. The slicer software converts the 3D model into thin layers and produces a G-code file. G-codes communicate with the chosen 3D printer, giving it directions on how to print the object.
Different 3D printers will run with different slicer programs. Typically a program will allow you to edit various parts of the process. One common consideration will be that of the layer thickness. This is the resolution at which the printer will print at. Each printer will have its own range of resolution. The thinner the layer thickness (higher resolution), the more detail you will get, but the print will be created more slowly. The thicker the layers (lower resolution), the less detail you will receive, but the object will be printed more quickly. Another consideration is support. For objects with overhangs, holes, etc., support will be needed. This will give the printer a surface to print on so that it can continue to build the print layer by layer. Each printer uses supports differently. Some printers have break away support while other have dissolvable support material.

Common errors... adhesion, clogging, air extruding... watch for first 30 min... stringing
General Laser Cutting Knowledge
Equipment Overview
| Name | Company | Model |
|---|---|---|
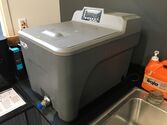
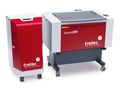
| Dissolvable Support Bath | Support Cleaning Apparatus | 1200HT |
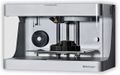
| F370 3D Printer | Stratasys | F370 |
| Formlabs 3D Printer | Formlabs | Form 3 |
| Laser Cutters | Trotec | |
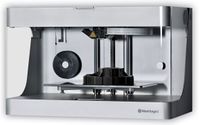
| Markforged 3D Printer | Markforged | Mark II |
| Prusa 3D Printer | Prusa | i3 MK3 / i3 MK3S |
| Speedy 300 | Trotec | Speedy 300 |
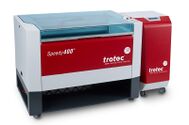
| Speedy 400 | Trotec | Speedy 400 |
| Equipment | Icon | Image |
|---|---|---|
| Dissolvable Support Bath |  |
 |
| F370 3D Printer | [[|center|x100px|link=F370 3D Printer]] | [[|center|x125px|link=F370 3D Printer]] |
| Formlabs 3D Printer | 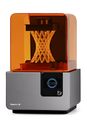 | |
| Laser Cutters |  | |
| Markforged 3D Printer |  |
 |
| Prusa 3D Printer |  | |
| Speedy 300 | | |
| Speedy 400 |  |
 |

Dissolvable Support Bath
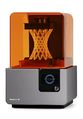
Form-2
Laser cutter image
Mark two
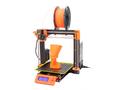
Prusa printer image
Laser cutter image

Speedy 400


3 commandments
1. Safety First
Safety First is the rule we hold highest of the 3. Given the delicate nature of our machines, and the different chemicals and materials we use in the Prototype lab, this rule applies to both the safety of you, and the machines.
Keeping yourself safe in the Prototype Lab is very easy, as there are very few ways to hurt yourself or the machines. However, proper procedure must be followed at all times, from here we will list potential safety hazards not given their own page in the Wiki:
Sodium Hydroxide Bath
The Sodium Hydroxide Bath is located in the back of the Prototype Lab, to the right of the sink. The Bath is used to dissolve support material from parts printed on the Dimension and F370, and will only be used by those trained in the Prototype Lab.The Bath uses a mixture of heated Sodium Hydroxide and water, and as such requires safety equipment to operate.