Difference between revisions of "Plasma Cutter"
Jump to navigation
Jump to search
Jwhipple15 (talk | contribs) |
|||
| Line 47: | Line 47: | ||
# Don't attempt to cut with the oxygen off | # Don't attempt to cut with the oxygen off | ||
# Don’t cut with the vent hood off | # Don’t cut with the vent hood off | ||
| + | |||
| + | Make: {{#show: {{PAGENAME}} |?Has make}} | ||
| + | |||
| + | Model: {{#show: {{PAGENAME}} |?Has model}} | ||
| + | |||
| + | Ace: {{#show: {{PAGENAME}} |?Has ace.Has name}} ({{#show: {{PAGENAME}} |?Has ace.Has email address}}). | ||
| + | |||
| + | Location: {{#show: {{PAGENAME}} |?Is located in facility}} | ||
| + | |||
| + | ==Description== | ||
| + | |||
| + | Insert Description Text | ||
| + | |||
| + | Here is an example of this piece of equipment being used. | ||
| + | |||
| + | Insert video media here. | ||
| + | |||
| + | ==Documentation== | ||
| + | |||
| + | ====Terminology==== | ||
| + | |||
| + | Insert terminology here | ||
| + | |||
| + | User Manual | ||
| + | |||
| + | ==Training== | ||
| + | ====Overview==== | ||
| + | |||
| + | Insert Text | ||
| + | |||
| + | ====Demonstration==== | ||
| + | |||
| + | Insert text | ||
| + | |||
| + | ====General Procedure==== | ||
| + | |||
| + | Insert text | ||
| + | |||
| + | ==Safety== | ||
| + | Insert text | ||
| + | |||
| + | ==Certification== | ||
| + | |||
| + | Foxtale Quiz | ||
| + | |||
| + | ==Troubleshooting== | ||
| + | |||
| + | ==Maintenance== | ||
| + | ====General maintenance==== | ||
| + | |||
| + | Insert text | ||
| + | |||
| + | ====Specific Maintenance Tasks==== | ||
| + | {| class="wikitable" | ||
| + | !Maintenance Procedure | ||
| + | !Frequency | ||
| + | !Done By | ||
| + | |- | ||
| + | |Sample | ||
| + | |Sample | ||
| + | |Sample | ||
| + | |} | ||
Revision as of 18:34, 26 August 2019
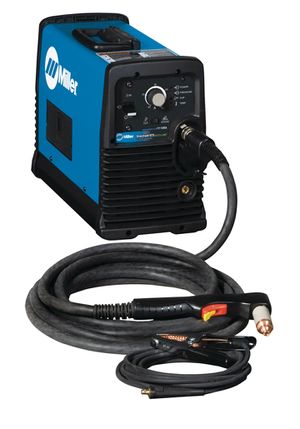
Miller Spectrum® 875 Plasma Cutter with 20 foot XT60 torch has compact size but 60 amps of output power.
It features easy operator controls, for optimum cutting and gouging performance.
The current Ace of the Plasma Cutter is Levi Gibson (lgibson19@georgefox.edu).
Documentation:
https://www.millerwelds.com/files/owners-manuals/o242880c_mil.pdf
Procedures:
- Place fume hood over the area you will be welding at
- Turn air on
- Turn plasma cutter on
- Attach ground clamp
- Measure thickness of material being cut and refer to chart for current setting on machine
- Set the current on the plasma cutter
- Place the drag shield on the edge of the base metal, or hold ⅛ inch off the surface. Direct the arc straight down.
- Raise the trigger lock and press the trigger, this will engage the pilot arc
- Once the cutting starts, begin to slowly move the torch across the metal
- Adjust your speed so the sparks go thru the metal and out the bottom of the cut
- At the end of the cut, angle the torch slightly towards the final edge or pause briefly before releasing the trigger
- Turn off machine
- Turn off air
- Disconnect ground clamp
Warnings:
- Don't cut lead, zinc, copper, cadmium, stainless, or beryllium.
- Don't attempt to cut with the oxygen off
- Don’t cut with the vent hood off
Make: Miller
Model: Spectrum 875
Ace: Levi Gibson (lgibson19@georgefox.edu).
Location: Welding Shop
Description
Insert Description Text
Here is an example of this piece of equipment being used.
Insert video media here.
Documentation
Terminology
Insert terminology here
User Manual
Training
Overview
Insert Text
Demonstration
Insert text
General Procedure
Insert text
Safety
Insert text
Certification
Foxtale Quiz
Troubleshooting
Maintenance
General maintenance
Insert text
Specific Maintenance Tasks
| Maintenance Procedure | Frequency | Done By |
|---|---|---|
| Sample | Sample | Sample |

