Difference between revisions of "Planer"
| Line 52: | Line 52: | ||
====General Procedure==== | ====General Procedure==== | ||
| − | # Connect and turn | + | # Connect and turn one of the dust collectors (shown below) on so we can keep the place clean. Ensure that the restriction plate is “out”.<gallery> |
File:Small Dust Collector Image.jpg|Small Dust Collector | File:Small Dust Collector Image.jpg|Small Dust Collector | ||
File:Large Dust Collector Image.jpg|Large Dust Collector | File:Large Dust Collector Image.jpg|Large Dust Collector | ||
Revision as of 10:50, 19 June 2020
Make: Powermatic
Model: 209HH-3
Ace: Needed (Makerhub@georgefox.edu).
Location: Wood Shop
Description
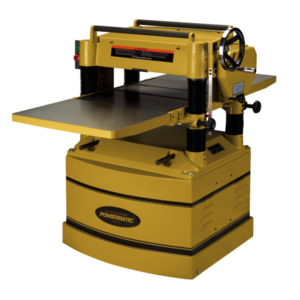
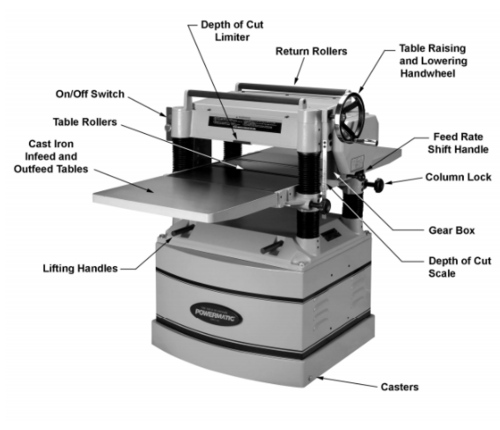
The Powermatic planer contains a 5HP motor and 20" planing capacity that will handle the most demanding work. The helical cutterhead provides quieter operation and finer finishing than conventional systems, and the four-sided knife inserts seat themselves without requiring a set-up gauge. The 5" dust port connects easily to any dust collector. Used to remove material from wood, as well as squaring to create straight pieces. [1] The Planer is used to trim wood boards down by precise measurements, never more than 1/16 of an inch on each pass. The anti-kickback fingers and pressure bar are located in close proximity to the cutterhead for an exceptional finish. The solid cast iron base, table and head are designed for production. The 2-speed oil bath gearbox transmits full power to feed rollers and facilitates fast speed changes at 24 and 31 FPM. The gearbox can be changed to 4-speed with the included gear to run lower speeds of 16 and 20 FPM. The corrugated infeed and fine groove outfeed rollers ensure a smooth feed. The precision ground and polished cast iron table rides on four steel columns giving it plenty of support for the larger workpiece. Heavy cast iron extension wings ensure a flat, smooth cut.
Documentation
Terminology
Training
Overview
The Planer is used to trim wood boards down by precise measurements, never more than 1/16 of an inch. It is super useful for make smooth surfaces without taking off too much of the board.
Demonstration
The demonstration for this machine will be to plane both sides of scrap piece of wood from the Wood Shop. It would be preferable to use a piece of wood that is warped in some way to understand the process of planning each side.
General Procedure
- Connect and turn one of the dust collectors (shown below) on so we can keep the place clean. Ensure that the restriction plate is “out”.
- The planer has two feed speeds, typically, the 24 fpm is used whenever possible. For softwood, the 31 FPM setting can be used.
- Before turning machine on, adjust wheel to feed in work piece and adjust wheel back down to fit snugly.
- Remove piece and adjust wheel to trim desired amount off of work piece.
- Do not attempt to remove more than 1/16” per pass (one turn). Do not over load motor. Multiple passes result in less tear-out and are easier on the machine.
- Always determine the thickness of the thickest part of the board and adjust planer to match this thickness.
- Do not attempt to pass stock less than 12” in length through the planer.
- Turn the Thickness Planer on and wait until it has reached full speed before starting to plane your stock.
- Only plane one piece of stock at a time. Stand to the side of the stock and feed it into the infeed opening. Let go of the stock when the roller takes hold of it.
- Always plane with the grain, never perpendicular to grain (i.e., feed boards lengthwise, not width-wise).
- Never attempt to force feed the planer; always allow stock to move through under the force of the feed roller only.
- Stock will sometimes “hang” (or stop moving forward). Causes and solutions are:
- The pressure bar is causing too much pressure on the wood. To fix, simply raise the pressure bar lever slightly and your stock should continue on its path. When it starts moving again, gently put the pressure bar lever back down.
- The feed control may have slipped. Simply push it all the way to the right.
- The table is too high (not adjusted to the proper height). This should NOT happen since you’re supposed to measure the stock and then make table adjustment according to your needs.
- Never attempt to reverse feed stock. The motor turns one direction and will try to spit it right back at you.
- Be careful not to let your fingers become pinched between stock and table. It will hurt a lot.
- If stock is real long, get help holding it while you feed it into the infeed opening. Ensure your helper is standing to the side of the stock and NOT behind it.
- Keep your full attention on the stock, the controls, and where your hands/fingers are while you plane.
- After half of the stock has entered the planer, walk around back and hold the end up as the rest of the stock comes out of the machine. Do not pull the stock out; simply allow the machine to push it toward you. Adjust the pressure bar lever if needed.
- Do NOT plane to a thickness less than 3/8”.
- Listen to the sound the planer makes as it’s operating. If something doesn’t sound right, turn the Thickness Planer off and notify the shop aid.
- Always turn the Thickness Planer off and wait until it stops moving before making any adjustments.
- When finished working with the Thickness Planer, turn the machine off and remain in the work zone until it stops moving.
- Clean off the infeed table so that the next users’ stock will be able to make contact directly with the table instead of being raised up slightly by the chips left after you’re finished planing.
- Turn off and disconnect the dust collector.
Safety
- NEVER allow your hands/fingers to enter the infeed opening. Unless it you want to lose a finger and try to win some lawsuit money. It won't work, you'll lose. Be safe kids.
- NEVER turn on the Thickness Planer with stock inside the infeed opening. No good. Be safe kids.
- NEVER bend down to look into a planer while it is running. Unless it you want to potentially lose an eye and try to win some lawsuit money. It won't work, you'll lose. Be safe kids.
- NEVER open top when machine is running. Unless it you want to potentially lose something and try to win some lawsuit money. It won't work, you'll lose. Be safe kids.
- NEVER put your finger in a knot hole while operating the Thickness Planer. Unless it you want to lose a finger and try to win some lawsuit money. It won't work, you'll lose. Be safe kids.
Certification
Troubleshooting
- If the Planer seems to be missing a spot on your board, then it is likely that you have a chipped blade. Replacing the blade would then be imperative before its next use.
- If the Planer does not seem to be cutting smoothly, then it is likely that the blade is getting dull. Replacing the blade would then be imperative before its next use.
Maintenance
General maintenance
General and specific tasks need to take place to maintain machinery. Specific tasks are listed below Note: In [Specific Maintenance Tasks below, 5th item has redundant terms "use if rusted", not sure how to edit table - CZ]
Specific Maintenance Tasks
| Maintenance Procedure | Frequency | Done By |
|---|---|---|
| Work area around machine marked off clearly | Before and after each use | Student and Ace |
| Non-skid floor strips in area where operator normally stands | Before and after each use | Student |
| Clean with dust collectors and remove gum/pitch with with oven cleaner | After each use | Student |
| Lubricate appropriate places with a good grade non-hardening grease | When needed | Ace |
| Clean Table surface. If rusted, use If rusted, use paste mixture of household ammonia, a good commercial detergent and 000 steel wool. Wash surface down with hot, soapy water, rinse and dry thoroughly. Coat surface with talcum powder, rubbing briskly into surface with a clean blackboard eraser. | Before and after each use | Student and Ace |
| Check blade condition, should be sharp and free of nicks or grooves | Before and after each use | Ace |
| Check belt condition. Replace as needed. Dress with belt dressing. Check belt tension | Before and after each use | Ace |
| Check motor for loose wiring and sawdust congestion, pulleys tight and in line. | Before and after each use | Ace |
| Check bearings. Replace any bad or suspect bearings immediately. | Before and after each use | Ace |
| Check leveling of extension tables with main table. | Before and after each use | Ace |
- ↑ Description adapted from Powermatic.


