Difference between revisions of "Photo Table"
Czickefoose (talk | contribs) |
|||
| Line 37: | Line 37: | ||
* Ortery Capture - This is the software that you will use to interact with the photo table in order to adjust the lighting, turntable, and take pictures. | * Ortery Capture - This is the software that you will use to interact with the photo table in order to adjust the lighting, turntable, and take pictures. | ||
*Canon 7D Mark II - This camera mounts on the side of the photo table and is used to take photos through the Ortery Capture software. | *Canon 7D Mark II - This camera mounts on the side of the photo table and is used to take photos through the Ortery Capture software. | ||
| + | *360 - 360 degrees | ||
'''[https://maker-hub.georgefox.edu/w/images/d/d6/UserGuide_en.pdf User Manual]''' | '''[https://maker-hub.georgefox.edu/w/images/d/d6/UserGuide_en.pdf User Manual]''' | ||
| Line 42: | Line 43: | ||
====Overview==== | ====Overview==== | ||
| − | + | Confirm that the unit is plugged in and then turn on the photo table using the large red power switch. Note that nothing will happen when you turn on the switch until you are logged into Ortery Capture and that you will not be able to log into Ortery Capture unless the photo table is turned on. After the the table is turned on, log onto the computer next to it using your standard George Fox log in. You will need to log into Ortery capture as well. The username is Cameraman and the password is Nikond70. Once you are logged into Ortery capture the lights in the photo table should automatically turn on. Place the object you are trying to photograph onto the center of the turntable using the door on the right side of the machine. It is especially important to have the object centered on the turntable if taking 360 photos because otherwise it will appear to shift side to side instead of just spinning. Now you can set up the Canon 7D Mark II; there is an adjustable mount on the side of the photo table that holds the camera still during the photo process and can be adjusted to find the perfect angle. Finish the setup process by plugging the camera into the computer using a Usb cable. The rest of the process will take place in Ortery capture. There you can adjust the camera settings, light intensity and direction, and turntable to take the perfect picture. Once you are done with the photo table, reset the space by logging out, turning off the table, and cleaning out any debris from the table. | |
====Demonstration==== | ====Demonstration==== | ||
Revision as of 10:19, 24 July 2019
Make: Ortery
Model: 3D PhotoBench 260
Ace: Kaitlyn Johnson (kjohnson20@georgefox.edu).
Location: The Vault
Description
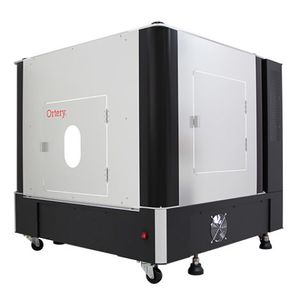
The Photo Table, or Photobench as called by its manufacturer Ortery, is a device which links to a lab PC specifically designated for this device and enables users to take still photos, 360 photos, and videos of various products and items on flat white backgrounds like the ones you see online for products you might view on a daily basis. If you have ever wondered how those product pictures are taken, this is it. This makes the photo table perfect for creating professional grade product photos for projects and presentations.
Documentation
Terminology
- Ortery Capture - This is the software that you will use to interact with the photo table in order to adjust the lighting, turntable, and take pictures.
- Canon 7D Mark II - This camera mounts on the side of the photo table and is used to take photos through the Ortery Capture software.
- 360 - 360 degrees
Training
Overview
Confirm that the unit is plugged in and then turn on the photo table using the large red power switch. Note that nothing will happen when you turn on the switch until you are logged into Ortery Capture and that you will not be able to log into Ortery Capture unless the photo table is turned on. After the the table is turned on, log onto the computer next to it using your standard George Fox log in. You will need to log into Ortery capture as well. The username is Cameraman and the password is Nikond70. Once you are logged into Ortery capture the lights in the photo table should automatically turn on. Place the object you are trying to photograph onto the center of the turntable using the door on the right side of the machine. It is especially important to have the object centered on the turntable if taking 360 photos because otherwise it will appear to shift side to side instead of just spinning. Now you can set up the Canon 7D Mark II; there is an adjustable mount on the side of the photo table that holds the camera still during the photo process and can be adjusted to find the perfect angle. Finish the setup process by plugging the camera into the computer using a Usb cable. The rest of the process will take place in Ortery capture. There you can adjust the camera settings, light intensity and direction, and turntable to take the perfect picture. Once you are done with the photo table, reset the space by logging out, turning off the table, and cleaning out any debris from the table.
Demonstration
In order to use this device, you must be able to demonstrate the following:
- Set up the Ortery Photo Table and the software on the computer, along with connecting the camera and getting the settings dialed in.
- Set up the camera and object to be photographed.
- Take a 360 photo of the object.
- Export the file to a safe location for later access and use.
General Procedure
Setting up the Ortery:
- Plug in the Ortery Photo table, if it isn't already, and turn the power switch to on. This will not cause a dramatic change in the table but must be done so the software can recognize the it.
- Turn on the computer and log in using your normal George Fox log in.
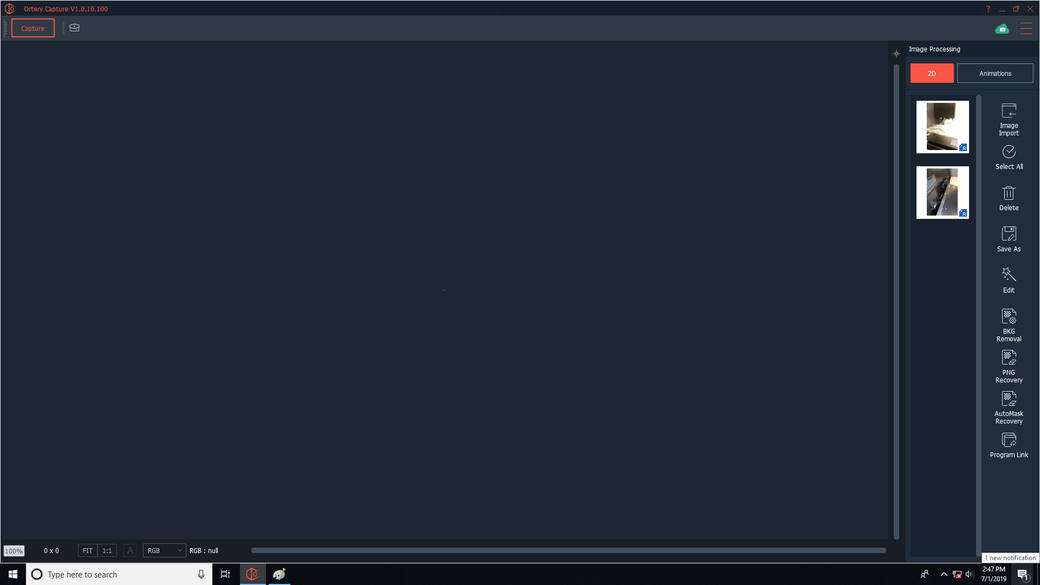
- Open up the Ortery Capture software and log in. The username is Cameraman and the password is Nikond70. The home page should look something like this:
- Use the provided USB cable to connect the Camera to the computer.
- Make sure when doing this, the camera is off while connecting the camera, and that the software is able to recognize the camera.
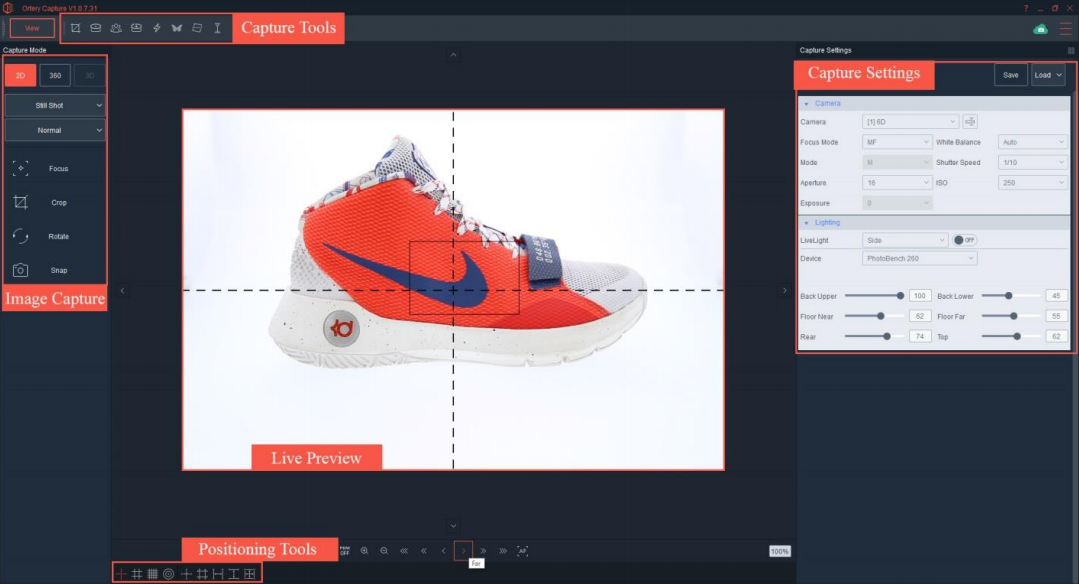
- Press the [capture] button to toggle the capture window shown below. Take some test shots using the [snap] button to ensure that the camera and the software are properly set up.
Setting up the object to be Photographed:
- Make sure that the object is clean and free of any debris. This will allow for not only a cleaner photo, but will also help with keeping the Photo table clean.
- Open up the small front door or the larger door on the right side of the photo table if the camera is already set up on the front part of the photo table.
- Place the object in the center of the table. It is important to be in the center so that the object will appear to spin in place in 360 photos instead of shifting side to side while spinning.
- Close the side or front door.
Capturing images of the product:
- In the Ortery software, open up a new capture and the camera settings panel will open up.
- Customize the camera settings (aperture, shutter speed, etc) as well as the table lighting to achieve the desired appearance. This is done done from the capture window and the video below walks through this as well.
- Press capture to take photos.
Safety
- For this machine, you want to make sure that you are treating all the equipment with respect and ensure that all things are secured before you proceed to any new step or moving around, as it is expensive.
- With the rotating table, if you have long hair, make sure that it is out of the way of the table; although it won’t kill you, it can still cause problems and cause some injuries if you’re not careful.
Certification
Troubleshooting
- Lights aren't turning on and the photo table is on - You must log into Ortery Capture before they will turn on, even if the table is powered on.
- Background looks dark/spotty - Make sure the turntable is clean and adjust the different lights and brightness.
Maintenance
General maintenance
The purpose of the photo table is to take product photos on white backgrounds and as a result it is important to keep the inside of the table clean to make sure the white surfaces stay that way. This is not difficult to do. Simply wipe out the the table with a paper towel if there is anything on the table. It may be helpful to use some cleaner from the prototype lab as well.
Specific Maintenance Tasks
| Maintenance Procedure | Frequency | Done By | Last Completed |
|---|---|---|---|
| Clean out and debris from the photo table | Check after each use and perform as necessary | Student | N/A |
| Inspect lights and replace as needed | Every two months. Refer to the user manual for instructions on replacing a light | Ace |


