PCB Printer

The Voltera V-One brings quick turn PCBs to your desktop. Import your gerber file into the Voltera software, press print, and the V-One will bring your board to life. Use the solder paste dispensing and reflow features to mount components onto your printed board, or mount components on a pre-fabricated board with ease. [1]
The current Ace of this area/machine is Jake Whipple.
Documentation
Training
Hello World
The Voltera comes with a getting started tutorial called "Hello World." It will guide you through fabricating your own single-sided board from start to finish.
Punk Console
After completing the Hello World tutorial, you can proceed with making double-sided boards. Voltera has a tutorial called "Punk Console" which walks through creating your own double-sided board. It also shows how to use the V-One drill to make vias and component through-holes.
Terminology
There are a lot of particular names given to Voltera's equipment. It is important to know what is what, especially when trying to explain troubleshooting issues. Here are the items you should familiarize yourself with:
Completed PCB

(Add pictures later)
Probe
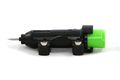
Dispenser and sheath
Cartridge
Conductive ink
Nozzle
Substrate Sacrificial layer
Usage
The Perfect Print
Two main factors affect the quality of your print.
Flow rate
Print height
Priming Conductors
Ideally, you should never have to prime the conductors. After a conductor has been primed correctly and used in the Voltera, it "closes" the dispenser. When done, you should be able to pull it off the mount and put the --- back in the fridge.
However, this is not always the case. If a student
Changing a Cartridge
- Remove the nozzle CAREFULLY
- Dissamble sheath by twisting green part clockwise
- Remove dispenser
- clean dispenser
- press downwards on the sheath to loose the cartridge
- remove the cartridge
- proceed to chuck the cartridge in the nearest garbage can
- wind the dispenser clockwise until it cant clockwise anymore
- acquire new cartridge
- remove top and bottom green caps SAVE THEM
- insert the cartidge with the label facing the back, in other words, the label should not be viewable through the window on the sheath
- insert the dispenser and lock it in by twisting the green part counter clockwise
- carefully REPLACE NOZZLE, use fingers first and then pliers!44