Difference between revisions of "Leatherworking Station"
(→Safety) |
|||
| (31 intermediate revisions by 2 users not shown) | |||
| Line 5: | Line 5: | ||
|Has name={{PAGENAME}} | |Has name={{PAGENAME}} | ||
|Has redirect={{FULLPAGENAME}} | |Has redirect={{FULLPAGENAME}} | ||
| − | |||
| − | |||
| − | |||
| − | |||
| − | |||
| − | |||
| − | |||
|Has make=Various | |Has make=Various | ||
|Has model=Various | |Has model=Various | ||
|Has serial number=Various | |Has serial number=Various | ||
| − | |Has ace= | + | |Has life expectancy= |
| + | |Has year of manufacture or purchase= | ||
| + | |Has replacement cost= | ||
| + | |Has icon=File:Leatherworking Station Icon.png | ||
| + | |Has icondesc=Leatherworking Station Icon | ||
| + | |Has iconwname=File:Leatherworking Station Icon.png | ||
| + | |Has image=File:Leatherworking Station 2.jpg | ||
| + | |Has imagedesc=Leatherworking Station | ||
| + | |Has description=Leatherworking Station | ||
| + | |Has certification=https://georgefox.instructure.com/courses/1226 | ||
| + | |Has ace=Dane Ziegler;dziegler22@georgefox.edu | ||
}} | }} | ||
[[{{#show: {{FULLPAGENAME}}|?Has icon|link=none}}|140px|left|top|{{#show: {{FULLPAGENAME}}|?Has icondesc}}]] | [[{{#show: {{FULLPAGENAME}}|?Has icon|link=none}}|140px|left|top|{{#show: {{FULLPAGENAME}}|?Has icondesc}}]] | ||
| Line 33: | Line 36: | ||
__TOC__ | __TOC__ | ||
| − | ==Safety== | + | ==Safety First== |
| − | [[File:Safety First | + | [[File:Safety First HD2.png|left|150px]] |
| + | Here are some safety instructions for the {{PAGENAME}}. Remember... SAFETY FIRST!!! | ||
* Do not laser cut chrome-tanned leather; this will produce toxic fumes (cyanide gas). Only vegetable-tanned leather is ok to laser cut. If you don't know which type of leather you are using, check with the Maker Hub staff before using the laser cutters. | * Do not laser cut chrome-tanned leather; this will produce toxic fumes (cyanide gas). Only vegetable-tanned leather is ok to laser cut. If you don't know which type of leather you are using, check with the Maker Hub staff before using the laser cutters. | ||
* You must wear safety glasses when performing any type of hammering at the leatherworking station. Anyone else within a 6-foot radius of you should put on safety glasses too. | * You must wear safety glasses when performing any type of hammering at the leatherworking station. Anyone else within a 6-foot radius of you should put on safety glasses too. | ||
| − | * Apply leather dyes in the finishing room to minimize breathing their vapors. | + | * Apply leather dyes and finishes in the finishing room to minimize breathing their vapors. |
* Remember that there are many sharp and pointy tools at the leatherworking station that are specifically designed to cut and puncture cow skin. If it can cut/puncture cow skin, it can certainly cut/puncture your skin. Treat the tools with respect, and exercise good judgment when cutting and puncturing to keep yourself out of the tool's path. | * Remember that there are many sharp and pointy tools at the leatherworking station that are specifically designed to cut and puncture cow skin. If it can cut/puncture cow skin, it can certainly cut/puncture your skin. Treat the tools with respect, and exercise good judgment when cutting and puncturing to keep yourself out of the tool's path. | ||
| Line 75: | Line 79: | ||
For an excellent explanation on the differences between vegetable-tanned leather and chrome-tanned leather, watch [https://www.youtube.com/watch?v=6D3TrHqhJHw| this video from Gentleman's Gazette]. | For an excellent explanation on the differences between vegetable-tanned leather and chrome-tanned leather, watch [https://www.youtube.com/watch?v=6D3TrHqhJHw| this video from Gentleman's Gazette]. | ||
| − | + | <br> | |
| + | <br> | ||
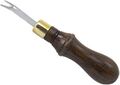
'''Awl''' - An awl is a tool with a metal point used for marking, piercing, punching, or sewing leather. | '''Awl''' - An awl is a tool with a metal point used for marking, piercing, punching, or sewing leather. | ||
| Line 86: | Line 91: | ||
'''Leather Dye''' - Leather dye will stain your vegetable-tanned leather. We have a variety of colors available. | '''Leather Dye''' - Leather dye will stain your vegetable-tanned leather. We have a variety of colors available. | ||
| − | '''Edge Beveler''' - An edge beveler is a tool with a metal | + | '''Edge Beveler''' - An edge beveler is a tool with a sharpened metal notch that is used to remove the square corners from the edges of leather goods. |
'''End Punch''' - An end punch is used to cut smooth and clean tips on belts and straps up to 2" wide. | '''End Punch''' - An end punch is used to cut smooth and clean tips on belts and straps up to 2" wide. | ||
| Line 159: | Line 164: | ||
File:Thread6.jpg|Slide the knot to the top of the eye, and now you are ready to stitch | File:Thread6.jpg|Slide the knot to the top of the eye, and now you are ready to stitch | ||
</gallery> | </gallery> | ||
| + | |||
| + | Why do we need a knot around the eye of the needle? It keeps the thread from falling out of the eye of the needle as you pull it through the leather. Why not just tie a regular old knot to secure the thread to the eye of the needle? This type of knot is low-profile and won't unnecessarily enlarge the holes you made for stitching as you pull the knot through the leather. | ||
'''Burnishing''' the edges of your leather will give your project a finished, professional look. Burnishing finishes the edges by melting the loose fibers together with heat created through friction. Basically, that just means you rub the edges with a wood burnisher or burnishing cloth until it looks good. A simple burnishing process includes: beveling the edges, sanding them, dyeing them, burnishing them, and then finishing the edge with glycerin soap or wax. | '''Burnishing''' the edges of your leather will give your project a finished, professional look. Burnishing finishes the edges by melting the loose fibers together with heat created through friction. Basically, that just means you rub the edges with a wood burnisher or burnishing cloth until it looks good. A simple burnishing process includes: beveling the edges, sanding them, dyeing them, burnishing them, and then finishing the edge with glycerin soap or wax. | ||
| Line 172: | Line 179: | ||
Now, it’s time to actually burnish. To do this, dip your finger in water and lightly wet the edges. Make sure not to soak the edges though. Leather becomes very pliable when soaked and can be molded. This is great for other things, but not so much when your burnishing. Once you’ve put water on the edges, rub a wood burnisher or burnishing cloth across it briskly until the edges start to darken and shine. You’ll know you’re done when you start to hear a tacky sound. | Now, it’s time to actually burnish. To do this, dip your finger in water and lightly wet the edges. Make sure not to soak the edges though. Leather becomes very pliable when soaked and can be molded. This is great for other things, but not so much when your burnishing. Once you’ve put water on the edges, rub a wood burnisher or burnishing cloth across it briskly until the edges start to darken and shine. You’ll know you’re done when you start to hear a tacky sound. | ||
| − | And finally, apply some glycerin soap or wax to the edge. This helps keep the leather water-resistant and seals the edges. After applying the glycerin soap or wax, buff the edges again with burnishing cloth. | + | And finally, apply some glycerin soap or wax to the edge. This helps keep the leather water-resistant and seals the edges. After applying the glycerin soap or wax, buff the edges again with a burnishing cloth. |
'''Dyeing Leather''' is tricky. Getting a nice even coat of dye on leather takes not only the know how, but also the skill that comes with lots and lots of practice. There are many different ways to dye leather. Here is one recommended method. | '''Dyeing Leather''' is tricky. Getting a nice even coat of dye on leather takes not only the know how, but also the skill that comes with lots and lots of practice. There are many different ways to dye leather. Here is one recommended method. | ||
| Line 182: | Line 189: | ||
You can dye any unfinished vegetable-tanned leather. In fact, you can probably dye pre-dyed veg tanned leather... but why? Just be aware that there are waxes on top of finished leathers that will not allow the dye to penetrate the leather well. Regardless of your skills with dyeing, be aware that dyeing often reveals various marks and inconsistencies in the leather grain. | You can dye any unfinished vegetable-tanned leather. In fact, you can probably dye pre-dyed veg tanned leather... but why? Just be aware that there are waxes on top of finished leathers that will not allow the dye to penetrate the leather well. Regardless of your skills with dyeing, be aware that dyeing often reveals various marks and inconsistencies in the leather grain. | ||
| − | Before dyeing, wipe down your leather piece with a paper towel to remove any dust or contaminants. This will help create an even coat. | + | Before dyeing, wipe down your leather piece with a cloth or paper towel to remove any dust or contaminants. This will help create an even coat. |
What is "cutting a dye" and why would I bother doing it? Cutting a dye reduces its potency by mixing the dye with a dye reducer. This allows you to apply several coats for a smooth and uniform finish. The more coats you do, the smoother your dye is going to look. At the same time, the more coats you do, the darker the finish will be. So, if you achieve the color you want on your first pass of dye but the finish isn't as smooth/uniform as you want, you won’t be able to apply more dye to help even out the finish. Instead, you’ll get a very marbled look... which is ok if that’s what you’re going for. If you don't cut the dye at all, it will be quite concentrated. A little dye will go a long way. Start with super light and thin strokes with the dauber. Avoid drenching your leather workpiece in the dye as this can produce some unwanted results (like your blue dye turning copper-colored). The following procedure assumes you have cut the dye. | What is "cutting a dye" and why would I bother doing it? Cutting a dye reduces its potency by mixing the dye with a dye reducer. This allows you to apply several coats for a smooth and uniform finish. The more coats you do, the smoother your dye is going to look. At the same time, the more coats you do, the darker the finish will be. So, if you achieve the color you want on your first pass of dye but the finish isn't as smooth/uniform as you want, you won’t be able to apply more dye to help even out the finish. Instead, you’ll get a very marbled look... which is ok if that’s what you’re going for. If you don't cut the dye at all, it will be quite concentrated. A little dye will go a long way. Start with super light and thin strokes with the dauber. Avoid drenching your leather workpiece in the dye as this can produce some unwanted results (like your blue dye turning copper-colored). The following procedure assumes you have cut the dye. | ||
| Line 196: | Line 203: | ||
With this 3-coat method, the grain of the leather has been hit with dye from every direction, and there should be no spotty or undyed parts. You can buff the finish with a burnishing cloth once it has dried. | With this 3-coat method, the grain of the leather has been hit with dye from every direction, and there should be no spotty or undyed parts. You can buff the finish with a burnishing cloth once it has dried. | ||
| − | Once this final coat has dried, you need to put a finish on the leather. If you decide to skip this step, whoever is using the item you made will end up with leather dye on their clothes. This is bad, so use a finish. Fiebing's Tan Kote works well as a finish, which can be purchases as either a gloss of matte finish. This can be applied in one coat; just work it into the leather using the same circular motion from before. Once you’ve worked it in evenly, leave it alone and let it dry. Touching it at all during the drying process will ruin the finish. After the finish has had time to dry, buff it with cotton cloth. Finally, the dyeing and finishing process is complete! | + | Once this final coat has dried, you need to put a finish on the leather. If you decide to skip this step, whoever is using the item you made will end up with leather dye on their clothes. This is bad, so use a finish. While a finish won't completely prevent dye rub off, it will greatly reduce it when applied to the leather properly. Fiebing's Tan Kote works well as a finish, which can be purchases as either a gloss of matte finish. This can be applied in one coat; just work it into the leather using the same circular motion from before. Once you’ve worked it in evenly, leave it alone and let it dry. Touching it at all during the drying process will ruin the finish. After the finish has had time to dry, buff it with a cotton cloth. Finally, the dyeing and finishing process is complete! |
==Certification== | ==Certification== | ||
| − | [https://georgefox.instructure.com/courses/ | + | [https://georgefox.instructure.com/courses/1226 Canvas Quiz] |
==Troubleshooting== | ==Troubleshooting== | ||
| + | |||
| + | Practice makes perfect. Don't expect your first leatherworking project to be a masterpiece. Many of these leatherworking techniques simply need to be practiced to gain proficiency. | ||
| + | |||
| + | For additional info, check out these websites: [https://www.instructables.com/Introduction-to-Leatherworking/ Instructables], [https://www.manmadediy.com/4482-it-s-easier-than-you-think-a-simple-straightforward-guide-to-getting-started-in-leatherworking/?chrome=1&A1c=1&D2c=1 MMDIY]. | ||
==Maintenance== | ==Maintenance== | ||
====General maintenance==== | ====General maintenance==== | ||
| − | + | The manual sewing machine and the tooling are the only parts of the leatherworking station that need periodic maintenance. | |
====Specific Maintenance Tasks==== | ====Specific Maintenance Tasks==== | ||
| Line 215: | Line 226: | ||
!Done By | !Done By | ||
|- | |- | ||
| − | | | + | |Lubricate the Manual Sewing Machine |
| − | | | + | |Yearly |
| − | | | + | |Maker Hub Technician |
| + | |- | ||
| + | |Sharpen the Tooling | ||
| + | |Yearly | ||
| + | |Maker Hub Technician | ||
|} | |} | ||
Revision as of 12:33, 23 January 2023

Make: Various
Model: Various
Serial Number: Various
Ace: Dane Ziegler (dziegler22@georgefox.edu).
Location: The Vault
Safety First

Here are some safety instructions for the Leatherworking Station. Remember... SAFETY FIRST!!!
- Do not laser cut chrome-tanned leather; this will produce toxic fumes (cyanide gas). Only vegetable-tanned leather is ok to laser cut. If you don't know which type of leather you are using, check with the Maker Hub staff before using the laser cutters.
- You must wear safety glasses when performing any type of hammering at the leatherworking station. Anyone else within a 6-foot radius of you should put on safety glasses too.
- Apply leather dyes and finishes in the finishing room to minimize breathing their vapors.
- Remember that there are many sharp and pointy tools at the leatherworking station that are specifically designed to cut and puncture cow skin. If it can cut/puncture cow skin, it can certainly cut/puncture your skin. Treat the tools with respect, and exercise good judgment when cutting and puncturing to keep yourself out of the tool's path.
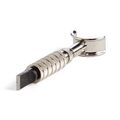
Description
Many leatherworking techniques do not require a high level of skill to get started. With a basic familiarity of the tools and what each one is used for, a large variety of leather projects become accessible. The main goal of this training course is to show you a wide range of tools and give you an opportunity to practice with them.
Documentation
Terminology
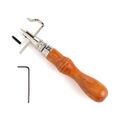
Awl
Burnishing Cloth
Daubers
Leather Dye
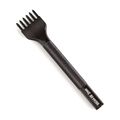
Edge Beveler
End Punch
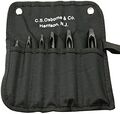
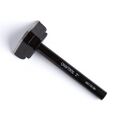
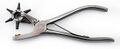
Hole Punch Set

Manual Leather Sewing Machine
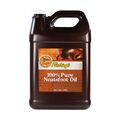
100% Pure Neatsfoot Oil
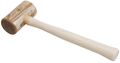
Rawhide Hammer
Revolving Punch

Rivet Setter
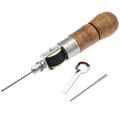
Sewing Awl
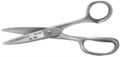
Leather Shears
Stitching Chisel
Stitching Groover
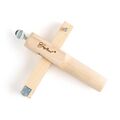
Stitching Pony
Strap Cutter
Swivel Knife


Vegetable-tanned Leather is tanned with natural vegetable tannins to alter the protein structure of the hide, causing it to become leather. This type of leather typically takes a longer amount of time to create. Approximately 10% of all leather is vegetable-tanned.
Chrome-tanned Leather uses chemicals to tan and is a faster, less costly process. Chrome-tanned leather comes in a large variety of colors and is often less stiff than untreated vegetable-tanned leather. Approximately 90% of all leather is chrome-tanned. Do not laser cut chrome-tanned leather.
For an excellent explanation on the differences between vegetable-tanned leather and chrome-tanned leather, watch this video from Gentleman's Gazette.
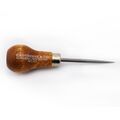
Awl - An awl is a tool with a metal point used for marking, piercing, punching, or sewing leather.
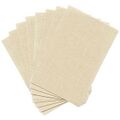
Burnishing Cloth - A canvas-like material that will burnish (to seal, smooth, and make shiny through rubbing friction) the edges of your leather workpiece. These can also remove char after using a laser engraver.
Wood Burnisher - A wooden piece with grooves that is used to smooth and harden the edges of leather through applied friction and pressure.
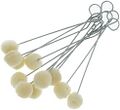
Daubers - Daubers are used to apply oil or dye to your leather workpiece.
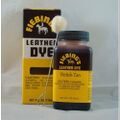
Leather Dye - Leather dye will stain your vegetable-tanned leather. We have a variety of colors available.
Edge Beveler - An edge beveler is a tool with a sharpened metal notch that is used to remove the square corners from the edges of leather goods.
End Punch - An end punch is used to cut smooth and clean tips on belts and straps up to 2" wide.
Hole Punch Set and Revolving Punch - Leather punches are hole punches specifically for making holes of various sizes in leather. They are great for setting rivets or making holes in belts and collars.
Manual Leather Sewing Machine - A heavy duty, hand-cranked sewing machine. Please receive proper training on threading and operation before using.
Neatsfoot Oil - Neatsfoot oil is an oil finish for leather that comes from the shin bones and feet of cattle. It's used to soften, condition, and preserve leather products.
Rawhide Hammer - A rawhide hammer (also called a leather maul) is a striking tool used for stamping, tooling, setting rivets, and more.
Rivet Setter - A set of tools used for setting rivets in leather.
Leather Shears - Heavy duty scissors that cut through leather quite easily.
Stitching Chisel - Stitching chisels are tools that are used for marking and creating holes in leather--usually for hand-sewing purposes. They are built with equally spaced metal points.
Stitching Groover - A tool that marks a groove around the edge of your workpiece by applying downward pressure as you drag the tool. The guide can be adjusted for different depths of inset grooves.
Stitching Pony - A device that keeps leather securely in place while hand-sewing, stitching, or lacing.
Strap Cutter - A tool designed to cut leather strips up to 4" wide as the leather is pushed/pulled across a small blade.
Swivel Knife - A swivel knife is used to outline and cut a design into the surface of leather as an initial stage to tooling the leather with decorations.
Training
Operation
Collectively, the leatherworking station is treated as a single piece of equipment--comprised of an assortment of tools. Each tool has a specific purpose, and half of the battle is just knowing what each tool does. The General Procedure section explains the process of various techniques you'll perform in the demonstration.
Demonstration
The demonstration for the leatherworking station will be an overview of the tools and techniques. Take a piece of scrap leather and perform the following actions:
- Take the strap cutter and cut a 0.5" strip of leather
- Practice punching a couple holes with either the rotary punch or the hole punch set
- Set the stitching groover to run a groove around the edges of your leather strip
- Use the edge beveler to round the top and bottom edges
- Burnish the edges of your leather strip with the wood burnisher, the burnishing cloth, or the burnishing attachment for the Dremel tool
- Prepare the leather for some hand-sewing by puncturing it with an awl or a stitching chisel
- Secure your leather strip in the stitching pony and attempt to sew using a saddle stitch in a few of the stitching holes you made
There are many more skills associated with leatherworking; this demonstration is only designed to cover the basics.
General Procedure
Cutting Leather is one of the first things you’ll do for your project. And this is something that’s pretty easy, but there’s a right way to cut and a not-so-right way. Because cutting out the leather is generally the first step in making a leather item and your cuts affect the difficulty of the steps that follow. Clean cuts ensure that burnishing is easy and your stitching lines are straight. Getting a clean cut is all about scoring, using a ruler that won’t slip and having a sharp knife or rotary cutting tool.
Hand-Stitching is one of the harder skills to learn, but it's still easy to pick up. Stitching a leather project together is a multi-step process. It involves marking out your stitching lines, punching your stitching holes, and finally saddle stitching the item together. Saddle stitching is a hand stitch that is widely used in leatherworking due to its durability. See the steps below along with the video to learn how to saddle stitch.
First, mark your stitching lines with a groover. If you’re not sure how far in to set your stitch, a general rule of thumb is to have the distance between the stitching and the edge be the same as the thickness of the edge.
Second, punch your stitching holes using a stitching chisel. Use the rawhide hammer to pound the stitching chisel with a scrap wood block underneath to avoid damaging the table. The main trick to this technique is to make sure that your chisel is perfectly perpendicular to the leather. A slight angle one way or the other will make it so the stitching on the backside doesn’t line up. This is especially a problem on thicker projects, like belts.
How much thread do I need? This depends greatly on the thickness of the leather and the style of stitch. For saddle stitching, it's recommended to cut thread that is between 4-lengths (for thinner projects) and 8-lengths (for thicker projects) of the total stitching length on the piece of leather. How tight you pull the thread will also make a big difference in how much thread is needed. No need to pull with all your might, but definitely don't leave your stitches loose.
Now to the hard part: saddle stitching. Once you have the needles through the first hole, take the needle on the left side and push it through the leather. Then, with the right needle, come behind the left needle to make a cross. Next, with the right needle still behind the left needle, pull the left needle through and rotate your hand toward you so that the left needle is now facing you and the right needle is facing the stitching holes.
Finally, put the right needle through the same hole you just pulled the left needle through. If you used a diamond chisel, each hole will be a diamond shape. This means that each hole has a high point and a low point. For your stitching to look uniform you need to consistently put the right needle back through the hole at the same point in the diamond, ideally the point of the diamond that is closest to you (assuming you are stitching towards yourself using the stitching pony). Once the needle is through, pull both tight. At that point, you’ve finished your first saddle stitch. On to the next one. Once you’ve completed your entire stitching line, you’ll need to backstitch. Back stitching is a saddle stitch that goes backwards 2-3 holes to make sure the thread won’t come loose.
Here is a video that shows the saddle stitching technique.
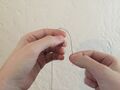
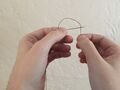
Threading a Needle is actually a skill too. Here's a quick aside on how to do it with waxed thread. Click on each image to see more detail.
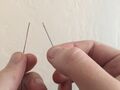
Cut the thread to the needed length
Roll or flatten the tip of the thread to put it through the eye of the needle
With the thread extending 1-2" beyond the tip of the needle, pierce the center of the thread with the needle
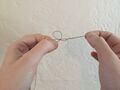
Pull the pierced section of thread beyond the eye of the needle to create a knot
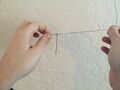
Pull from both sides of the thread to tighten the knot
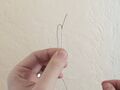
Slide the knot to the top of the eye, and now you are ready to stitch


Why do we need a knot around the eye of the needle? It keeps the thread from falling out of the eye of the needle as you pull it through the leather. Why not just tie a regular old knot to secure the thread to the eye of the needle? This type of knot is low-profile and won't unnecessarily enlarge the holes you made for stitching as you pull the knot through the leather.
Burnishing the edges of your leather will give your project a finished, professional look. Burnishing finishes the edges by melting the loose fibers together with heat created through friction. Basically, that just means you rub the edges with a wood burnisher or burnishing cloth until it looks good. A simple burnishing process includes: beveling the edges, sanding them, dyeing them, burnishing them, and then finishing the edge with glycerin soap or wax.

First, you’ll need to bevel your edges. The reason for this is that the surface of the leather will start to fold over as you sand the edge. Beveling basically removes the part that would fold over. Beveling is super easy. All you need to do is run the beveler smoothly and consistently along the edge with a moderate amount of force.
Next, you’ll need to get the edges nice and smooth. First, start with a 200 grit sandpaper; this will even out any part of the edge that is not flat with the rest. Then, sand off loose fibers with a 600 grit sandpaper.
Once the edges are smoothed out, it’s time to decide whether to dye the edge or not. Dying the edge isn’t something you have to do. If you want your edge to be a natural color, then don’t dye it. Typically though, you can dye the edge with the same color used to dye the surface. Burnished edges will naturally darken, so using the same dye provides a darker shade of the same color, which always looks good. Make sure to apply any dye in the Finishing Room.
Now, it’s time to actually burnish. To do this, dip your finger in water and lightly wet the edges. Make sure not to soak the edges though. Leather becomes very pliable when soaked and can be molded. This is great for other things, but not so much when your burnishing. Once you’ve put water on the edges, rub a wood burnisher or burnishing cloth across it briskly until the edges start to darken and shine. You’ll know you’re done when you start to hear a tacky sound.
And finally, apply some glycerin soap or wax to the edge. This helps keep the leather water-resistant and seals the edges. After applying the glycerin soap or wax, buff the edges again with a burnishing cloth.
Dyeing Leather is tricky. Getting a nice even coat of dye on leather takes not only the know how, but also the skill that comes with lots and lots of practice. There are many different ways to dye leather. Here is one recommended method.
First, all leather dyeing must occur in the Finishing Room with proper ventilation. The fumes from leather dyes are not good for you.
Secondly, put on gloves. Leather dye does not come off of your hands easily. A glove station is located in the Machine Shop just to the left of the Finishing Room door.
You can dye any unfinished vegetable-tanned leather. In fact, you can probably dye pre-dyed veg tanned leather... but why? Just be aware that there are waxes on top of finished leathers that will not allow the dye to penetrate the leather well. Regardless of your skills with dyeing, be aware that dyeing often reveals various marks and inconsistencies in the leather grain.
Before dyeing, wipe down your leather piece with a cloth or paper towel to remove any dust or contaminants. This will help create an even coat.
What is "cutting a dye" and why would I bother doing it? Cutting a dye reduces its potency by mixing the dye with a dye reducer. This allows you to apply several coats for a smooth and uniform finish. The more coats you do, the smoother your dye is going to look. At the same time, the more coats you do, the darker the finish will be. So, if you achieve the color you want on your first pass of dye but the finish isn't as smooth/uniform as you want, you won’t be able to apply more dye to help even out the finish. Instead, you’ll get a very marbled look... which is ok if that’s what you’re going for. If you don't cut the dye at all, it will be quite concentrated. A little dye will go a long way. Start with super light and thin strokes with the dauber. Avoid drenching your leather workpiece in the dye as this can produce some unwanted results (like your blue dye turning copper-colored). The following procedure assumes you have cut the dye.
For your first coat (or base coat), apply the dye in a circular motion. This is easily the most important coat. First you’ll dip your dauber, cloth, or sponge into the dye. Start with a very light pressure and slowly increase pressure in your circular motions as the dye absorbs into the leather. Then allow it to dry.
Here are a few tips for applying this coat evenly and consistently.
When you first set your dauber, cloth, or sponge onto the leather it is going to be loaded up with dye, and if you apply pressure when you first set it onto the leather that one spot is then going to be loaded up with dye. When you first start, apply little to no pressure. As you keep going and less dye is being released from the dauber/cloth/sponge, begin applying more pressure to release an equal amount of dye as before. When the dye starts getting spotty, reload the dauber/cloth/sponge with dye. Basically when the area you just passed over isn’t completely covered in dye, it’s time to get some more. As you dye with circular motion, overlap half of your previous circle with your new circle as you go. Don’t shy away from the edges. Make sure you dye the leather on something you don’t mind getting dye on, because you should be dyeing beyond the edge of the leather. If you treat the edge of the leather like the end of where you should dye, you’ll approach it timidly and the edges will look less dyed than the rest of the project. You can get a piece of cardboard from the low fidelity prototyping station to use as a platform for dyeing in the Finishing Room. Let your base coat dry.
Apply your second and third coats diagonally. The second coat can go back and forth diagonally to the right; the third coat can go back and forth diagonally to the left. Make sure to go beyond the edge of the leather piece for an even coat. Always allow time for drying between coats.
With this 3-coat method, the grain of the leather has been hit with dye from every direction, and there should be no spotty or undyed parts. You can buff the finish with a burnishing cloth once it has dried.
Once this final coat has dried, you need to put a finish on the leather. If you decide to skip this step, whoever is using the item you made will end up with leather dye on their clothes. This is bad, so use a finish. While a finish won't completely prevent dye rub off, it will greatly reduce it when applied to the leather properly. Fiebing's Tan Kote works well as a finish, which can be purchases as either a gloss of matte finish. This can be applied in one coat; just work it into the leather using the same circular motion from before. Once you’ve worked it in evenly, leave it alone and let it dry. Touching it at all during the drying process will ruin the finish. After the finish has had time to dry, buff it with a cotton cloth. Finally, the dyeing and finishing process is complete!
Certification
Troubleshooting
Practice makes perfect. Don't expect your first leatherworking project to be a masterpiece. Many of these leatherworking techniques simply need to be practiced to gain proficiency.
For additional info, check out these websites: Instructables, MMDIY.
Maintenance
General maintenance
The manual sewing machine and the tooling are the only parts of the leatherworking station that need periodic maintenance.
Specific Maintenance Tasks
| Maintenance Procedure | Frequency | Done By |
|---|---|---|
| Lubricate the Manual Sewing Machine | Yearly | Maker Hub Technician |
| Sharpen the Tooling | Yearly | Maker Hub Technician |