Difference between revisions of "Lathe"
Jwhipple15 (talk | contribs) |
|||
| (45 intermediate revisions by 8 users not shown) | |||
| Line 3: | Line 3: | ||
|Has make=Monarch | |Has make=Monarch | ||
|Has model=10EE | |Has model=10EE | ||
| + | |Has serial number=30890 / 38728 | ||
|Has name={{PAGENAME}} | |Has name={{PAGENAME}} | ||
|Is located in facility= Machine Shop | |Is located in facility= Machine Shop | ||
|Is used in domain=Metal | |Is used in domain=Metal | ||
|Has function=Lathe | |Has function=Lathe | ||
| + | |Has certification=https://georgefox.instructure.com/courses/1234 | ||
|Has url=http://www.monarchlathe.com/products/lathes/toolroom/monarch-ee-series | |Has url=http://www.monarchlathe.com/products/lathes/toolroom/monarch-ee-series | ||
|Has icon=File:lathe_icon.png | |Has icon=File:lathe_icon.png | ||
| Line 15: | Line 17: | ||
|Has description=Used turn, face, or part round stock | |Has description=Used turn, face, or part round stock | ||
|Has QR code=File:Horizontal Bandsaw QR code.png | |Has QR code=File:Horizontal Bandsaw QR code.png | ||
| − | |Has ace= | + | |Has ace=Needed;Makerhub@georgefox.edu |
}} | }} | ||
| − | [[{{#show: {{FULLPAGENAME}}|?Has icon|link=none}}| | + | [[{{#show: {{FULLPAGENAME}}|?Has icon|link=none}}|140px|left|top|{{#show: {{FULLPAGENAME}}|?Has icondesc}}]] |
[[{{#show: {{FULLPAGENAME}}|?Has image|link=none}}|300px|thumb|upright=1.5|{{#show: {{FULLPAGENAME}}|?Has imagedesc}}]] | [[{{#show: {{FULLPAGENAME}}|?Has image|link=none}}|300px|thumb|upright=1.5|{{#show: {{FULLPAGENAME}}|?Has imagedesc}}]] | ||
| − | + | Make: {{#show: {{PAGENAME}} |?Has make}} | |
| + | |||
| + | Model: {{#show: {{PAGENAME}} |?Has model}} | ||
| + | |||
| + | Serial Number: {{#show: {{PAGENAME}} |?Has serial number}} | ||
| + | |||
| + | Ace: {{#show: {{PAGENAME}} |?Has ace.Has name}} ({{#show: {{PAGENAME}} |?Has ace.Has email address}}). | ||
| + | |||
| + | Location: {{#show: {{PAGENAME}} |?Is located in facility}} | ||
| − | |||
| − | |||
__TOC__ | __TOC__ | ||
| + | ==Safety First== | ||
| + | [[File:Safety First HD2.png|left|150px]] | ||
| + | Here are some safety instructions for the {{PAGENAME}}. Remember... SAFETY FIRST!!! | ||
| + | * Never wear gloves, long sleeves, jewelry, or have long hair down as all of these can get caught in the rotating portion of the machine. | ||
| + | * Make sure to remove the chuck key. Sounds simple but this is probably the most common mistake in the machine shop. | ||
| + | * Keep clear of any rotating parts. | ||
| + | * Ensure that the chuck jaws do not collide with the carriage. | ||
| + | * When loading your stock into the machine, make sure the diameter of your piece does not over extend the jaws -as they might fall out and get damaged. If your workpiece diameter is any larger than 2“, ask a shop supervisor to flip the jaws for you. | ||
| + | |||
| + | ==Description== | ||
| + | |||
| + | A lathe is a machine tool that rotates the work piece on an axis to perform various operations such as boring, sanding, knurling ,drilling, facing, and turning. It does this with a stationary tool that is applied to the work piece to remove material. The lathe will create an object that is symmetrical about the axis of rotation it was rotated about. It is useful for creating flywheels and other circular parts. There are two lathes available in the machine shop and they have several small differences between the two. The main difference is the start/stop procedure. When removing accessories from the tailstock you will need to use a tapered key to drive out the tooling in lathe #1 whereas you can eject the tooling using the tailstock hand wheel on lathe #2. | ||
| + | {{#evu:https://www.youtube.com/watch?v=lcGHtI9Lql4}} | ||
| + | |||
| + | ==Documentation== | ||
| − | == | + | ====Terminology==== |
| − | + | * Spindle - The part of the lathe that rotates. | |
| − | + | * Chuck - Clamping device that holds the material. | |
| + | * Tailstock - Adjustable mount that is used to support the material, drill holes, and ream holes. | ||
| − | + | [[Media:Monarch-10EE-Manual.pdf|Lathe User Manual]] | |
| − | == | + | ==Training== |
| − | + | ====Operation==== | |
| − | |||
| − | + | To begin you will need to a piece of round stock that is at least a quarter inch longer than the final part. The extra material is so that your part will be the correct length after machining the end to a smooth face (facing). Using the chuck key found in the tool holder, place the stock in the chuck and tighten to secure the stock. Always remove the chuck key from the chuck or it can fly across the room once the lathe is turned on. A common difficulty with using these lathes is activation. The images below demonstrate the differences between Lathe 1 and Lathe 2, please refer to the video below for more information. Lathe 1 must be turned on using the power button circled on the left and the spinning is initiated using the activation lever. Note that the activation lever on Lathe 1 needs to be pulled out before being moved up and down. It also has a neutral position. The lever must be in neutral position for the machine to turn on. It is safer to run the machine in forward because the chips will tend to fall down and into the tray rather than fly up and out. Lathe 2 is controlled by an intuitive button panel. The final piece to using the lathe is setting the correct speed. Refer to the speed chart posted on the wall above the lathes to determine the correct speed for your specific material and set the spindle speed to match. Use the control panel to do this on lathe 2 and the left most knob to do this on lathe 1. You can then begin machining. For more details see the video below. | |
| − | == | + | <gallery widths="300" heights="230"> |
| + | File:Lathe2 on.jpg|Control Panel for Lathe 2 | ||
| + | File:Lathe1 onandoff.jpg|Start Stop Switch and Activation Lever of Lathe 1 | ||
| + | </gallery> | ||
| − | == | + | ====Demonstration==== |
| + | |||
| + | Face a 1” aluminum bar down to 0.75”, drill a hole through the middle, and then ream the hole. Check out the image below to see what this should look like. | ||
| + | [[File:Lathe Demonstration.png|none|thumb|400x400px|Lathe demonstration expectations.]] | ||
| + | |||
| + | ====General Procedure==== | ||
| − | |||
This video contains specific information for using the lathe in the Maker Hub as well as a basic overview of what will be expected in your live demonstration. | This video contains specific information for using the lathe in the Maker Hub as well as a basic overview of what will be expected in your live demonstration. | ||
{{#evu:https://www.youtube.com/watch?v=oqmJ-dvSMHc}} | {{#evu:https://www.youtube.com/watch?v=oqmJ-dvSMHc}} | ||
| − | [[File: | + | |
| − | + | ==Reset the Space== | |
| + | [[File:Reset The Space HD2.png|left|150px]] | ||
| + | Here is how you can reset the space for the {{PAGENAME}}. Remember... leave it better than you found it! | ||
| + | * Turn off the machine (do not forget to turn off the generator on lathe 1). | ||
| + | * Clean and Return all tools back to the tool rack, workbench and/or tool cart. | ||
| + | * Place long chips and birds’ nests in the metal scrap bin. | ||
| + | * Sweep and vacuum the machine. Only vacuum small chips, otherwise it will clog the vacuum. | ||
| + | * Put any unused materials back on the storage shelf and put small pieces in the scrap box. | ||
| + | |||
| + | ==Certification== | ||
| + | |||
| + | [https://georgefox.instructure.com/courses/1234 Canvas Quiz] | ||
| + | |||
| + | ==Troubleshooting== | ||
| + | * Not cutting smoothly or Tool is making excessive noise (chattering) - Slow down the feed rate and the amount of material being removed. Check the spindle speed as well. If the problem persists check the tool to make sure it is not chipped and that it is at the correct height. Ask a shop supervisor for help if the tool is damaged. | ||
| + | * A small bump remains when facing the end of the material - Adjust the tool height so it is exactly in the center of the material. | ||
| + | |||
| + | ==Maintenance== | ||
| + | ====General maintenance==== | ||
| + | |||
| + | This machine requires minimal maintenance but like all the other machines in the Maker Hub it is important to clean the machine of metal chips and any other debris after each use. Anything more advanced is taken care of by Justin. | ||
Revision as of 09:40, 25 May 2022

Make: Monarch
Model: 10EE
Serial Number: 30890 / 38728
Ace: Needed (Makerhub@georgefox.edu).
Location: Machine Shop
Safety First

Here are some safety instructions for the Lathe. Remember... SAFETY FIRST!!!
- Never wear gloves, long sleeves, jewelry, or have long hair down as all of these can get caught in the rotating portion of the machine.
- Make sure to remove the chuck key. Sounds simple but this is probably the most common mistake in the machine shop.
- Keep clear of any rotating parts.
- Ensure that the chuck jaws do not collide with the carriage.
- When loading your stock into the machine, make sure the diameter of your piece does not over extend the jaws -as they might fall out and get damaged. If your workpiece diameter is any larger than 2“, ask a shop supervisor to flip the jaws for you.
Description
A lathe is a machine tool that rotates the work piece on an axis to perform various operations such as boring, sanding, knurling ,drilling, facing, and turning. It does this with a stationary tool that is applied to the work piece to remove material. The lathe will create an object that is symmetrical about the axis of rotation it was rotated about. It is useful for creating flywheels and other circular parts. There are two lathes available in the machine shop and they have several small differences between the two. The main difference is the start/stop procedure. When removing accessories from the tailstock you will need to use a tapered key to drive out the tooling in lathe #1 whereas you can eject the tooling using the tailstock hand wheel on lathe #2.
Documentation
Terminology
- Spindle - The part of the lathe that rotates.
- Chuck - Clamping device that holds the material.
- Tailstock - Adjustable mount that is used to support the material, drill holes, and ream holes.
Training
Operation
To begin you will need to a piece of round stock that is at least a quarter inch longer than the final part. The extra material is so that your part will be the correct length after machining the end to a smooth face (facing). Using the chuck key found in the tool holder, place the stock in the chuck and tighten to secure the stock. Always remove the chuck key from the chuck or it can fly across the room once the lathe is turned on. A common difficulty with using these lathes is activation. The images below demonstrate the differences between Lathe 1 and Lathe 2, please refer to the video below for more information. Lathe 1 must be turned on using the power button circled on the left and the spinning is initiated using the activation lever. Note that the activation lever on Lathe 1 needs to be pulled out before being moved up and down. It also has a neutral position. The lever must be in neutral position for the machine to turn on. It is safer to run the machine in forward because the chips will tend to fall down and into the tray rather than fly up and out. Lathe 2 is controlled by an intuitive button panel. The final piece to using the lathe is setting the correct speed. Refer to the speed chart posted on the wall above the lathes to determine the correct speed for your specific material and set the spindle speed to match. Use the control panel to do this on lathe 2 and the left most knob to do this on lathe 1. You can then begin machining. For more details see the video below.
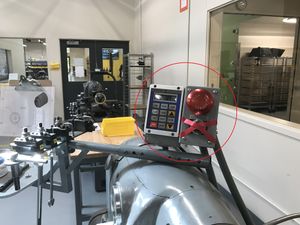
Control Panel for Lathe 2
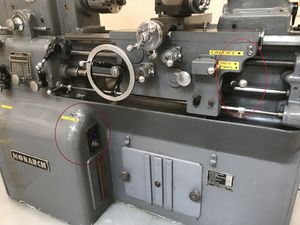
Start Stop Switch and Activation Lever of Lathe 1


Demonstration
Face a 1” aluminum bar down to 0.75”, drill a hole through the middle, and then ream the hole. Check out the image below to see what this should look like.

General Procedure
This video contains specific information for using the lathe in the Maker Hub as well as a basic overview of what will be expected in your live demonstration.
Reset the Space

Here is how you can reset the space for the Lathe. Remember... leave it better than you found it!
- Turn off the machine (do not forget to turn off the generator on lathe 1).
- Clean and Return all tools back to the tool rack, workbench and/or tool cart.
- Place long chips and birds’ nests in the metal scrap bin.
- Sweep and vacuum the machine. Only vacuum small chips, otherwise it will clog the vacuum.
- Put any unused materials back on the storage shelf and put small pieces in the scrap box.
Certification
Troubleshooting
- Not cutting smoothly or Tool is making excessive noise (chattering) - Slow down the feed rate and the amount of material being removed. Check the spindle speed as well. If the problem persists check the tool to make sure it is not chipped and that it is at the correct height. Ask a shop supervisor for help if the tool is damaged.
- A small bump remains when facing the end of the material - Adjust the tool height so it is exactly in the center of the material.
Maintenance
General maintenance
This machine requires minimal maintenance but like all the other machines in the Maker Hub it is important to clean the machine of metal chips and any other debris after each use. Anything more advanced is taken care of by Justin.