Difference between revisions of "Jointer"
(→Safety) |
|||
| Line 119: | Line 119: | ||
* Don't exceed a 1/16" cut per pass as too heavy of a cut can try to push material back at you and overload the machine. | * Don't exceed a 1/16" cut per pass as too heavy of a cut can try to push material back at you and overload the machine. | ||
* Make sure material cut is free of all metal and loose Knots to prevent damage to you and the machine. | * Make sure material cut is free of all metal and loose Knots to prevent damage to you and the machine. | ||
| + | * Never apply pressure to the material directly over the cutter head. This could cause the board to tip and or put your hand/fingers at risk. | ||
This is a video showing how to safely use the jointer: | This is a video showing how to safely use the jointer: | ||
{{#evu:https://www.youtube.com/watch?v=3d1qBxcnI0E | {{#evu:https://www.youtube.com/watch?v=3d1qBxcnI0E | ||
Revision as of 11:34, 17 June 2020
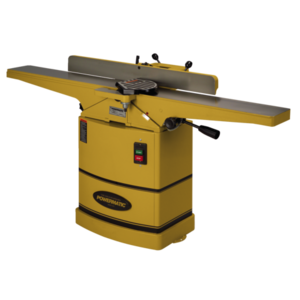
Make: Powermatic
Model: 54HH
Ace: Needed (Makerhub@georgefox.edu).
Location: Wood Shop
Description
The jointers function is to produce a flat surface along a boards length and has a 6" width capacity. When gluing board edges together they need to be flat and fit together without gaps. A jointer cuts with a helical cutter-head made up of many tiny carbide cutters wrapped around a rotating drum. Some of the cheaper and older machines use blades rather than carbide inserts to cut away material.
Here is an example of this piece of equipment being used.
Documentation
Terminology
- Cutter Head - Drum of carbide inserts that performs the cutting action.
- Fence - Metal back-stop that is used to guide and control the angle of material being cut.
Training
Operation
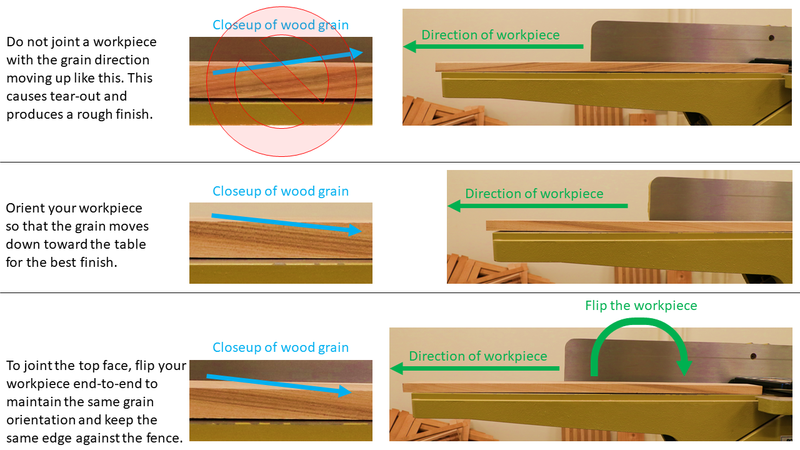
The core of jointer consists of a round cutter head with many carbide cutters. The cutter head is located between the in-feed and out-feed table. The front table can be adjusted up and down to control the amount of material that is exposed to the cutter head. The lower the table the more material per pass will be removed. Don't try to adjust the out-feed table as the height has been set to support the material after it has been ran past the cutter head. Misalignment of the cutter head to out-feed table will create uneven cuts or jam the material on out-feed. There are a few other things to keep in mind regarding your material as well. Make sure the material you are cutting is free of all foreign objects. Do not cut materials that may have nails or screws as they will damage the blade and may cause injury to you. Also, if the material contains a loose knot it can break free and create a safety hazard. Only cut with the grain, attempting to cut across the grain of material will create poor results and could create kick-back. Do not attempt to joint end grain either. If you have a cupped board place the concave side down on the table while running it through the machine. This will help remove material on the ends and flatten out the board.
If your material looks good, the next step is to set up the jointer itself. When setting up the jointer in-feed table, make sure not to remove more than 1/16" of material. This limits the amount of cutter engagement and will help prevent a kickback. You will also need to hook up the adjacent dust collector to the end of the machine, make sure it is plugged in, and turned on. The dust collector must be used with the jointer to help keep the dust out of the air. As you make a cut, it is imperative that you keep the wood firmly against the fence and table. Therefore, you should double check to see if the fence is secure, especially because the fence can be adjusted. You do not want the fence to move while you are making a cut.
After the jointer is set up you are ready to cut. Press the power switch and slowly push the material through, making sure to keep your hands away from the cutter head/guard. Do not stop pushing the material until after the cut is finished. Do not let go of your work piece during the cut or it could be forced backwards.
Demonstration
Demonstrate you can safely setup the jointer. You will need to clean up one edge and one face of a board. Remember to never adjust the out feed table as it has been precisely set to the height of the cutter head. Adjusting the in-feed table will change the amount of material removed per pass. Do not set the in-feed table to remove more than 1/16" per pass. Your fingers should never go any lower than the height of the cutter guard. Verify the fence is locked and set at the angle needed before making a pass.
General Procedure
Edge Cleanup
1. Ensure that the material you are cutting is free from nails and foreign objects. Foreign material will damage the cutters and create flying hazards. Check for problematic knots too.
2. Make sure the board is at least 10" long and at least 3/8" wide to prevent the board from tilting while cutting. Do not joint workpieces less than 1/4" thick.
3. Check the cut gauge on the front table. Make sure you know how much material is being removed. Never adjust the rear table.
4. Make sure the fence is tight and set at the correct angle.
5. Check that the dust collector is connected.
6. Make sure the machine table is clear and press the power on switch for the jointer and dust collector.
7. Position your hands safely on the material and use a push stick if needed. A push pad/stick is needed if your material is less than 2" thick. This will keep your fingers away from the cutter head.
8. Slowly feed the material through while pushing down on the table and back against the fence. Moving the material too fast will produce a poor finish.
9. After making a pass measure the material to see if another pass is required. Multiple passes are normally needed to get the desired results.
10. Power off the machine and dust collector.
11. Reset the space.
Facing Material (planing)
1. Ensure that the material you are cutting is free from nails or foreign objects. Foreign material will damage the cutters and create flying hazards. Check for problematic knots too.
2. Make sure the board is at least 10" long x 2" wide to prevent the board from tilting while facing. Do not joint workpieces less than 1/4" thick.
3. Check the cut gauge. When facing you normally want to take off a small amount of material per pass due to the large surface area.
4. Make sure the fence is tight and set at the correct angle.
5. Check that the dust collector is connected.
6. Make sure the machine table is clear and press the power on switch for the jointer and dust collector.
7. Position your hands safely on the material. A push pad/stick is needed if your material is less than 2" thick. This will keep your fingers away from the cutter head.
8. Slowly feed the material through on the table to get a smooth finish.
9. After making a pass inspect the material to see if another pass is needed. Multiple passes are normally required to get the desired results.
10. Power off the machine and dust collector.
11. Reset the space.
Safety
There are several hazards you need to be aware of when using a jointer.
- The cutters are very sharp and spin very fast. Keep your fingers away from the cutter head even when its not spinning. Use a push pad/stick to keep your fingers a safe distance from the cutters.
- Never let your thumb or fingers hang down near the table when pushing a board through the machine.
- Hold onto material firmly and keep it against the table and fence to help prevent material kicking back. If material catches on the blade the material can shoot back at you and this is called a kickback.
- Use a hold down or push block when surfacing stock less than 12" long, or 3 inches wide, or 3 inches thick.
- Never feed material the same direction as the cutter rotation.
- Never try to cut across grain as this could cause a kickback.
- Don't exceed a 1/16" cut per pass as too heavy of a cut can try to push material back at you and overload the machine.
- Make sure material cut is free of all metal and loose Knots to prevent damage to you and the machine.
- Never apply pressure to the material directly over the cutter head. This could cause the board to tip and or put your hand/fingers at risk.
This is a video showing how to safely use the jointer:
Certification
Troubleshooting
If the finish looks rough you may be feeding the material too fast. Try slowing down the speed you are feeding the material through.
Maintenance
General maintenance
Carbide cutters need rotating when they start to dull. This is a job for the technician.
Specific Maintenance Tasks
| Maintenance Procedure | Frequency | Done By |
|---|---|---|
| Sample | Sample | Sample |

