Difference between revisions of "Foam Cutter"
| (9 intermediate revisions by the same user not shown) | |||
| Line 4: | Line 4: | ||
|Is used in domain= | |Is used in domain= | ||
|Has name={{PAGENAME}} | |Has name={{PAGENAME}} | ||
| − | |Has icon=File: | + | |Has icon=File:Foam Cutter 2.png |
|Has icondesc= | |Has icondesc= | ||
|Has iconwname= | |Has iconwname= | ||
| Line 109: | Line 109: | ||
# Switch on the device with the switch 1(Fig. 1). | # Switch on the device with the switch 1(Fig. 1). | ||
# Adjust the temperature with the regulator 2. The table on the front of the device serves as a guide. The best way to find the ideal temperature is to try different temperatures yourself. For simple, straightforward cuts you use a high temperature, for complicated shapes a lower temperature. | # Adjust the temperature with the regulator 2. The table on the front of the device serves as a guide. The best way to find the ideal temperature is to try different temperatures yourself. For simple, straightforward cuts you use a high temperature, for complicated shapes a lower temperature. | ||
| − | # Now move the workpiece through the wire with a light pressure and even speed. Be aware that too high pressure in the direction of the cut when cutting complicated shapes will tend to bend the wire. | + | # Now move the workpiece through the wire with a light pressure and even speed. Thick sections should be cut with a slower speed. Be aware that too high pressure in the direction of the cut when cutting complicated shapes will tend to bend the wire. |
Note: It is normal that the wire extends somewhat after being heated for the first time. Stretch the wire slightly by the first heating and tension it again. The wire will now retain its length. | Note: It is normal that the wire extends somewhat after being heated for the first time. Stretch the wire slightly by the first heating and tension it again. The wire will now retain its length. | ||
| Line 137: | Line 137: | ||
====General Procedure==== | ====General Procedure==== | ||
| − | The tabletop foam cutter is best for performing straight, miter, and parallel cuts. Odd shapes and rounded features may be better cut with the handheld foam cutter. Only the handheld foam cutter can have its hot wire bent into odd shapes. | + | The tabletop foam cutter is best for performing straight, miter, and parallel cuts. Odd shapes and rounded features may be better cut with the handheld foam cutter. Only the handheld foam cutter can have its hot wire bent into odd shapes. Loosen the adjustment knobs and bend the wire to your liking. |
| + | |||
| + | When you finish using a foam cutter, turn it off. The hot wire should cool down in a few seconds. Gently wipe down the hot wire with a soft cloth or paper towel to remove any leftover residue. | ||
If you are gluing foam together, cut the foam before the glue dries. The foam cutters will not work well through dried glue. | If you are gluing foam together, cut the foam before the glue dries. The foam cutters will not work well through dried glue. | ||
| Line 147: | Line 149: | ||
==Safety== | ==Safety== | ||
| − | Clearly, getting burned by the hot wire is a safety concern. Don’t touch the hot wire. However, a much greater risk is the potential for dangerous fumes when cutting foams - especially foams other than polystyrene. It is very important that you verify that any other foams are safe to be cut. | + | Clearly, getting burned by the hot wire is a safety concern. Don’t touch the hot wire. However, a much greater risk is the potential for dangerous fumes when cutting foams - especially foams other than polystyrene. It is very important that you verify that any other foams are safe to be cut. |
# Provide good ventilation, when using the device. | # Provide good ventilation, when using the device. | ||
| Line 160: | Line 162: | ||
You can not cut through the spongy polyurethane foams used for upholstery. It beads off on the hot wire and gives off toxic fumes. | You can not cut through the spongy polyurethane foams used for upholstery. It beads off on the hot wire and gives off toxic fumes. | ||
| + | |||
| + | ==Cut List== | ||
| + | ===Approved Materials=== | ||
| + | * EPS/Expanded Polystyrene (Styrofoam) | ||
| + | * XPS/Extruded Polystyrene (Styrofoam) | ||
| + | * Owens Corning Pinkboard (Foamular) | ||
| + | * DOW Blueboard | ||
| + | * PE/polyethylene | ||
| + | * PP/polypropylene | ||
| + | |||
| + | ===DO NOT CUT=== | ||
| + | * Polyurethane foams | ||
| + | * Polyisocyanurate foam | ||
| + | * Items that are not foam | ||
| + | |||
| + | If you want to cut a material not listed here, please talk with the Maker Hub staff. | ||
==Certification== | ==Certification== | ||
Revision as of 14:50, 28 February 2022


Make: Proxxon
Model: Thermocut 12E & 115E
Ace: Needed (Makerhub@georgefox.edu).
Location: The Hub
Description
The PROXXON THERMOCUT allows you to cut polystyrene (Styrofoam) in a clean and safe way without frayed edges or particulation. This foam cutter is deal for architects, designers, decorators, artists, and teachers. Examples include building architectural models, classic model railroads, plane and boat items, and numerous decorative items.
The large table with 15 11/32" x 11" (390 x 280mm) ensures smooth and easy movement of the workpiece. The printed grid and protractor assist with division and cutting. The solid aluminum overarm has a 13 3/4" (350mm) throat and offers 5 1/2" (140mm) in height. The holder and wire coil (one spool of wire 98ft., 0.008" diameter is included) may be shifted and adjusted along the overarm to enable miter cutting. An LED indicates operation and thus reminds you not to touch the hot wire to prevent burnt fingers (the wire heats to maximum in less than 1 second).
Note: The correct temperature, being material and thickness dependent, is learned from experience. Profiles are ideally cut at lower temperatures and while applying less cutting force.
Technical data:
Cutting wire temperature: 210 - 390 °F (100 - 200 °C) Transformer secondary max: 10V at 1.0A Volts: 110 - 120V AC, 60 Hz Weight: 6.6 lb (3kg)
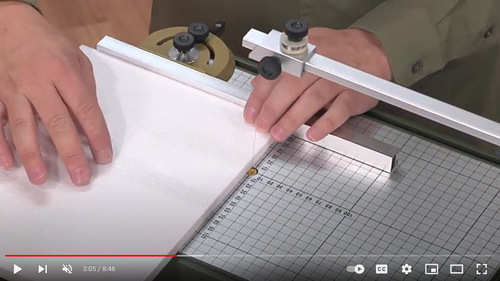
Here is an example of the table in use. (Link takes you to YouTube - embedding not allowed for this video??)
This is Proxxon's video for the hand-held cutter.
This is Proxxon's video for the table-top cutter.
Documentation
Terminology
There are two types of polystyrene foam best suited for processing with the Hot wire foam cutters and Hot knife cutters: extruded polystyrene (XPS foam), and expanded polystyrene (EPS foam). Although both types of insulation are comprised of polystyrene, the two types of manufacturing processes produce finished products with very different performance properties. XPS is manufactured in a continuous extrusion process that produces a homogeneous closed cell cross-section, whereas EPS is manufactured by expanding spherical beads in a mold, using heat and pressure to fuse the beads together.
Some people like to use hot wire tools to cut nylon and polyethylene rope because it singes and seals the ends.

Anatomy of the Thermocut Foam Cutter
- On/Off switch
- Temperature adjustment knob
- Standby LED
- Knurled screw for clamping the cutting wire
- Overarm
- Wire spool
- Screw for wire spool
- Spool carrier
- Screw for spool carrier
- Guide slot
- Cutting Wire
- Lower wire guide
- Slot for angle stop
- Angle gauge
- Extension
User Manual
Training
Operation
A 0.2mm wire is heated using a safe 10V source, and this heated wire cuts through the polystyrene, melting it and providing a clean cut. By varying the amount of voltage on the wire (and thus current), the wire temperature can be varied between 100℃ - 200℃ (212℉ - 392℉).
Assembling the THERMOCUT
- Fit the overarm 1 (Fig. 2) underneath the device by using the enclosed knurled screw.
- Fasten the cable 2 to the overarm with the screw 3.
- Tighten the screw well to ensure good electrical contact (10.5 volt low voltage).
- Slide the spool carrier 8 (Fig. 1) on to the arm and fasten it with the screw 9.

Installing the cutting wire
- Switch off the device.
- Carefully unwind the cutting wire approx. 8’’ (20 cm).
- Open the lower wire guide by turning the knurled screw 4 (Fig. 1).
- Thread the wire approx. 2’’ (5 cm) into the lower wire guide.
- Clamp the wire by turning the knurled screw 4.
- Push the overarm 5 lightly downwards with your left hand, thread the wire through the guide slot 10 and fasten the wire spool 6 so that the wire is slightly tensioned.
- Release the arm. The wire is tensioned by the spring force of the arm.
- Check that the wire is a right angle with work surface. Adjust, if necessary by sliding the spool carrier 8 or by bending the clamp.
- Connect the mains plug. Your device is now ready for use.
Cutting
- Switch on the device with the switch 1(Fig. 1).
- Adjust the temperature with the regulator 2. The table on the front of the device serves as a guide. The best way to find the ideal temperature is to try different temperatures yourself. For simple, straightforward cuts you use a high temperature, for complicated shapes a lower temperature.
- Now move the workpiece through the wire with a light pressure and even speed. Thick sections should be cut with a slower speed. Be aware that too high pressure in the direction of the cut when cutting complicated shapes will tend to bend the wire.
Note: It is normal that the wire extends somewhat after being heated for the first time. Stretch the wire slightly by the first heating and tension it again. The wire will now retain its length.
Note: Please note that too high temperatures will cause untidy edges.
Miter cutting
Miter cutting can be done in two ways with the THERMOCUT: by adjusting the spool carrier on the overarm or with the adjustable angle gauge.
- To adjust the spool carrier, loosen the screws 1 and 2 (Fig. 3) and select the required angle by sliding the spool carrier. Tighten the screw 1 again and tension the wire as usual.
Note: Adjusting the spool carrier will lengthen the heated part of the wire and thus increase the electrical resistance. The temperature must be adjusted accordingly.

Working with the stop:
- Select the required miter on the angle stop and secure the adjustment with the screw 1 (Fig. 4).
- Move the extension 2 so that you can pass the cutting wire without difficulty.
- Press the workpiece against the stop and guide the stop along the slot 3.

Note: The stop can be fixed for parallel cutting. Turn the screw 1 (Fig.5) to clamp the stop in the slot. Guide the workpiece past the cutting wire along the stop.

Demonstration
Pick an angle between 45 and 80 degrees, and set the hot wire to your desired angle by adjusting the spool carrier.
Turn on the Thermocut and perform a miter cut on a scrap piece of foam.
Reset the angle of the hot wire perpendicular to the table top.
General Procedure
The tabletop foam cutter is best for performing straight, miter, and parallel cuts. Odd shapes and rounded features may be better cut with the handheld foam cutter. Only the handheld foam cutter can have its hot wire bent into odd shapes. Loosen the adjustment knobs and bend the wire to your liking.
When you finish using a foam cutter, turn it off. The hot wire should cool down in a few seconds. Gently wipe down the hot wire with a soft cloth or paper towel to remove any leftover residue.
If you are gluing foam together, cut the foam before the glue dries. The foam cutters will not work well through dried glue.
Here are a few good videos to watch if you are building scenery with foam.
Safety
Clearly, getting burned by the hot wire is a safety concern. Don’t touch the hot wire. However, a much greater risk is the potential for dangerous fumes when cutting foams - especially foams other than polystyrene. It is very important that you verify that any other foams are safe to be cut.
- Provide good ventilation, when using the device.
- Observe the material suppliers safety instructions when cutting.
- The cutting wire is hot. Risk of skin burn!
- Do not use the device near curtains or other combustible materials.
- Do not leave the device unattended when it is switched on.
- Only use the supplied cutting wire or original PROXXON replacement wire, otherwise the transformer can become overloaded.
- Switch off the device after use.
Polyisocyanurate foam should not be cut with hot wire tools. It needs a ton of heat, gives off toxic fumes, and leaves a lot of melted plastic wherever it is cut. We recommend that the polyisocyanurate foams only be cut with a blade or saw.
You can not cut through the spongy polyurethane foams used for upholstery. It beads off on the hot wire and gives off toxic fumes.
Cut List
Approved Materials
- EPS/Expanded Polystyrene (Styrofoam)
- XPS/Extruded Polystyrene (Styrofoam)
- Owens Corning Pinkboard (Foamular)
- DOW Blueboard
- PE/polyethylene
- PP/polypropylene
DO NOT CUT
- Polyurethane foams
- Polyisocyanurate foam
- Items that are not foam
If you want to cut a material not listed here, please talk with the Maker Hub staff.
Certification
Troubleshooting
- When cutting double miter (e.g. roof), don’t remove the cut off part after the first cutting. Use it as an underlay for the second cut.
- The wire has a higher temperature at the exit side of the workpiece, which may cause surface melting. To prevent this, the wire can be cooled by blowing on it.
- Small sections of long profiles can best be cut by laying a waste piece 1 (Fig. 6) between the stop and the work piece and then cutting against the stop. The cutting wire then cuts into the waste piece and the edges remain clean.

- You can make a simple device yourself for cutting circular segments. Fix a drawing-pin at the center of the required circle on the working table with a piece of tape. Fix the workpiece onto the pin and turn the workpiece around the pin (Fig. 7).

- The cutting wire normally breaks above the guide bushing. Insert the wire a few inches further in the lower wire guide and fasten it again at regular intervals to prevent the wire from breaking. If the wire breaks, loosen the clamping knob and remove the broken piece. Then loosen the spool screw, pull out more wire and place it into the wire hole. Re-tighten all of the screws.
Maintenance
General maintenance
Clean the wire and the bushing regularly to prevent unnecessary evaporation of polystyrene residue. Caution: First switch off the device!
Specific Maintenance Tasks
| Maintenance Procedure | Frequency | Done By |
|---|---|---|
| Sample | Sample | Sample |