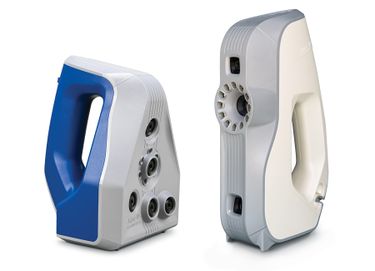
3D Scanners
Make: Artec
Model: Spider & Eva
Ace: Klayton Rhoads (krhoads16@georgefox.edu).
Location: The Vault
Description
Spider: A new and enhanced precision instrument for CAD users and engineers, Artec Space Spider is a high-resolution 3D scanner based on blue light technology. It is perfect for capturing small objects or intricate details of large industrial objects in high resolution, with steadfast accuracy and brilliant color. The scanner’s ability to render complex geometry, sharp edges and thin ribs sets our technology apart. It is an ideal industrial 3D scanner for high resolution capturing of objects such as molding parts, PCBs, keys, coins or even a human ear, followed by the export of the final 3D model to CAD software.
Eva: This structured light 3D scanner is the ideal choice for making a quick, textured and accurate 3D model of medium sized objects such as a human bust, an alloy wheel, or a motorcycle exhaust system. It scans quickly, capturing precise measurements in high resolution. Light, fast and versatile, Eva is our most popular scanner and a market leader in handheld 3D scanners. Based on safe-to-use structured light scanning technology, it is an excellent all round solution for capturing objects of almost any kind, including objects with black and shiny surfaces. Artec Eva’s ease of use, speed and precision has made it an essential product for a wide range of industries. From rapid prototyping to quality control, CGI to heritage preservation, the automotive industry to forensics, medicine and prosthetics to aerospace, the device is used to customize, innovate and streamline countless forward-thinking industries. Eva was even used to scan Barack Obama and help make the very first 3D portrait of an American president.
Here is an example of this piece of equipment being used.
Documentation
Terminology
Insert terminology here
Training
Operation
Insert Text
Demonstration
Complete a scan of a small object like a Lego.
General Procedure
1. Choose which scanner you are going to use. The Spider can pick up more detail but has a small field of vision. Consequently, this is a good choice for smaller objects with many details. This scanner works best when it is held still while the object is rotated. When scanning larger objects like people this scanner is more difficult to use because of this field of vision. The Eva is not as detailed as the spider but is designed for larger objects and has a larger field of view. When scanning, it works well to walk around the object while scanning.
2. Plug the desired scanner into the computer and open the artec studios software.
3. Plug in scanner power and USB cables
4. Open Artec Studio
5. For Space Spider, wait for current temperature to reach optimal temperature range in order for accuracy to be at its best.
6. Press the rocker switch or slider up in order to enter preview mode
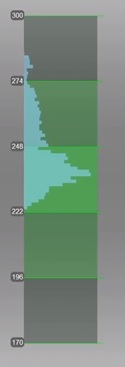
7. When scanning, make sure that the blue distance waveform is within the three green regions on the distance meter in order to get the best results.
8. Adjust texture brightness until detail is visible but colors are not blown out. This will need to be adjusted for each object scanned.
9. When scanning shiny or dark objects with the Space Spider, it may be necessary to adjust the sensitivity for the object to be scanned correctly. However, increasing the sensitivity will cause the scanner to capture more noise, increasing processing time. As a rule of thumb, don’t increase the sensitivity over 1/4 of the bar’s range. This step is not necessary with the Eva.
10. If speed is more important than accuracy, check the Real-time fusion box to make Artec Studio render the model in real time, removing the rendering step that is usually necessary after scanning.
11. For some objects, such as larger floorstanding objects, it may be helpful to check the Enable automatic base removal box in order to remove the base from the model during processing.
12. If scanning a smaller object, it is much easier to place the object on a turntable and scan it there.
13. Press the up button again to begin scanning the object.
14. While scanning, watch the computer screen to make sure that the distance from the scanner to the object is within the green range and that the object is at the center of the field of view.
15. Move the scanner all the way around the object with smooth motion, capturing as many different angles as possible. Once you have captured all you can with the object in its current position, press the down button on the scanner to stop, turn the object onto a different side, and repeat the scanning process.
16. Once you have captured enough angles, click on the Autopilot button on the left, select all the scans you would like to use, and adjust the scan quality values, following the in-software suggestions. Then click Next
17. If you did not select automatic base removal, or if there are extraneous objects that need to be removed, edit the object. Otherwise, skip the following step.
18. In the editing pane, select Cutoff-plane selection and draw on the base you would like to remove. Then, click next.
19. If alignment does not work properly, move the models next to each other and select several points, once on one model and once on the other, so that Artec Studio knows how to align the models.
20. Once alignment is complete, go to File/Export mesh and select the format to use for export.
Safety
The scanners are very fragile. Take care to prevent damage by dropping. Never pull on the scanner cords as the connectors could be easily damaged. Keep your fingers off of the optical lens as the grease from your fingers can cause issues.
Certification
Troubleshooting
Maintenance
General maintenance
Scanners should be wiped down with a dry cloth as needed. Avoid touching lens windows.
Specific Maintenance Tasks
| Maintenance Procedure | Frequency | Done By |
|---|---|---|
| N/A | N/A | N/A |

